background image

Tel: +972-3-9626462

Fax: +972-3-9626620

support@meitavtec.com

ETNC24-SUPER-MDB-01

Owner’s manual & Technician Settings

Pg. 10

1. Enter technician settings mode:

Adjust the set-point temperature to 10°C or to 50°F.
Press and hold the [Mode] button for 15 seconds to enter technician settings mode.

Use the [Mode] button to move between parameters 2-7.
Use the [+] and [-] buttons to make adjustments. 

When finished, press the [Mode] button and Readjust he set point.

Technician Settings

Communication MAC Address

Adjust the set point temperature to 11°C or to 51°F. 
Press and hold the [Mode] button (15 sec.) to enter 
MAC Address settings mode.
Use the [+] and [-] buttons to change the MAC 
Address (range 1 to 99)
When finished, press the [Mode] button and 
Readjust he set point.

* Do not use the same MAC Address for two units.

F

o

SET

Cool

2. Adjusting the temperature limit for Cool

(range 10...30°C/50...86°F, default 10°C/50°F).

3. Adjusting the temperature limit for heat

(range 10...30°C/50...86°F, default 30°C/86°F).

4. Adjusting the Offset for calibration of measured temperature

(range -5…+5°C/-9…+9°F, default 0°C/0°F).

5. Adjusting the Dead zone

(range 2…5°C/4…9°F, default 2°C/4°F).

6. Adjusting the set point temp. for cooling in economy mode

(range 18...30°C/64...86°F, default 26°C/79°F).

7. Adjusting the set point temp. for heating in economy mode

(range 10...22°C/50...72°F, default 12°C/54°F).

F

o

SET

F

o

Cool

Aux

F

o

SET

Heat

F

o

SET

Aux

F

o

Heat

Aux

F

o

SET

1. Enter 

technician 

settings

2. Limit Cool

3. Limit Heat

4. Offset

5. Dead zone

6. EC Cool

7. EC Heat

F

o

SET

Enter MAC 

Addr. settings

Communication MAC 

Address (1-99)

Summary of Contents for ETNC24-SUPER-MDB-01

Page 1: ...ETNC24 SUPER MDB 01 Owner s manual Technician Settings OFF F o Aux On Off Mode Fan Hi Me Lo Fan ...

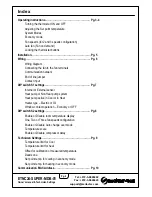
Page 2: ... in Cool or in Heat Heater type Electric or Oil Window contact operation Economy or OFF DIP switch S2 settings Pg 8 Enable or Disable room temperature display One Two or Three fan speeds configuration Enable or Disable Auto change over mode Temperature scale Enable or Disable compressor delay Technician Settings Pg 9 Temperature limit for Cool Temperature limit for heat Offset for calibration of m...

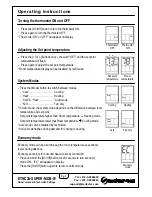
Page 3: ...ol Heat Auto mode Fan Fan only In Auto mode the system mode depends on the difference between room temperature and set point Set point temperature higher than Room temperature Heating mode Set point temperature lower that Room temperature Cooling mode Auto mode can be disabled by technician Active mode flashes during demand for cooling or heating Economy mode can be used to keep the room temperatu...

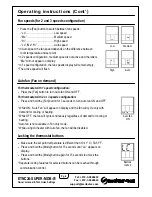
Page 4: ...an ON and OFF For thermostat with 2 or 3 speeds configuration Press and hold the Fan button for 3 seconds to turn Auto fan ON and OFF While ON Auto Fan will appear on display and the fan will cycle only with demand for cooling or heating While OFF the fan will cycle continuously regardless of demand for cooling or heating Auto fan is not available in Fan only mode While using Oil heater with Auto ...

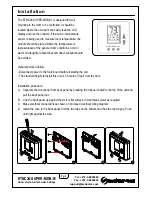
Page 5: ...efore installing the unit The standard height to install this unit is 1 6 meter 5 feet from the floor Installation procedure A Separate the front panel from back panel by pressing the tongue located in the top of the unit and pull the back panel out B Line the back panel up against the wall or flat surface Install three screws as required C Make electrical connections as shown on enclosed electric...

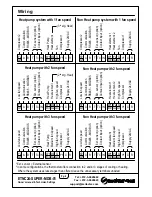
Page 6: ...n Heat element 1 Heat element 2 Compressor Supply 24VAC Low fan speed High fan speed R C Y1 Y2 IN To B A T G1 G3 G2 B 0 G W2 W1 Heat pump with 3 fan speed Low fan speed Communication RS485 MODBUS Ext sensor option Contact input option Heat Pump Medium fan speed High fan speed Compressor Supply 24VAC R C Y1 Y2 IN To B A T G1 G3 G2 B 0 G W2 W1 Non Heat pump with 3 fan speed Communication RS485 MODBU...

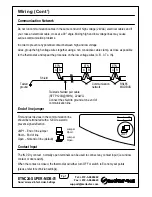
Page 7: ...cause serious communication problems In order to prevent any potential contact between high and low voltage wires group the high voltage wires together using a non conductive cable clamp as close as possible to the thermostat and repeat the procedure on the low voltage wires A B 0 To IN Communication Network RS485 MODBUS Twisted shielded pair cable SFTP 120Ω 1MHz 22AWG Connect the shield to ground...

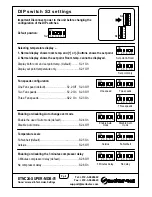
Page 8: ...Heat pump Active in Cool or in Heat or Non Heat pump Electrical or Oil heaters Non Heat pump with El heaters default S1 4 Off S1 5 Off Non Heat pump with Oil heaters S1 4 Off S1 5 On Heat pump system active in Heat S1 4 On S1 5 Off Heat pump system active in Cool S1 4 On S1 5 On Window contact operation when closes Use Economy set points default S1 6 On Turn the unit Off S1 6 Off ON 1 2 3 4 5 6 Ex...

Page 9: ...2 3 Off Three Fan speeds S2 2 On S2 3 On Enabling or disabling Auto change over mode Enable the use of Auto mode default S2 4 On Disable Auto mode S2 4 Off Enabling or disabling the 3 minutes compressor delay 3 Minutes compressor delay default S2 6 Off No compressor delay S2 6 On Temperature scale Fahrenheit default S2 5 On Celsius S2 5 Off ON 1 2 3 4 5 6 ON 1 2 3 4 5 6 ON 1 2 3 4 5 6 One speed Tw...

Page 10: ...9 When finished press the Mode button and Readjust he set point Do not use the same MAC Address for two units F o SET Cool 2 Adjusting the temperature limit for Cool range 10 30 C 50 86 F default 10 C 50 F 3 Adjusting the temperature limit for heat range 10 30 C 50 86 F default 30 C 86 F 4 Adjusting the Offset for calibration of measured temperature range 5 5 C 9 9 F default 0 C 0 F 5 Adjusting th...

Page 11: ...Tel 972 3 9626462 Fax 972 3 9626620 support meitavtec com ETNC24 SUPER MDB 01 Owner s manual Technician Settings Pg 11 Technician Settings ...

Page 12: ...Tel 972 3 9626462 Fax 972 3 9626620 support meitavtec com ...

Reviews: