118 of 271
LED Cluster PCB Replacement
The purpose of the LED cluster is to illuminate the fabric while the machine is sewing. None of the indi-
vidual LEDs have any particular significance or indication as to the condition or position of the machine.
Failure of either LED cluster or any of the individual LEDs on them will not affect the functionality of the
remainder of the machine. There are two LED Cluster Assemblies installed on the bottom of the upper
arm at the front of the machine, one on the left, the other on the right side.
If both LEDs are not illuminating when the machine is powered up, and no other obvious causes result-
ing in the LED clusters failure to illuminate can be found, extra troubleshooting and harness replacement
might be required. This kind of repair has to be completed by an authorized service technician.
If the failure only involves a replacement of a LED Cluster Assembly, this repair can be completed by the
machine operator.
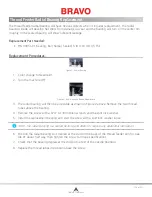
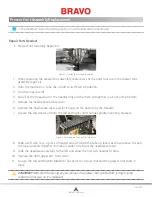
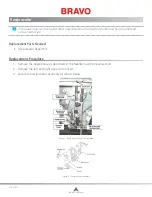
Figure 1 - LED Cluster Assembly
1. Each LED cluster is accessible from underneath the upper arm of the sewing head.
WARNING! The LEDs may be hot to the touch when illuminated. They must be turned off for a
few minutes before handling or they can cause minor burns.
2. Turn off the machine and allow the LED’s to cool for a few minutes.
3.
Remove the two M4x6mm cap head socket screws and M4 flat washers and set them aside for
reuse.
4. The LED cluster assembly should drop down when you remove the screws. If it does not, carefully
remove it from it’s position.
5. Disconnect the LED Cluster Assembly Harness from the LED Cluster Assembly and replace the clus-
ter with a new one.
6. Connect the LED Cluster Assembly Harness to the LED Cluster Assembly.
7. Install the LED Cluster Assembly to the bottom of the upper arm with two M4x6mm cap head
socket screws and M4 flat washers. Tighten the screws to the torque specifications.
8. Turn the machine on. The LEDs should all illuminate.
Table of Contents


