
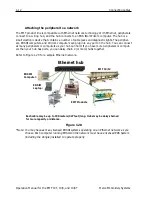


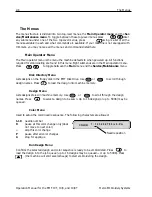

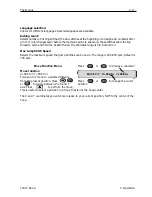


Operation
2-5
11817 Rev. A
2. Operation
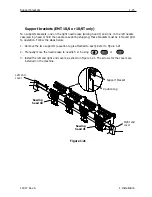
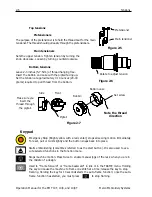
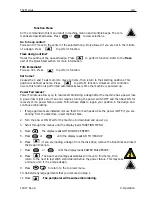
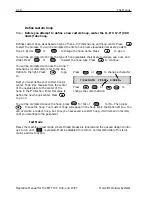
1. Pull the thread from the guide hole down between the pretensioner disks.
2. Route the thread down through the pretensioner, between the two metal wheels.
3. Pull the thread down to the main tensioner and wrap the thread around the disk clockwise 1
1
/
2
times.
4. Route the thread through the tension take-up spring. When you tug on the thread, the take-
up spring should move and break contact with the thread break sensor post.
5. Route the thread down through the thread guide post(s). Threads using the top tensioners
have two posts, threads using the bottom tensioners have one post.
6. The upper thread guide is just above the the take-up levers. Route the thread through it.
7. The middle thread guide is just below the take-up levers. Route the thread though the hole
facing outward, from back to front.
8. Bring the thread through the take-up lever eye, from right to left.
9. Route the thread straight down to the middle thread guide, through the hole facing down-
ward.
10. Drop the thread through the lower guide, just above the presser foot.
11. Run the thread through the eye of the needle, from front to back.
12. Pass the thread through the center of the presser foot.
13. Pull on the thread until you feel tensioner pressure.
14. Set the tension to equal 80-120 grams required to pull the thread at the needle end.
15. Fasten the thread to the retainer spring and trim the end to about an inch in length.
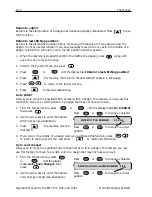
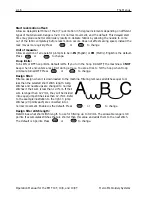
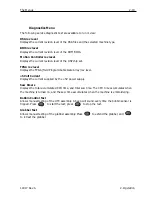
Tensions
Embroidery tensions are controlled on both the upper and bobbin thread. To set the tension, sew
a column (satin stitch), or embroider a capital letter “I”. You should have bobbin thread across
approximately
1
/
3
of the total column width on the back. If you do not, refer to the following table
to adjust tensions.
Note: Do not attempt to judge tension by looking at the back of a fill stitch.
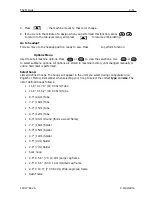
Problem
Solution
Bobbin thread showing on top of garment
Top tension too tight and/or bobbin tension
too loose
More than 1/3 of column showing bobbin
thread on back of garment
Bobbin tension too loose and/or top tension
too tight
Less than 1/3 of column showing bobbin
thread on back of garment
Bobbin tension too tight and/or top tension
too loose
Design puckering
Top and/or bobbin tension too tight
Top thread in design loose (looping)
Top tension too loose
Summary of Contents for EMT 10/4
Page 52: ...2 28 Quick Start Operation Manual for the EMT 10T 10 4 and 10 4T Melco Embroidery Systems ...
Page 108: ...6 10 Error Messages Operation Manual for the EMT 10T 10 4 and 10 4T Melco Embroidery Systems ...
Page 126: ...INDEX Operation Manual for the EMT 10T 10 4 and 10 4T ...
Page 127: ...Quick Ref erence Guide for the EMT 10T 10 4 and 10 4T 11817 Revision A ...


