


Quick Start
2-25
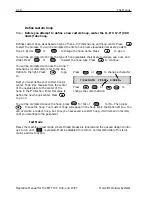
Flat hoops
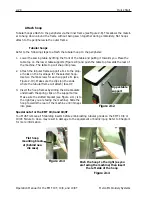
You can purchase an optional kit to embroider using flat hoops. Flat hoops attach to the peripher-
al via the outer frame and attach to the peripheral differently than tubular hoops.
Refer to the following steps to attach the flat hoop to
the peripheral:
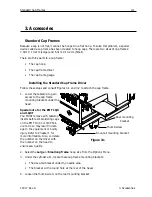
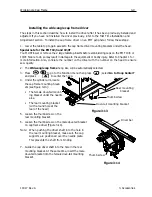
1. Raise the sewing table by lifting the front of the
table and pulling it towards you. Place the table top
on the upper table supports (Figure 2-12) and push
the table top towards the rear of the machine. The
table top will snap into place.
2. Remove the tubular frame support arms from the
front of the X-carriage. Remove the two thumb
screws holding each support arm (refer to Figure
2-10).
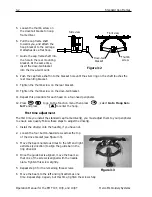
3. Attach the flat hoop adapter bracket to the x-car-
riage using the thumb screws. Make sure the slot-
ted end of the adapter is facing to the right.
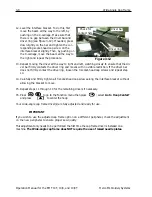
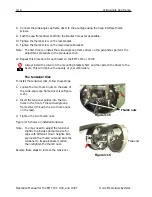
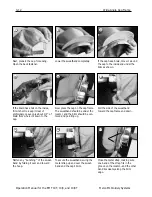
4. Along the x-carriage (behind the needle case) are
the mounting locations for the flat hoops. The
mounting brackets on the peripheral are spring-
loaded, so insert the right side (as you are facing
the machine) of the hoop’s bracket first, then push
slightly to the right (to move the spring-loaded
bracket). Insert the left side of the hoop’s bracket
next. Refer to Figures 2-13 and 2-14.
11817 Rev. A
2. Operation
Figure 2-11
Inner frame attaches
to peripheral
Figure 2-9
Lower table
support
Figure 2-10
Thumb screws
Slotted bracket
Summary of Contents for EMT 10/4
Page 52: ...2 28 Quick Start Operation Manual for the EMT 10T 10 4 and 10 4T Melco Embroidery Systems ...
Page 108: ...6 10 Error Messages Operation Manual for the EMT 10T 10 4 and 10 4T Melco Embroidery Systems ...
Page 126: ...INDEX Operation Manual for the EMT 10T 10 4 and 10 4T ...
Page 127: ...Quick Ref erence Guide for the EMT 10T 10 4 and 10 4T 11817 Revision A ...


