3-14
Wide-Angle Cap Frame
Operation Manual for the EMT 10T, 10/4, and 10/4T
Melco Embroidery Systems
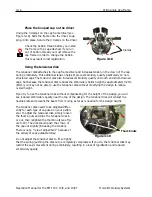
Place the hooped cap on the driver
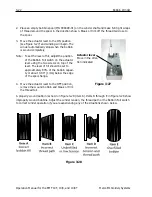
Unclip the 3 clamps on the cap frame driver (see
Figure 3-18). Slide the frame onto the driver, snap-
ping it into place. Secure the 3 clamps on the driver.
Check the bobbin thread before you install
the frame with a cap attached; if you run
out of bobbin thread you must remove the
cap frame in order to change the bobbin.
This may result in lost registration.
Using the tensioner disk
The tensioner disk attaches to the cap frame driver and increases tension in the crown of the cap
during embroidery. This additional tension helps improve embroidery quality, particularly on non-
structured caps. The tensioner disk also increases embroidery quality on slouch and short-crowned
caps, but because the tensioner disk reduces the embroidery field’s height by approximately 0.23in
(6mm) you may not be able to use the tensioner disk without modifying the design to reduce
overall height.
If you try to use the tensioner disk without compensating for the height of the design, you will
see reduced embroidery quality near the top of the design. The tensioner disk will contact the
needle plate and prevent the beam from moving as far as is needed for the design height.
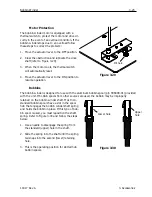
The tensioner disk needs to be adjusted differ-
ently for each type of cap used on your periph-
eral. To adjust the tensioner disk, simply loosen
the thumb nuts and slide the tensioner disk in
or out, then retighten the thumb nuts (see Fig-
ure 3-19). The disk should push the crown of
the cap out slightly (increasing the tension).
There is not a “rule of adjustment” because of
the variety of caps available today.
Do not adjust the tensioner disk to fit so tightly
that the spring (pushing the disk out) is completely compressed. If you do, the tensioner disk may
restrict the cap’s movement during embroidery, resulting in a loss of registration and reduced
embroidery quality.
Figure 3-18
Clamps
Tip
Figure 3-19
Thumb nuts
Summary of Contents for EMT 10/4
Page 52: ...2 28 Quick Start Operation Manual for the EMT 10T 10 4 and 10 4T Melco Embroidery Systems ...
Page 108: ...6 10 Error Messages Operation Manual for the EMT 10T 10 4 and 10 4T Melco Embroidery Systems ...
Page 126: ...INDEX Operation Manual for the EMT 10T 10 4 and 10 4T ...
Page 127: ...Quick Ref erence Guide for the EMT 10T 10 4 and 10 4T 11817 Revision A ...


