background image

15

•  Ensure that the cord is fully extended.
•  The cord must not be twisted or wound 

around the appliance.

•  Check regularly that neither cord nor plug is 

damaged and do not use if they are, or if the 
appliance has been dropped or damaged in 
any other way. 

•  If the appliance, cord or plug has been 

damaged, have the appliance inspected 
and if necessary repaired by an authorised 

repairer. Never try to repair the appliance 

yourself. Please contact the store where 
you bought the appliance for repairs under 

the guarantee. Unauthorised repairs or 

modifications to the appliance will invalidate 
the guarantee.

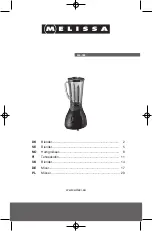
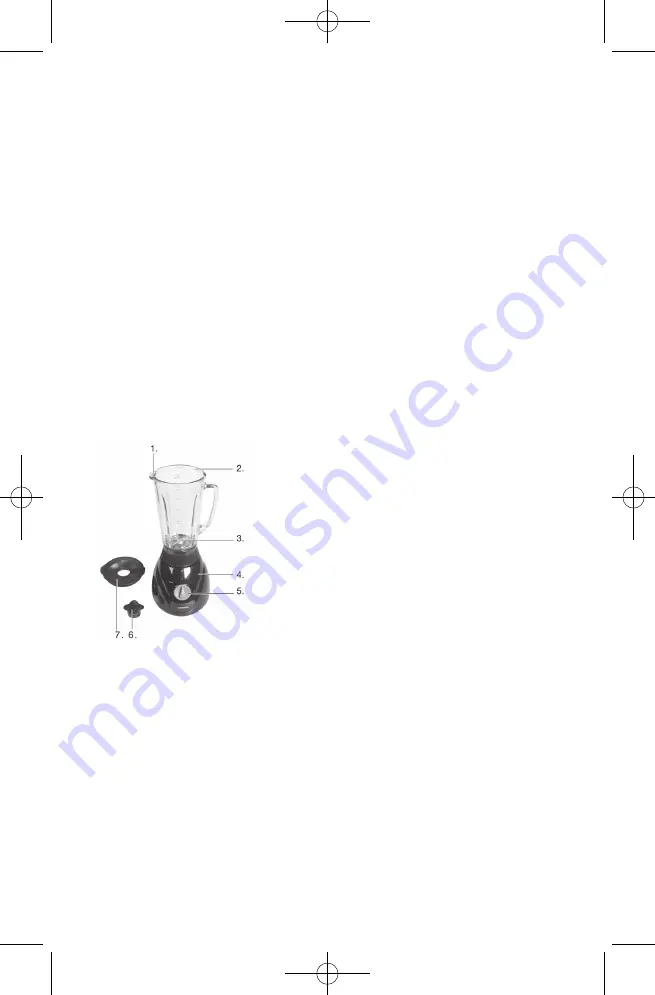
KEY TO THE MAIN COMPONENTS OF THE 
APPLIANCE

1.  Pouring spout
2.  Blender glass with scale

3.  Blade

4.  Motor section

5.  On/Off button

6.  Cap
7.  Blender glass lid

PRIOR TO FIRST USE

•  Before using for the first time, or after 

prolonged storage without use, wash any 
parts that will come into contact with food.

•  Spare cord can be wrapped around the 

cord storage holders at the bottom of the 
appliance.

USING THE APPARATUS

1.  Place the motor section (4) on a level 

surface, e.g. a kitchen counter, and make 
sure it is standing firmly on the four suction 
cups underneath.

2.  Place the blender glass (2) on the drive shaft 

of the motor section, making sure that the 
pins at the bottom of the glass lock onto the 
pins on the motor section.

3.  Lift the blender glass lid (7) (can be a bit 

tight).

4.  Pour food into the blender glass.

      o     NOTE: Never add liquid or food above 
             the “MAX 1,300 ml” mark on the blender 

             glass.

5.  Place the lid on the blender glass. The 

curved edge should be above the pouring 
spout (1). It is best to start by placing the 
inclined rear edge of the lid into the glass by 
the handle and proceed by pressing down 
the front edge by the pouring spout. Take 
care to press the lid firmly into position.

6.  Place the cap (6) in the hole in the lid, and 

turn it clockwise until it locks into position.

7.  Plug in and switch on the power.
8.  Place a hand on the lid and switch on the 

appliance by turning the On/Off button (5) to 
“1” (low speed) or “2” (high speed).

9.  The appliance also has a pulsing option with 

extra speed. 

      o    Turn the on/off button to the "Pulse" 

             position, and hold it there briefly. 
      o     When you release the button, it reverts 

             to “0” and the appliance stops.

10. You can add more food to the blender glass 

during operation through the opening in the 

lid. Always switch off the appliance before 

removing the cap and adding more food.

11. Turn off the appliance by turning the On/

Off button to “0” when you have finished 
blending. Wait until the blade (3) has come 

to a complete stop before removing the 
blender glass lid.

NOTE: 

•  Do not leave the appliance running non 

stop for more than 1 minute at a time. If the 
appliance has been running for 1 minute, 
allow it to cool down for 1 minute before you 
use it again.

•  Always add liquid to the blender glass when 

crushing ice cubes.

CLEANING

When cleaning the appliance, you should pay 
attention to the following points:

•  Remove plug from the mains socket, and 

allow the appliance to cool down before 
cleaning it.

•  Do not immerse the motor section of the 

appliance in water and make sure no water 
enters the appliance.

•  Clean the motor section by wiping it with a 

damp cloth. A little detergent can be added 

if the appliance is heavily soiled.

Summary of Contents for 646-098

Page 1: ...DK Blender 2 SE Blender 5 NO Hurtigmikser 8 FI Tehosekoitin 11 UK Blender 14 DE Mixer 17 PL Mikser 20 www adexi eu 646 098...

Page 2: ...f lsomhed fysiske eller mentale handicap eller personer som ikke er i stand til at betjene apparatet medmindre de overv ges eller instrueres i brugen af en person som er ansvarlig for deres sikkerhed...

Page 3: ...ntakten og t nd for str mmen 8 L g en h nd p l get og start apparatet ved at dreje t nd sluk knappen 5 til position 1 lav hastighed eller 2 h j hastighed 9 Apparatet har ogs en pulsfunktion som giver...

Page 4: ...ordan du skal h ndtere elektrisk og elektronisk affald REKLAMATIONSBESTEMMELSER Reklamationsretten g lder ikke hvis ovenn vnte ikke iagttages hvis der har v ret foretaget uautoriserede indgreb i appar...

Page 5: ...under anv ndning Barn som befinner sig i n rheten av apparaten n r den r i bruk b r h llas under uppsyn Apparaten r inte en leksak Apparaten f r inte anv ndas av personer med nersatt k nslighet fysisk...

Page 6: ...Se till att sk rorna nertill p glasbeh llaren l ser fast i tapparna p motordelen 3 Ta av glasbeh llarens lock lid 7 det kan sitta ganska h rt 4 H ll mat i glasbeh llaren o OBS Tills tt aldrig v tska...

Page 7: ...kr ver att varje medlemsstat vidtar tg rder f r korrekt insamling tervinning hantering och material tervinning av s dant avfall Privata hush ll inom EU kan utan kostnad terl mna sin anv nda utrustnin...

Page 8: ...hemminger eller av personer som ikke kan bruke apparatet med mindre de er under tilsyn av eller f r anvisninger av en person som er ansvarlig for deres sikkerhet ADVARSEL N r du blander varme v sker m...

Page 9: ...kket og vri det med klokken til det l ses p plass 7 Sett i st pselet 8 Legg en h nd p lokket og sl p apparatet ved vri av p bryteren 5 til 1 lav hastighet eller 2 h y hastighet 9 Apparatet har ogs en...

Page 10: ...yndigheter hvis du nsker ytterligere informasjon om hva du skal gj re med elektrisk og elektronisk avfall GARANTIVILK R Garantien gjelder ikke hvis instruksjonene over ikke f lges apparatet har blitt...

Page 11: ...kikalu Fyysisesti ja henkisesti heikot henkil t eiv t saa k ytt laitetta ilman ett paikalla on muita jotka pystyv t valvomaan ja opastamaan heit laitteen k yt ss VAROITUS Kuumia nesteit tai ruokia sek...

Page 12: ...ettamalla kannen kalteva takareuna lasiosaan k densijan kohdalta ja painaa sitten etureuna paikalleen kaatonokan kohdalta Paina kansi huolellisesti paikalleen 6 Aseta korkki 6 kannessa olevaan aukkoon...

Page 13: ...ille j lleenmyyj lle jolta se on ostettu jos tilalle hankitaan uusi laite Lis tietoja s hk ja elektroniikkaj tteen k sittelyst saat l himm lt j lleenmyyj lt tukkukauppiaalta tai paikallisilta viranoma...

Page 14: ...s not a toy The appliance is not to be used by persons with reduced sensitivity physical or mental disabilities or persons who are unable to use the appliance unless supervised or instructed by a pers...

Page 15: ...curved edge should be above the pouring spout 1 It is best to start by placing the inclined rear edge of the lid into the glass by the handle and proceed by pressing down the front edge by the pourin...

Page 16: ...ong with ordinary household waste as electrical and electronic waste must be disposed of separately In accordance with the WEEE directive every member state must ensure correct collection recovery han...

Page 17: ...r t nochmals auf korrekten Zusammenbau zu berpr fen Halten Sie das Ger t w hrend des Gebrauchs unter st ndiger berwachung Beaufsichtigen Sie Kinder die sich in der N he des Ger tes aufhalten wenn es i...

Page 18: ...e Nicht ben tigtes Kabel kann um den Kabelhalter unter dem Ger t gewickelt werden GEBRAUCH DES GER TES 1 Stellen Sie das Motorteil 4 auf eine ebene Oberfl che z B eine K chentheke und sorgen Sie daf r...

Page 19: ...esondert entsorgt werden muss Gem der WEEE Richtlinie hat jeder Mitgliedsstaat f r ordnungsgem e Einsammlung Handhabung und Recycling von Elektro und Elektronikm ll zu sorgen Private Haushalte innerha...

Page 20: ...e jest zabawk Urz dzenie nie mo e by u ywane przez osoby o obni onej wra liwo ci osoby niepe nosprawne fizycznie lub umys owo ani przez osoby kt re nie potrafi korzysta z urz dzenia chyba e s one inst...

Page 21: ...zez autoryzowanego technika Nie wolno wykonywa napraw samodzielnie Informacje na temat napraw gwarancyjnych mo na uzyska w sklepie w kt rym urz dzenie zosta o zakupione Nieautoryzowane naprawy lub mod...

Page 22: ...z gniazdka zasilania i pozostawi urz dzenie do ostygni cia Nie zanurza cz ci silnikowej urz dzenia w wodzie i pilnowa aby do urz dzenia nie dosta a si woda Cz silnikow czy ci przecieraj c wilgotn szma...

Page 23: ...alno ci i stylistyki zastrzegamy sobie prawo do wprowadzania zmian w produkcie bez uprzedzenia CZ STO ZADAWANE PYTANIA W razie jakichkolwiek pyta dotycz cych korzystania z urz dzenia na kt re odpowied...

Reviews: