Care and maintenance
57
ENGLISH
9.3 Cleaning the brewing unit
To avoid damage to the appliance, we
recommend cleaning the brewing unit
once a week.
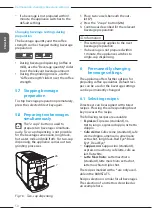
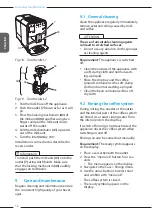
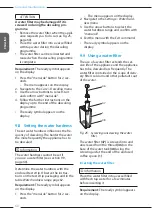
Fig. 20: Removing the brewing unit, 1
44
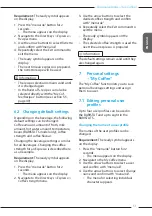
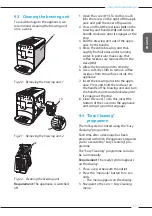
Fig. 21: Removing the brewing unit, 2
45
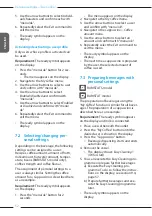
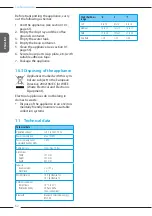
Fig. 22: Cleaning the brewing unit
Requirement:
The appliance is switched
off.
1. Open the cover
. To do this, reach
into the recess on the right of the appli-
ance and pull the cover off upwards.
2. Press and hold the red lever
on the
and turn the
handle clockwise until it engages at the
stop.
3. Pull the brewing unit out of the appli-
ance by the handle.
4. Rinse the entire brewing unit thor-
oughly from all sides under running
water. In particular, make sure that
coffee residues are removed from the
sieve
.
5. Allow the brewing unit to drip dry.
6. Use a soft, dry cloth to remove coffee
residues from the surfaces inside the
appliance.
7. Insert the brewing unit into the appli-
ance. Press and hold the red lever on
the handle of the brewing unit and turn
the handle counter anticlockwise until
it engages at the stop.
8. Close the cover. To do this, insert the
bottom of the cover into the appliance
and swing it up until it engages.
9.4 "Easy Cleaning"
programme
The milk system is rinsed using the "Easy
Cleaning" programme.
Each time after a beverage has been
prepared with milk, the appliance requests
you to execute the "Easy Cleaning" pro-
gramme.
The "Easy Cleaning" programme can also
be run manually.
Requirement:
The ready symbol appears
on the display.
1. Place a vessel beneath the outlet.
2. Press the "menu/ok" button for 2 sec-
onds.
»
The menu appears on the display.
3. Navigate to the
Care
>
Easy Cleaning
menu.
Summary of Contents for BARISTA T
Page 2: ...34 DEUTSCH ...

