EN
–
–
–
–
–
–
–
–
–
–
–
–
–
–
–
–
–
–
–
–
–
–
–
ASSEMBLING INSTRUCTIONS
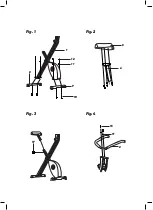
FIG.1
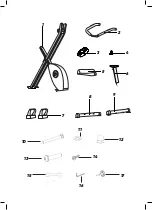
Place the front stabilizer (9) to the
main frame (1) using the screws
provided.
Place the rear stabilizer (8) to the
main frame (1) using the screws
provided.
FIG.2
Place the seat (5) to the seat post
(6) with the screws provided.
FIG.3
Place the seat post (6) into the
frame (1) and line up the holes.
Secure the seat in position with the
seat regulator knob (17).
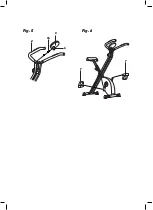
FIG.4
Place the handlebar (2) to the
frame (1) and fix it with the screws
provided.
FIG.5
Fix the monitor holder (4) on the
handlebar (2).
Fix the monitor (3) on the monitor
holder (4).
Connect the monitor cable to the
input behind the monitor.
FIG.6
Fix the pedals (7) into its crank arm.
The right-hand pedal, marked with
letter R, screws onto the right-
hand crank, also marked with R, in
clockwise direction till tight.
The left-hand pedal, marked with
letter L, screws onto the left-hand
crank, also marked with L, in a
counter-clockwise direction till
tight
Instructions for use
USE
The monitor will turn on
automatically when users start
exercising.
The monitor will turn off
automatically if there is not any
operation for 4 minutes.
Press MODE button to select the
function you want.
Press RESET button to reset the
function you want. Hold the button
for 3 seconds to clear all values.
TIME → 00:00 – 99:59 MIN:SEC
SPEED → 0.0 – 99.9 KM/H
DISTANCE → 0.00 – 999.9 KM
CALORIES → 0.0 – 9999 KCAL
PULSE → 40-240 BPM
HOW TO ADJUST THE INTENSITY
REGULATOR KNOB
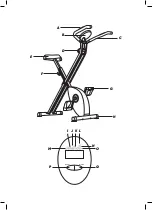
The intensity regulator knob (D)
allows you to alter the resistance
of the pedals. A high resistance
makes it more difficult to pedal, a
low resistance makes it easier.
HOW TO ADJUST THE SEAT HEIGHT
The seat height can be adjusted by
removing the seat regulator knob
(F) and raising or lowering the seat.


