background image

- Should you wish to dispose of the product once its 

working life has ended, take it to an authorised waste 

agent for the selective collection of Waste from Elec-

tric and Electronic Appliances (WEEA).

- The product includes a battery; the user must 

remove them before disposing of the product. Re-

member that batteries must be disposed of in duly

authorised containers. Do not dispose of them in fire.

How to remove the batteries from inside the ap-

pliance:

Warning: It is important that the batteries are

completely de-charged before removing them

from the appliance.

To remove the batteries once the appliance life has 

come to an end, follow the instructions:

Removal of blades

- Detach the two screws from razor

- Remove head by pulling outwards

- Remove the cut-length regulator by pulling out-

wards

- Separate the two main bodies of appliance

- Find battery and cut flaps that attach it to the circuit. 

In order to eliminate short-circuit risks due to resid-

ual charge in the battery, first cut the Red cable and 

protect the conductor end with insulating tape, then 

proceed to cut the Black cable in the same manner. 

(Fig 6)

- Safely extract the battery from its position.

This appliance complies with Directive 2006/95/EC 

on Low Voltage and Directive 2004/108/EC on Elec-

tromagnetic Compatibility.

MA_20001_IM.indd   6

MA_20001_IM.indd   6

5/20/2010   11:46:17 AM

5/20/2010   11:46:17 AM

Summary of Contents for MACRO ALDANY MA20001

Page 1: ...P r o n t o H a i r c l i p p e r M o d e l MA20001 PLEASE READ ALL INSTRUCTIONS BEFORE USE P r o n t o H P MA_20001_IM indd 1 MA_20001_IM indd 1 5 20 2010 11 46 12 AM 5 20 2010 11 46 12 AM...

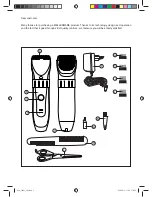
Page 2: ...t Thanks to its technology design and operation and the fact that it goes through strict quality controls we feel sure you will be entirely satisfied A E B D C F G H I J K L M N MA_20001_IM indd 2 MA_...

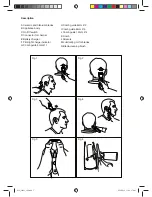
Page 3: ...ry charger F Pilot light charge indicator G Comb guide 3mm 1 Fig 1 Fig 2 Fig 3 Fig 4 Fig 5 Fig 6 H Comb guide 6mm 2 I Comb guide 9mm 3 J Comb guide 12mm 4 K Comb L Scissors M Lubricating oil for blade...

Page 4: ...r involves a risk even if the appli ance is disconnected Disconnect the battery charger from the mains when not in use and before undertaking any cleaning task This appliance is not a toy Children sho...

Page 5: ...ch Finally use the appliance without attaching any comb guides to the blades to cut the hair around the base of the neck the sides of the neck and the ears To make the sideburns straight turn the appl...

Page 6: ...ies once the appliance life has come to an end follow the instructions Removal of blades Detach the two screws from razor Remove head by pulling outwards Remove the cut length regulator by pulling out...

Page 7: ...MA_20001_IM indd 7 MA_20001_IM indd 7 5 20 2010 11 46 17 AM 5 20 2010 11 46 17 AM...

Page 8: ...75 Eppindust 7475 South Africa Tel 27 21 534 8114 Fax 27 21 534 8086 Service Centre Share Call 086 111 5006 w e b w w w c r e a t i v e h o u s e w a r e s c o z a MA_20001_IM indd 8 MA_20001_IM indd...

Reviews: