background image

3.3. Blender jug

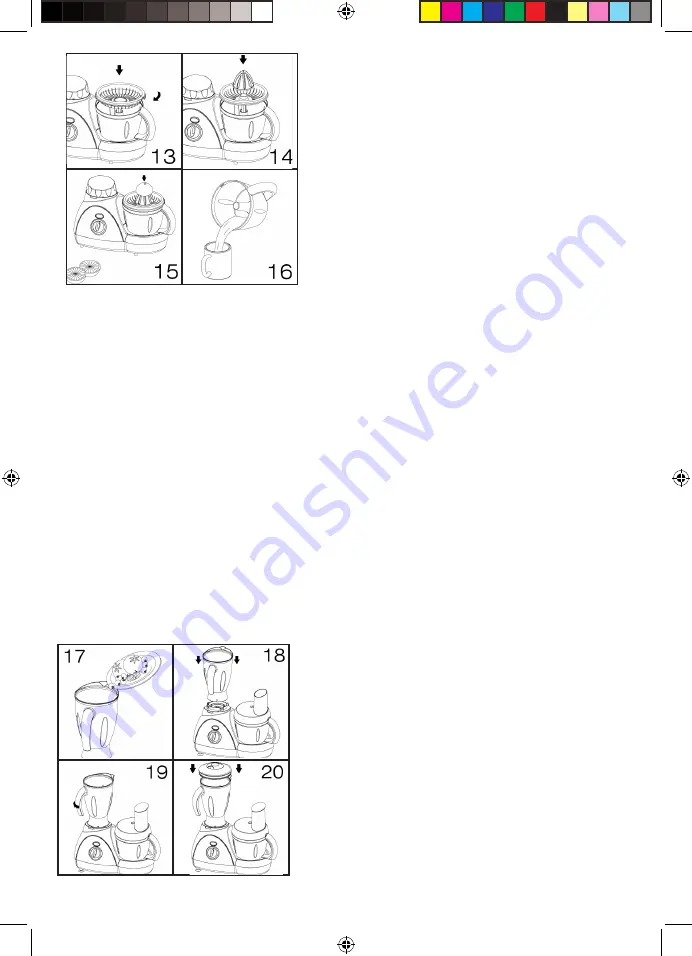
3.3.1. Put the bowl on the power unit first, Then turn 
the bowl in clock-wise direction, until hearing the chat-
tering sound; Put the cover on the bowl, and turn it until 
hearing the chattering sound.
3.3.2. Place the ingredients into the Blender jug and fix 
the Blender jug cover onto the body tightly
3.3.3. Put Blender jug on the power unit till cup support 
connect with power unit properly.
3.3.4. Connect the power plug of the machine and 
switch on the food processor. Turn the knob to the 
required level. The speed is increased by levels. PULSE 
is the highest level . Turn the knob to the PULSE for any 
intermittent operation. 
3.3.5. You can add some liquid (such as oil, cream, 
juice) to the food by removing the Blender Jug Cup. Do 
not do this while blending. Stop the machine first. 
3.3.6. Turn the knob to “0” level and shut off the 
machine after working. Pour the mixed food out of the 
Blender jug.

3.4 Once you have finished using the appliance:

3.4.1. Allow appliance to cool down.
3.4.2. Unplug the appliance from the mains power 
supply.
3.4.3. Clean the appliance as described in the cleaning 
section.
3.4.4. When the blender is in the state of idle operation 
(e.g. there is no food in the glass jug), the appliance 
should not be used for more than 10 seconds.

4. Cleaning

4.1. Disconnect the appliance from the mains power 
supply and allow it to cool completely before undertak-
ing any cleaning task.
4.2. Clean the glass jug, lid, blade base and blades 
with sealing ring with hot water. Dry well before reus-
ing. 

CAUTION

! The blades are very sharp. Care must 

be taken while cleaning the appliance. 
4.3. Clean the outer parts of the appliance with a damp 
cloth with a few drops of washing-up liquid and then 
dry. 

CAUTION

! Do not immerse electrical parts of the 

appliance in any liquid.
4.4. Do not use solvents, or products with an acid 
or base pH such as bleach, or abrasive products, for 
cleaning the appliance.
4.5. Never submerge the appliance in water or any 
other liquid or place it under running water.
4.6. The blades cannot be sharpened. Replace them if 
they are not cutting properly or are worn

.

5. Anomalies and repair

5.1. Take the appliance to an authorised support centre 
if product is damaged or other problems arise.
5.2. If the connection to the mains has been damaged, 
it must be replaced and you should proceed as you 
would in the case of damage.

26210_IM.indd   5

2019-10-07   01:48:12 PM

Summary of Contents for MAESTRO 500W

Page 1: ...Model 26210 complies with INTERNATIONAL IEC60335 SAFETY SPECIFICATIONS 500W MAESTRO 500W Food processor 26210_IM indd 1 2019 10 07 01 48 12 PM...

Page 2: ...appliance 2 1 5 Place the appliance on a horizontal flat stable surface suitable for withstanding high temperatures and away from other heat sources and contact with water 2 1 6 Keep the appliance awa...

Page 3: ...s in use or connected to the mains power supply 2 3 5 Do not cover the cooking surface or food with aluminium foil and other similar materials 2 3 6 Unplug the appliance from the mains power supply wh...

Page 4: ...slicing shredding knife to the knife support as shown in Diagram 9 Slicing knife makes the food into slices Shredding knife make the food into shreds 3 2 3 3 Put the bowl on the power unit first then...

Page 5: ...eaning section 3 4 4 When the blender is in the state of idle operation e g there is no food in the glass jug the appliance should not be used for more than 10 seconds 4 Cleaning 4 1 Disconnect the ap...

Page 6: ...300g 10g piece 300g 15g piece 400g 20g piece six yolks 200g 100g 100g 100g 100g MAX TIMES s 30s 30s 30s 25s 25s 20s 20s 20s 20s SLICING 50s 50s SHREDDING 30s 30s INGREDIENT apple orange grape strawbe...

Page 7: ...g ontstaan as die rooster bedek is of aan vlambare material raak insluitende gordyne as dit in werking is 2 1 7 Moenie vlambare materiaal naby toestel plaas nie 2 1 8 Die toestel is nie geskik om op a...

Page 8: ...ie koord beskadig word moet dit deur die diensagent of n gekwalifiseerde person vervang word om brandgevaar te verhoed 2 4 3 Enige misbruik en mislukking om instruksies te volg lewer die waarborg nul...

Page 9: ...en voedsel min raak soos in Diagram 11 12 3 2 3 5 Draai die knop na O wanneer kos klaar is en wag vir lem om stil te staan voor deksel afgehaal word 3 2 4 Sap funksie 3 2 4 1 Sit bak op krageenheid en...

Page 10: ...m lap skoon en moet glad nie in water gedruk word nie 4 4 Moenie oplosmiddels suur bleikmiddels of skuur produkte gebruik om toestel skoon te maak nie 4 5 Moet nooit die motor part van toestel onder l...

Page 11: ...Tye s 30s 30s 30s 25s 25s 20s 20s 20s 20s Sny 50s 50s Versnippering 30s 30s BESTANDELE SPANSPEK WORTEL VLEIS HAM UIE EIER AARBEIE KAAS AMANDELS HAZELNEUTE OKKERNEUTE MAX QTY 250g 300g 250g 250g MAX TY...

Page 12: ...ares 2 1 4 Mantenga alejados a los ni os y transe ntes cuando utilice este aparato 2 1 5 Coloque el aparato sobre una superficie horizontal plana y estable adecuada para soportar altas temperatu ras y...

Page 13: ...mientras est en uso o conectado a la red el ctrica 2 3 5 No cubra la superficie o los alimentos con papel de aluminio y otros materiales similares 2 3 6 Desconecte el aparato de la red el ctrica cuan...

Page 14: ...ezcla tiene casi los mismos pasos operativos que una funci n de corte El nico cambio de la cuchilla de cortar a la hoja de tritura ci n Se utiliza para mezclar y batir los alimentos por ejemplo huevo...

Page 15: ...n 3 3 2 Coloque los ingredientes en la jarra de la licuadora y fije la cubierta de la jarra de la licuadora en el cuerpo firmemente 3 3 3 Coloque la jarra de la licuadora en la unidad de potencia has...

Page 16: ...to en agua o cualquier otro l quido o col quelo bajo agua corriente 4 6 Las cuchillas no pueden ser afiladas Sustit yalos si no est n cortando correctamente o si est n desgastados 5 Anomal as y repara...

Page 17: ...g piece 300g 15g piece 400g 20g piece six yolks 200g 100g 100g 100g 100g TIEMPO s MAX MO 30s 30s 30s 25s 25s 20s 20s 20s 20s SLICING 50s 50s SHREDDING 30s 30s INGREDIENT Manzana Naranja Uva Fresa QUAN...

Page 18: ...te et stable apte supporter des temp ratures lev es et l cart des autres sources de chaleur et au contact de l eau 2 1 6 Gardez l appareil l cart des mat riaux inflam mables tels que les textiles les...

Page 19: ...ec du papier d aluminium et d autres mat riaux similaires 2 3 6 D branchez l appareil de l alimentation secteur lorsqu il n est pas utilis et avant toute t che de nettoyage 2 3 7 Cet appareil doit tre...

Page 20: ...s pour m langer et fouetter des aliments par exemple des ufs 3 2 3 Fonction de tranchage et de d chiquetage 3 2 3 1 Mettez le couvercle de protection sur le corps bien 3 2 3 2 Fixez le couteau trancha...

Page 21: ...l utilisation de l appareil 3 4 1 Laisser refroidir l appareil 3 4 2 D branchez l appareil de l alimentation secteur 3 4 3 Nettoyez l appareil comme d crit dans la section de nettoyage 3 4 4 Lorsque l...

Page 22: ...0g piece 300g 15g piece 400g 20g piece six yolks 200g 100g 100g 100g 100g TEMPS MAX 30s 30s 30s 25s 25s 20s 20s 20s 20s SLICING 50s 50s SHREDDING 30s 30s INGREDIENT Pomme Orange Grain de raisin Fraise...

Page 23: ...ores afastados quando utilizar este aparelho 2 1 5 Coloque o aparelho numa superf cie horizontal plana e est vel adequada para suportar altas temperatu ras e longe de outras fontes de calor e contacto...

Page 24: ...e montados 2 3 3 N o utilize o aparelho quando estiver vazio 2 3 4 N o ligue o aparelho enquanto estiver a ser utilizado ou ligado rede el ctrica 2 3 5 N o cubra a superf cie de cozedura ou alimentos...

Page 25: ...2 2 1 A fun o de mistura tem quase as mesmas etapas de opera o que uma fun o de corte A nica altera o da l mina de corte na l mina de tritura o usado para misturar e levantar alimentos por exemplo ov...

Page 26: ...quina depois de trabalhar Despeje a comida mista do jarro do liquidificador 3 4 Depois de terminar o uso do aparelho 3 4 1 Deixe o aparelho arrefecer 3 4 2 Desligue o aparelho da rede el ctrica 3 4 3...

Page 27: ...piece 300g 15g piece 400g 20g piece six yolks 200g 100g 100g 100g 100g TIEMPO s MAX MO 30s 30s 30s 25s 25s 20s 20s 20s 20s SLICING 50s 50s SHREDDING 30s 30s INGREDIENTES Ma Laranja Uva Morango QUANTI...

Page 28: ...ed the product must be complete with all accessories parts and packag ing Missing parts will render the warranty void 3 Upon receipt of your appliance check it for any transport damage to ensure it is...

Page 29: ...that you must check that your receipt has been uploaded correctly Creative Housewares cannot be held responsible for faxes or files not received 6 For assistance with registration please email market...

Page 30: ...verpakking Toebehore wat weg is sal die waarborg nietig maak 3 Met ontvangs van u toestel gaan dit na vir enige vervoer skade om te verseker dat dit veilig is vir gebruik Stuur dit so gou as moontlik...

Page 31: ...moet seker maak dat u kwitansie korrek op gelaai is Creative Housewares kan nie verantwoordelik gehou word vir fakse of l ers nie ontvang nie 6 Vir hulp met registrasie e pos asseblief marketing chwsa...

Page 32: ...ndermere Durban South Africa 4001 Tell 27 31 303 3465 Fax 27 31 303 8259 Johannesburg Unit 25 26 San Croy Office Park Die Agora Road Croydon 1619 Tell 27 11 392 5652 Fax 27 11 392 1694 26210_IM indd 3...

Reviews: