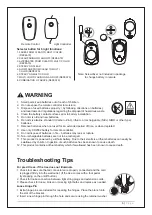
background image

6 | 

P a g e

Remote Control

Light Controller

Selector button for 8 light functions:

1. FADES FROM CLEAR TO MULTI COLOR 

    (REPEATS)

2. CLEAR FADING ON AND OFF (REPEATS)

3. ALTERNATES FROM CLEAR TO MULTI COLOR 

    (REPEATS)

4. STEADY ON CLEAR

5. SLOW FADE FROM CLEAR TO MULTI 

    COLOR (REPEATS)

6. STEADY ON MULTI COLOR

7. MULTI COLOR FADING ON AND OFF (REPEATS)

8. COMBINATION OF ABOVE (REPEATS)

WARNING

1.   Small parts, keep batteries out of reach of children.

2.   Do not expose the remote controller to moisture.

3.   Dispose of used batteries properly

by following directions on batteries),

      and local laws and regulations regarding the disposal of hazardous waste.

4.   Clean the battery contact surfaces prior to battery installation.

5.   Do not mix old and new batteries.

6.   Do not mix alkaline, standard (Carbon - Zinc), lithium, or rechargeable (NiCd, NiMH or other type) 

      batteries.

7.   Remove batteries when not used for an extended period of time, or when depleted.

8.   Use only CR2032 battery for remote controller. 

9.   Do not dispose of batteries in fire – batteries may leak or rupture.

10. Non-rechargeable batteries are not to be recharged.

11. This product is powered by a lithium battery. Due to their small size, lithium batteries can easily be 

      swallowed by children. Ingestion of such batteries has been known to cause death.

12. This product contains a lithium battery which if swallowed has been known to cause death.

For pre-lit trees, if the tree does not illuminate

1. Check to make sure that all connectors are properly connected and the cord  

    is plugged firmly into the wall outlet. (If the tree comes with a foot pedal, 

    try stepping on the on/off button).

2. Check for loose connection between light string plugs and extension cords.

3. Please check for loose, broken or missing light bulbs and replace as needed.

Loose Hinge Pin

1. Extra hinge pins are included for repairing the hinges. Place the branch into 

    the slot of the bracket.

2. Insert a new hinge pin through the hole and secure using the retainer washer.

Troubleshooting Tips


Note: Screwdriver not included in package 

          to change battery in remote.

Summary of Contents for TG90M2W75D00

Page 1: ...odel Number TG90M2W75D00 Customer Assistance spare replacement parts www polygroupstore com or 1 888 919 0070 THIS ASSEMBLY MANUAL CONTAINS IMPORTANT SAFETY INFORMATION PLEASE READ AND KEEP FOR FUTURE REFERENCE Assembly Instructions User s Manual for ...

Page 2: ... of Contents Quality Statement 3 Important Safety Information 3 Care Use Instructions 4 Technical Data 4 Package Contents 4 Assembly Instructions 4 Warning 6 Troubleshooting Tips 6 Storage Instructions 7 Spare Parts 7 ...

Page 3: ... lamps rest on the supply cord or on any wire g Unplug the product when leaving the house when retiring for the night or if left unattended h This is not a toy For decorative use only To avoid risk of fire burns personal injury and electric shock it should not be played with or placed where small children can reach it i Do not use this product for other than its intended use j Do not hang ornament...

Page 4: ...ect product carefully Discard any products that have cut damaged or frayed wire insulation or cords cracks in the lampholders or enclosures loose connections or exposed copper wire 2 When storing the product carefully remove the product from wherever it is placed including trees branches or bushes to avoid any undue strain or stress on the product conductors connections and wires 3 When not in use...

Page 5: ...5 P a g e Step 2 Step 3 Remote Control 1 2 3 Tree Top ...

Page 6: ...ly CR2032 battery for remote controller 9 Do not dispose of batteries in fire batteries may leak or rupture 10 Non rechargeable batteries are not to be recharged 11 This product is powered by a lithium battery Due to their small size lithium batteries can easily be swallowed by children Ingestion of such batteries has been known to cause death 12 This product contains a lithium battery which if sw...

Page 7: ...ntinue by gently lifting straight up each section s from the section below and fold all branches toward the pole until the bottom section is removed from the tree stand Cover the protective cap on the poles to avoid damaging the internal parts 4 Carefully place all tree sections into the storage bag if included or original packing box For best fit in the tree bag lay the tree sections facing oppos...

Page 8: ...8 P a g e Need Assistance Visit us at samsclub com membersmarkhelp ...

Reviews: