background image

Installation Manual: MeMC silvantis 72 cell Pv modules

4 of 13

© Copyright 2012 MEMC Electronic Material

4.0 MeChanICal InsTallaTIon 

4.1 PlannIng and desIgn 

• 

Before installation, check to ensure all sub-structure will accommodate expected system loads. This includes and is not 
limited to roof, foundations, mechanical structure, and mechanical connections. 

• 

For roof installations, utilize a fire-resistant roof covering rated for the application. 

• 

Mechanical structures should not contact the module backsheet under any expected load conditions

• 

Consider the following factors during system design, which will influence performance: 

a)  MEMC solar modules produce the most power when they are pointed directly at the sun, and should be tilted for 

optimum system performance.

b)  Proximity to obstructions such as: walls, buildings, trees, groundcover, snow cover, or dust and debris that have the 

potential to shade or damage the modules.

c)  Elevated temperatures will decrease energy yield, so designs should ensure adequate airflow across the back of the module.

d)  Allow a minimum spacing of 10 mm between modules for thermal expansion.

4.2 Module InsTallaTIon oPTIons for MounTIng loCaTIons  

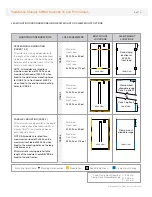
For mounting locations for clamps or bolt for specified load, please refer to Table on page 5.

• 

Each module should be mounted using four bolts through the mounting holes on the rear side of the module, or with four 
clamps over the front side.

• 

Depending on the desired load capability of the array, modules may be mounted either perpendicular or parallel to the 
structure rails. Clamps can be mounted anywhere inside of the safe mounting range for each case illustrated below (referring 
to chart showing clamp and bolt mounting locations).

• 

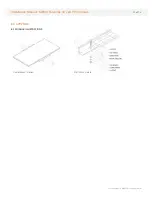
If using bolts, eight mounting holes are provided on the rear side the module frame as shown in Appendix 8.1. Use a stainless 
steel bolt stack no smaller than ¼"-20 or M6, with two flat washers and a locking washer as shown in Appendix 8.2.

• 

To ensure an adequate clamping area, all clamps used should comply with the following general conditions:

1.  Clamp height must correspond to 50 mm frame height 

2.  Clamp must have a minimum width of 38 mm

3.  Clamp depth must be between 6 mm to 10 mm

• 

All fasteners used to fix the modules with clamps should be stainless steel, and no smaller than ¼”-20 or M6.

• 

To provide adequate fixing or clamping force, torque the minimum recommended fasteners to 6.2 - 8.9 Nm (4.6 - 6.6 ft-lb).  

• 

All other structural dimensions, such as clamp and rail thickness, should be sized appropriately for the intended site load.

Summary of Contents for MEMC-P270ACA

Page 1: ...270ACA MEMC P275ACA MEMC P280ACA MEMC P285ACA MEMC P290ACA MEMC P280AMC MEMC P285AMC MEMC P290AMC MEMC P295AMC MEMC P300AMC MEMC P305AMC MEMC P280ACC MEMC P285ACC MEMC P290ACC MEMC P295ACC MEMC P300AC...

Page 2: ...nstallation 7 5 1 Planning and Design 7 5 2 Module Wiring 7 5 3 Grounding 8 5 4 Electrical Installation Warnings 8 6 0 Disclaimer of Liability 9 7 0 Mechanical and Electrical Parameters and Specificat...

Page 3: ...te and EVA back sheet substrate These laminates are secured inside an aluminum frame to provide rigidity and a means for attachment to mounting sub structures The frames should not be modified or remo...

Page 4: ...mmissioning trouble shooting disconnecting or connecting a PV system Trouble shooting should include planning checking disconnecting cause seeking replacement and record keeping Do not install or hand...

Page 5: ...ations For mounting locations for clamps or bolt for specified load please refer to Table on page 5 Each module should be mounted using four bolts through the mounting holes on the rear side of the mo...

Page 6: ...modules are rated for a maximum rear load of 2400 Pa and a maximum front load of 5400 Pa when fixed to the mounting holes on the long side frames only Structural rails running parallel to the length...

Page 7: ...nstallers should adhere to all applicable local regional and national codes and regulations when designing and constructing the photovoltaic system Do not stand or walk on any surface of the modules D...

Page 8: ...tional codes and regulations when designing and constructing the photovoltaic system Note In colder climates it may be necessary to further reduce the maximum number of modules in series by using Vocm...

Page 9: ...regional and national codes and regulations when designing and constructing the photovoltaic system Photovoltaic modules produce DC electrical energy from light When illuminated each module can have a...

Page 10: ...arranty shall be VOID if handling and installation of the product does not conform to MEMC s written installation instructions or if the product has been reworked repaired or otherwise modified in a m...

Page 11: ...12 MEMC P285AMA 285 44 5 8 71 14 6 35 1 8 18 MEMC P285ACA 285 44 5 8 71 14 6 35 1 8 18 MEMC P290ACA 290 44 7 8 78 14 8 35 4 8 20 MEMC P290AMA 290 44 7 8 78 14 8 35 4 8 20 Copyright 2012 MEMC Electroni...

Page 12: ...976 77 8 C 50 2 0 D 40 1 6 E 940 37 0 F 1 926 75 8 G 1 188 46 8 H 594 23 4 L 1 000 39 4 Module Dimensions Mounting Hole Spacing Dimension MM INCH Dimension MM INCH Cable Length for ACA and ACC Cable L...

Page 13: ...Bolt Stack Details Center Mount Option 8 0 Appendix 8 2 Module illustrations Installation Manual MEMC Silvantis 72 cell PV modules Copyright 2012 MEMC Electronic Material 12 of 13...

Page 14: ...00 V UL 1000 V IEC Temperature rating 40 C to 90 C 40 C to 85 C Qualification TUV 2PFG UL PV wire EN 50521 UL for PV sys Copyright 2012 MEMC Electronic Material Controlled Document MEMC Electronic Mat...

Reviews: