background image

OPER

OPERA

ATION

TION

20

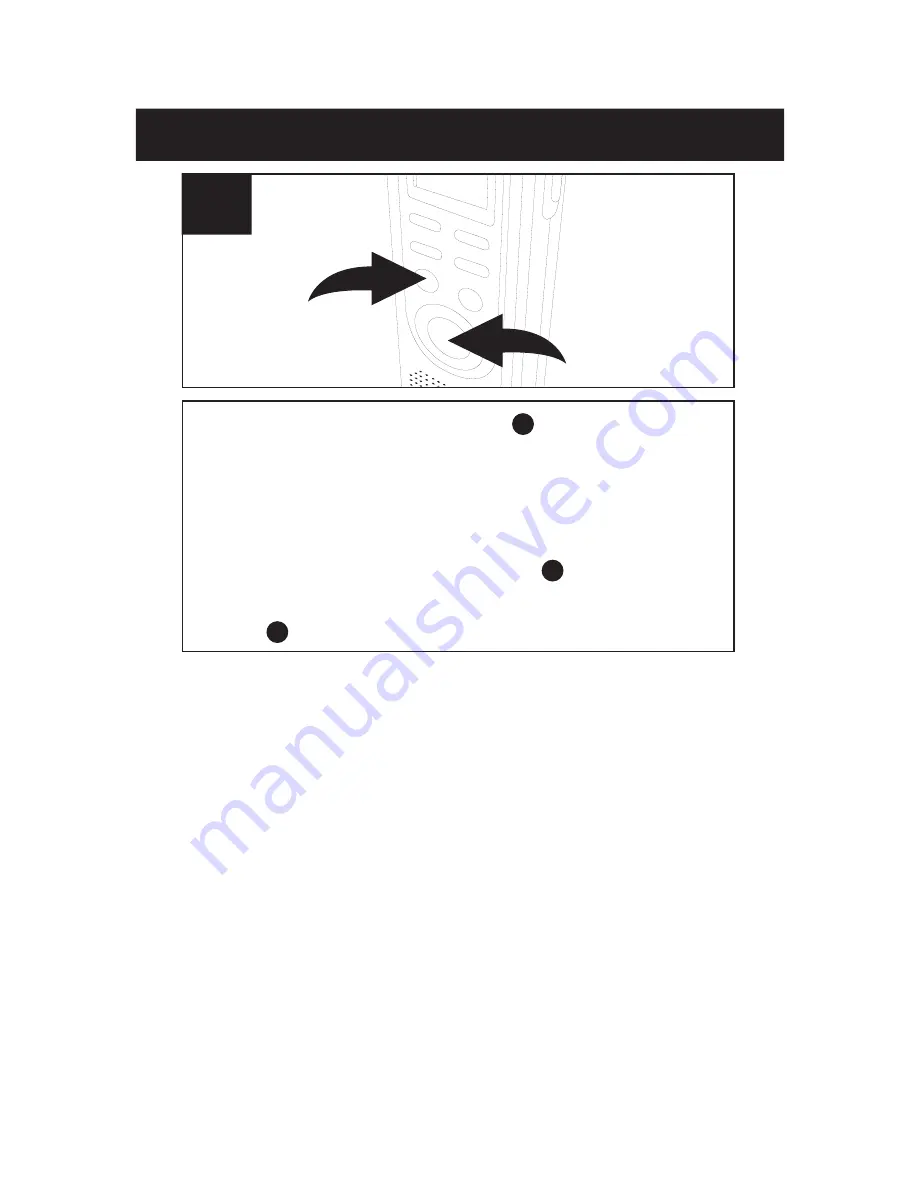
Press the PLAY/STOP button  ; the unit will play

the currently selected message, then stop. During

playback, the Play indicator and the elapsed time

of the message will appear in the display. You can

check  the  message  recording  time  and  date  by

pressing  the  REC/STOP button   . To   return  to 

display  the  elapsed  time, press the REC/STOP 

button     .


2

3

1

1

3

NOTES:

• To adjust the volume, simply press the VOL+

or VOL– button.

• To pause,  press  the  MODE/PAUSE  button;

PAUSE will blink in the display. To release pause,

press the MODE/PAUSE button again.

• For Cue and Review during playback, simply

press  and  hold  the  desired  REV  or  FWD

button.  A chattering  sound  will  be  heard.

Release the button when the desired point is

reached.

• To skip or go back to messages, simply press

and release the desired REV or FWD button

until the desired message number is reached.

1

2

2

Summary of Contents for MB2059

Page 1: ...User sGuide 15 Hours Digital Voice Recorder MB2059A Before operating this product please read these instructions completely...

Page 2: ...io or television reception which can be determined by turning the equipment off and on the user is encouraged to try to correct the interference by one or more of the following measures Reorient or re...

Page 3: ...cators D REPEAT 1 ALL Indicators E Record Indicator F Battery Indicator G Date Volume Indicators H Minute Second Timer Indicators I REMAIN Indicator J R Record DATE Indicator K VOX Indicator L Message...

Page 4: ...MIC Microphone Jack 2 Built in Microphone 3 Display 4 REV Button 5 MODE PAUSE Button 6 PLAY STOP Button 7 REC STOP Button 8 Speaker 9 EAR Earphone Jack 10 REC Indicator 11 VOLUME Up Button 12 VOLUME...

Page 5: ...LOCATION OF CONTROLS 4 1 3 2 4 REAR 1 MIC SENS Microphone Sensitivity Switch 2 VOX Switch 3 HOLD Switch 4 Battery Compartment...

Page 6: ...it towards the bottom of the unit 1 Insert two 2 AAA size batteries not included following the polarity diagram Slide the battery compartment back in place 2 NOTE When replacing the batteries the reco...

Page 7: ...age to the device 3 Do not mix different types of batteries together e g Alkaline Rechargeable and Carbon zinc or old batteries with fresh ones 4 If the device is not to be used for a long period of t...

Page 8: ...e REV and FWD buttons then press the PLAY STOP button again to confirm 3 1 2 2 Press and hold the MODE PAUSE button for two seconds then release SET will appear in the display Press the MODE PAUSE but...

Page 9: ...ton to select 12 or 24 hour time display 1 4 Set the Month using the FWD and REV buttons then press the PLAY STOP button again to confirm Repeat this step to set the Day Hour and Minute After setting...

Page 10: ...the unit will automatically turn off and show the time 1 3 1 2 1 T TO O TURN TURN THE THE UNIT UNIT ON ON OFF OFF To enter the Standby mode press the REC STOP button or PLAY STOP button while the unit...
Page 11: ...volume number will increase or decrease to indicate the volume level i e 0 is minimum and 15 is maximum 1 3 3 2 1 ADJUSTING ADJUSTING THE THE VOLUME VOLUME EARPHONE JACK For private listening connect...

Page 12: ...3 button to select the desired recording quality 1 1 3 2 1 RECORDING QUALITY You can choose between four voice recording quality modes For best sound quality select HP High Play for very good sound qu...

Page 13: ...e MODE PAUSE button twice to confirm and turn the unit off Time will show on the display or the unit will turn off automatically if no button is High Play 185 min Standard Play 275 min Medium Play 695...

Page 14: ...IN NG G A A F FI IL LE E F FO OL LD DE ER R This unit has four memory storage areas file folders to choose from labeled A B C and D You can store a total of 200 messages or 925 minutes in LP mode 695...

Page 15: ...he HIGH position if recording sounds that are further away 1 1 RECORDING SENSITIVITY Slide the HOLD switch to the LOCK position to disable the buttons HOLD will appear in the display if the unit is in...

Page 16: ...eviously described 1 1 Select a File Folder as described on page 13 by pressing the FILE TIME button 1 While in the Standby mode press the REC STOP button 2 and the REC indicator will light and the el...

Page 17: ...rding 3 3 Press and hold the PLAY STOP button 1 to see the remaining recording time during recording To pause recording press the MODE PAUSE button 2 PAUSE will blink in the display To release pause p...

Page 18: ...nd select the desired sound quality as described on page 11 1 1 Select a File Folder by pressing the FILE TIME button see page 13 2 VOICE ACTIVATED VOX RECORDING Voice activated recording will allow d...

Page 19: ...nk and PAUSE will blink in the display until sound is detected Press the REC STOP button again to stop recording 3 NOTES The first few sounds activate the recorder and may not be recorded A variation...

Page 20: ...LAY STOP button and select a File Folder by pressing the FILE TIME button see page 13 1 1 Select the desired message number by pressing the REV 1 or FWD 2 button the message number and the message len...

Page 21: ...e press the REC STOP button 2 3 1 1 3 NOTES To adjust the volume simply press the VOL or VOL button To pause press the MODE PAUSE button PAUSE will blink in the display To release pause press the MODE...

Page 22: ...essed 1 2 1 1 REPEAT ALL MESSAGES IN THE SELECTED FILE FOLDER While playing back a message press the DEL REPEAT button 1 twice REPEAT ALL will appear in the display and all messages in the selected fi...

Page 23: ...PAUSE will blink in the display 1 1 Press the MODE PAUSE button again to resume recording or playback 2 TO PAUSE A MESSAGE TO CANCEL REPEAT PLAYBACK To cancel repeat playback press the DEL REPEAT butt...

Page 24: ...y the first five seconds of each message in the selected file folder starting at message one 1 2 1 1 The unit will automatically stop after all messages have been played To play back the message durin...

Page 25: ...ay 1 2 3 1 Press the DEL REPEAT button ERASE will appear in the display and the first five seconds of the message will play To erase press the DEL REPEAT button within the five seconds while it is pla...

Page 26: ...all the messages press the DEL REPEAT button again within five seconds If the DEL REPEAT button is not pressed again within the five seconds the messages will not erase 2 ERASING ALL MESSAGES IMPORTAN...

Page 27: ...s will return to their preset values but the previous messages are saved TRAFFIC SAFETY Do not use while operating a motorized vehicle It may create a traffic hazard and is illegal in many areas Even...

Page 28: ...nts Extreme temperatures can shorten the life of electronic devices damage batteries and or melt plastic parts Keep the unit away from dirt and dust Handle the unit gently and carefully Dropping it ca...

Page 29: ...me level Dimensions 4 4 H x 1 4 W x 7 D inches Weight 46g without batteries Specifications are subject to change without notice FOR ADDITIONAL SET UP OR OPERATING ASSISTANCE PLEASE VISIT OUR WEBSITE A...

Page 30: ...Memcorp Inc Weston FL Printed in China Visit our website at www memorexelectronics com...

Reviews: