8
Installation Step 4: Grill Mounting
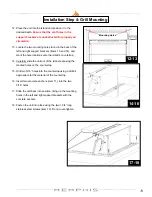
Mounting Holes
12-13
14-16
17-18
12. Place the unit into the island and position it to the
desired depth.
Ensure that the vent holes in the
support brackets are unobstructed for properly air
circulation.
13. Locate the two mounting holes found in the back of the
left and right support brackets (Items 13 and 14), and
mark the hole locations onto the island’s countertop.
14. Carefully slide the unit out of the island, exposing the
marked holes on the countertop.
15. Drill two 5/16” holes into the countertop using a drill bit
appropriate for the material of the countertop.
16. Insert two concrete anchors (item 11), into the two
5/16” holes.
17. Slide the unit back into position, lining up the mounting
holes in the left and right support brackets with the
concrete anchors.
18. Fasten the unit into place using the two 1 3/4” long
stainless steel screws (item 12). Do not over-tighten.


