18
Operating Instructions - CPC6050
Modular Pressure Controller
CPC6050
4 Specifications
Accuracy specifications presented herein are obtained by comparison with primary standards traceable
to a national metrology institute or recognized international standard organization. These specifications
are obtained in accordance with the ISO Guide to the Expression of Uncertainty in Measurement (GUM).
The calibration program at Mensor is accredited by the American Association of Laboratory Accreditation
(A2LA) as complying with both the ISO/IEC 17025:2005 and the ANSI/NCSL Z540-1-1994 standards. If
there is an exception to the requirements and recommendations of Z540 during a calibration the excep-
tion is noted on the individual calibration certificate.
Mensor reserves the right to change specifications without notice.
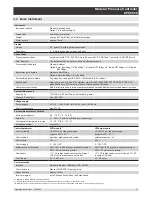
4.1 Measure Specification
Reference pressure transducer model CPR6050
Pressure range
Standard
Optional
Accuracy
1)
0.01 % FS
2)
0.01 % IS-50
3)
Gauge pressure
0 ... 0.025 to 0 ... 210 bar
(0 ... 0.36 to 0 ... 3,045 psi)
0 ... 1 to 0 ... 210 bar
(0 ... 14.5 to 0 ... 3,045 psi)
Bi-directional pressure
-0.012 ... 0.012 to -1 ... 210 bar
(-0.18 ... 0.18 to -15 ... 3,045 psi)
-1 ... 10 to -1 ... 210 bar
(-15 ... 145 to -15 ... 3,045 psi)
Absolute pressure
4)
0 ... 0.5 to 0 ... 211 bar abs.
(0 ... 7.5 to 0 ... 3,060 psi abs.)
0 ... 1 to 0 ... 211 bar abs.
(0 ... 14.5 to 0 ... 3,060 psi abs.)
Precision
5)
0.004 % FS
0.004 % FS
Calibration interval
365 days
6)
365 days
Optional barometric reference
Function
The barometric reference can be used to switch pressure types
7)
, absolute <=> gauge. With gauge
pressure transducers, the measuring range of the transducers must begin with -1 bar (-15 psi) in order to
carry out a complete absolute pressure emulation.
Measuring range
552 ... 1,172 mbar abs. (8 ... 17 psi abs.)
Accuracy
1)
0.01 % of reading
Pressure units
39 and two freely programmable
1) It is defined by the total measurement uncertainty, with the coverage factor (k = 2) and includes the intrinsic performance of the instrument, the measurement uncertainty of the reference
instrument, long-term stability, influence of ambient conditions, drift and temperature effects over the compensated range with recommended zero point adjustment every 30 days.
2) FS = full span
3) 0.01 % IS-50 accuracy: Between 0 ... 50 % of the full scale, the accuracy is 0.01% of half of the full scale value and between 50 ... 100 % of the full scale, the accuracy is 0.01 % of reading.
4) The minimum calibrated range of absolute transducer(s) is 600mTorr
5) It is defined as the combined effects of linearity, repeatability and hysteresis throughout the stated compensated temperature range
6) 180 days for pressure ranges below 1 bar (15 psi) gauge or absolute, and -1 ...1 bar (-15 ... 14.5 psi) bidirectional. 365 days for the remainder of the specified ranges.
7) For a pressure type emulation, we recommend a native absolute pressure transducer, since the zero point drift can be eliminated through a zero point adjustment.


