Operating Instructions - CPG2500
75
Precision Pressure Indicator
CPG2500
10.8 Two Point Cal Application
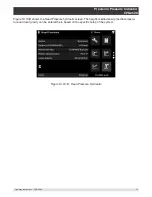
The Two Point Cal Application provides a place to adjust the Transducer Zero and Span (some-
times referred to as the offset and slope).
Figure 10.8 - Two Point Cal Application
Follow the steps below for a complete 2 Point Calibration:
Select a Transducer to calibrate by pressing the Channel button at the top of the screen.
To calibrate the “low Point”:
1. The pressure port of the transducer being calibrated should be supplied with a suitable, “low point”
pressure (see section 5.4 Rear Panel for the port location).
2. For a gauge transducer, this low point pressure can be achieved by opening the pressure and refer-
ence ports to atmospheric pressure.
3. For an absolute transducer a suitable source of vacuum should be applied to the Pressure port along
with a high accuracy vacuum standard or a pressure calibration standard can be connected to the
Pressure port that can generate and measure a stable pressure value between 600 mTorr absolute
and 20% of the active transducer’s span
4. When the pressure is stable, record the live reading shown on the Two Point Cal screen and enter this
value as the “Low Reading” by pressing the Low Reading button and entering the number followed by
the check mark [
]. Record the “true pressure” obtained from the reference standard and enter it
as the “Low Reference” value in the same manner.
To calibrate the”High Point”:
5. The “High Point” Calibration is done in a similar way as the “Low Point”.
6. Supply a pressure to the Pressure Port of the Transducer being calibrated, using a pressure standard.
This pressure should be as close as possible to the full scale value of the selected transducer or at
least within 20% of that value.
7. After the pressure stabilizes, record live reading shown on the Two Point Cal screen and enter this
value as the “High Reading” by pressing the High Reading button and entering the number followed by
the check mark [
]. Record the “true pressure” obtained from the reference standard and enter it
as the “High Reference” value in the same manner.
Summary of Contents for CPG2500
Page 14: ...14 Operating Instructions CPG2500 Precision Pressure Indicator CPG2500 NOTES ...
Page 47: ...Operating Instructions CPG2500 47 Precision Pressure Indicator CPG2500 NOTES ...
Page 61: ...Operating Instructions CPG2500 61 Precision Pressure Indicator CPG2500 NOTES ...
Page 67: ...Operating Instructions CPG2500 67 Precision Pressure Indicator CPG2500 NOTES ...
Page 69: ...Operating Instructions CPG2500 69 Precision Pressure Indicator CPG2500 NOTES ...
Page 85: ...Operating Instructions CPG2500 85 Precision Pressure Indicator CPG2500 NOTES ...


