72
WIKA operating instructions hydraulic high pressure controller, model CPC8000-H
PN 0018708001B 11/2020 EN
EN
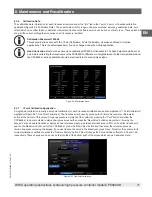
8.3.8 2 Point Calibration Application
The 2 point calibration application provides a place to adjust the transducer zero and span (sometimes referred to as offset and
slope)(Figure 8.3.8 Two Point Calibration).
Figure 8.3.8 Two Point Calibration
Follow the steps below for a complete Two Point Calibration:
Select a transducer to calibrate by pressing the corresponding transducer on the bottom of the screen.
To calibrate the “Low Point” :
1. The Measure/Control port of the CPC8000-H being calibrated should be supplied with a suitable, “Low point” pressure.
2. For the Low Point, the same process from Section 8.2.7 - One Point Calibration can be followed. If the reading is too high, the
Actual value cell will display a yellow highlighted box with "Too High".
3. When the pressure is stable, record the reference value in the "New Value" cell next to "Low Point" and then press the
"Reading" button to input the instrument pressure.
To calibrate the”High Point”:
4. The “High Point” Calibration is done in a similar way as the “Low Point”.
5. Supply a pressure to the Measure/Control Port of the CPC8000-H being calibrated, using a pressure standard. This
pressure should be as close as possible to the full scale value of the selected transducer or at least within 20% of the active
transducer’s span.
6. After the pressure stabilizes, type in the Reference reading by selecting "New Value" next to "High Point" and using the keypad
to enter the reference pressure reading. Press the "Reading" button that will appear in the Actual column on the "High Point"
row. This cell remain yellow and display "Too Low" until the pressure is within 20% of the maximum range.
7. After all four values (High Reference, High Reading, Low reference, & Low reading) have been entered, the Save button will
become active. Press the Save button to accept the calibration data and store it to the memory of the transducer.
The Restore Factory button will return the Span and Zero offset to their original values. This can be done at any time to revert back
to the transducer's original calibration. The current offsets can be displayed on the Info tab.
8.3.9 Linearization Application
The linearization calibration application provides a place to record upscale and/or downscale calibration data and to linearize each
device using that data.
• As Found
An “as found" calibration can be performed by connecting a suitable pressure standard to the Measure/Control port, placing the
instrument in Measure mode and supplying 3 to 11 pressure points across the complete range of the transducer being calibrated.
The pressures generated or measured by the pressure standard and the corresponding reading from the instrument’s transducer
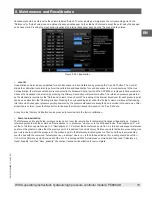
can be recorded and transcribed into the Linearize / As Found screen. The screen is accessed by pressing the As Found button
in the Linearize screen(Figure 8.2.9 Linearization). In the Linearize / As Found screen choose the transducer to be linearized by
pressing the Primary, Secondary, or Barometer button. Pressure test points generated by the reference standard are entered in the
column labeled “Reference”; each of the corresponding readings from the instrument’s
8. Maintenance and Recalibration

