24
WIKA operating instructions hydraulic high pressure controller, model CPC8000-H
PN 0018708001B 11/2020 EN
EN
6. Operation
6.1 General Operation
This section describes the procedures for operating the CPC8000-H from the front panel. Instructions for operating the device
remotely from an external computer are covered in Section 8, Remote Operations. By following the procedures provided in these
two sections and section 9.2, Recalibration, you can expect your CPC8000-H to deliver maximum accuracy and dependability for
many years of useful service.
6.1.1 Power Up
Apply power to the power connector on the rear of the instrument using the power cord included, and switch the power switch on
the front of the unit ON. The instrument will go through an initialization process and system check. As soon as the system check is
completed the system will default to a screen similar to the one shown in Section 6.1.3 Display Screen Features. The main screen
may be configured in many different ways but initially it will be in a default configuration. Subsequently, the unit will power up in the
configuration that it was in when last powered off.
WARNING!
Allow 60 minutes of warm up before performing critical pressure measurements.
WARNING!
Do not position the equipment so that it is difficult to remove the power cord. The instrument is not
intended for connection of long-distance lines, i.e. lines within a building that are longer than 30 m, or that
leave the building (including lines of outdoor installations).
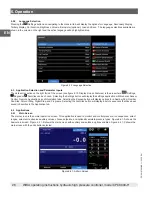
6.1.2 Setup Applications
Configuration of the CPC8000-H is achieved by changing settings accessed through the Application (“App”) buttons. Local
operation is accomplished by observing the data presented in the display. The appearance and functionality of the display can be
changed by pressing the App button for the related function. After an App has been chosen, a set of related parameters will appear
on the left. After choosing one of these parameters, a set of selections related to that parameter will appear on the right or a data
entry keypad. The desired selection or data can be entered here.
6.1.3 Display Screen Features
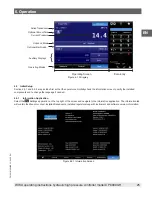
The screen shown below provides an overview of the features that may appear on the display after initialization. The left two thirds
of the display contains the area where information is displayed (in this case the Home Application) and the right one third contains
the selection icons for each application. A tare button, zero button, bar graph and up to two of the available auxiliary displays
(Peak, Rate, Sensor 3, Units, Tare, Uncertainty) will appear in the Home App, if activated. All of the CPC8000-H screen features
are described in more detail throughout this manual. Any button activated will turn a different shade of blue.
6. Operation


