71
WIKA operating instructions hydraulic high pressure controller model CPC8000-H
PN 0018708001B 11/2020 EN
EN
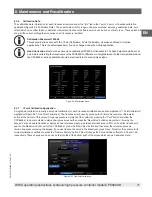
8.3.6 Calibration Data
The calibration data information for each transducer is stored under the "Info" tab in the 1 point, 2 point, or linearize calibration
application(Figure 8.3.6 Calibration Data). The serial number (S/N), range, units, pressure type, accuracy, calibration date, zero
offest (Zero), span offset (Span), calibration interval and transducer software version can be seen on this screen. These values will
show all the current settings that are active on all transducers installed.
Calibration Password: 123456
This password allows access to the 1 Point Calibration, 2 Point Calibration, Linearize and Head Correction
applications. This is the default password, it can be changed using the Admin application.
Head Correction
should not be active when calibrating CPC8000-H transducers. The head height should be set at
zero before calibrating the transducers of the CPC8000-H. Difference in height between the laboratory standard and
the CPC8000-H during calibration should be factored into the uncertainty analysis.
Figure 8.3.6 Calibration Data
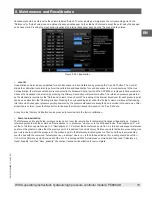
8.3.7 1 Point Calibration Application
A single point calibration (usually a zero point calibration) of each transducer installed can be accomplished in “1 Point Calibration”
Application(Figure 8.3.7 One Point Calibration). The transducer is chosen by pressing the Primary, Secondary or Barometer
button at the bottom of this screen. For gauge pressure simply Vent the system by pressing the "Vent" button and allow the
CPC8000-H to become stable to atmospheric pressure and then press the “New Value” button and enter zero (0) using the
keypad. For an absolute transducer, apply a known reference pressure between atmosphere and 20% of the active transducer’s
span to the Measure/Control port of the CPC8000-H, press the “New Value” button and then enter the reference pressure
(known true pressure) using the keypad. If you want to save the value in the transducer, press Save. To restore the sensors to its
original calibration coefficients, press the "Restore Factory" button. This will change the Zero and Span offsets to 0.00 and 1.00,
respectively. These changes can be seen on the Info tab at the bottom right of the screen which shows Calibration Data.
Figure 8.3.7 One Point Calibration
8. Maintenance and Recalibration

