76
WIKA operating instructions hydraulic high pressure controller, model CPC8000-H
PN 0018708001B 11/2020 EN
EN
10. Specifications
Accuracy specifications presented herein are obtained by comparison with primary standards traceable to a national metrology
institute or recognized international standard organization. These specifications are obtained in accordance with the ISO Guide
to the Expression of Uncertainty in Measurement (GUM). The calibration program at Mensor is accredited by the American
Association of Laboratory Accreditation (A2LA) as complying with both the ISO/IEC 17025:2017 and the ANSI/NCSL Z540-1-1994
standards. If there is an exception to the requirements and recommendations of Z540 during a calibration the exception is noted on
the individual calibration certificate. Mensor reserves the right to change specifications without notice.
10.1 Measurement Specification
Specifications
Reference pressure sensors
Model CPR8000
Accuracy
1)
0.01 % FS up to 0.01% IS-50
Pressure ranges
0...100 bar (0...1,500 psi) up to 0...400 bar
(0...6,015 psi)
Precision
2)
0.004 % FS
Model CPR8050
Accuracy
1)
0.01 % FS
Pressure ranges
0...400 bar (0...6,000 psi) to 0 … 700 bar (0 … 10,015 psi)
Precision
2)
0.005% FS
Model CPR8850
Standard
Advanced
Accuracy
1)
0.01 % FS
0.014 % FS
Pressure ranges
0 … 480 bar to 0 … ≤ 1,030 bar
(0 … 7,000 psi to 0 … ≤ 15,000 psi)
0 … 1,030 bar to 0 … 1,600 bar
(0 … 15,000 psi to 0 … 23,000 psi)
Precision
2)
0.005 % FS
0.007 % FS
1)
The accuracy is defined by the total measurement uncertainty, which is expressed with the coverage factor (k = 2) and includes the following factors: the intrinsic performance of the
measuring instrument, the measurement uncertainty of the reference instrument, long-term stability, influence of ambient conditions, drift and temperature effects over the compensated
range during a periodic zero point adjustment.
2)
The precision is the maximum deviation between two measurements at one point under laboratory conditions which contains linearity, hysteresis and repeatability of the measuring
instrument.
Hydraulic module
Version
Low pressure version CPC8000-HM-L
High pressure version CPC8000-HM-M
Instrument version
Standard: 19" rack-mounting with side panels incl. rack-mounting kit
Optional: built into a 19" rack with CPC8000-HC pressure controller
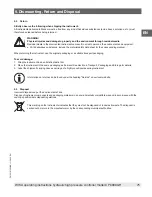
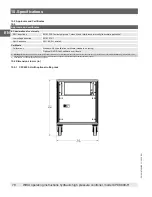
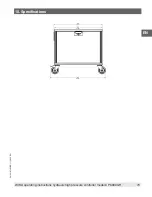
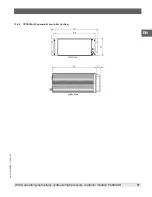
Dimensions in mm
see technical drawings
Weight
approx. 78 kg (172 lb.)
approx. 87.5 kg (193 lbs.)
Connections
Pressure connections
Drive-Air port: 6 mm FITOK
®
/SWAGELOK
®
tube
connection
Supply port: 6 mm FITOK
®
/SWAGELOK
®
tube
connection
Measure/Control port: ¼” SNOTRIK
SWAGELOK
®
high pressure tube connection
Drive-Air port: 6 mm FITOK
®
/SWAGELOK
®
tube
connection
Supply port: 6 mm FITOK
®
/SWAGELOK
®
tube
connectionv
Measure/Control port: ¼” SNOTRIK SWAGELOK
®
high pressure tube connection
Permissible pressure media
Drive-Air port: clean and dry air or nitrogen
Supply port: clean and dry air or nitrogen
Measure/Control port: non-corrosive liquids
Permissible reference sensors
CPR8050 and CPR8000
CPR8850 and CPR8050
Permissible pressure
Drive-Air port (from CPC8000-HC)
8 … 35 bar (116 … 507 psi)
Supply port
35 ... 38 bar (500 ... 550 psi)
10. Specifications

