46
7
7.3
7.3
7.3
7.3
7.3
MANUTENZIONE
MANUTENZIONE
MANUTENZIONE
MANUTENZIONE
MANUTENZIONE
STRAORDINARIA
STRAORDINARIA
STRAORDINARIA
STRAORDINARIA
STRAORDINARIA
• Comprende gli interventi di personale specia-
lizzato per operazioni di riparazioni o sostitu-
zione di parti usurate, difettose, ecc...
7.4
7.4
7.4
7.4
7.4
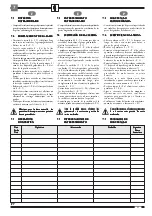
SOSTITUZIONE DELLA LAMA
SOSTITUZIONE DELLA LAMA
SOSTITUZIONE DELLA LAMA
SOSTITUZIONE DELLA LAMA
SOSTITUZIONE DELLA LAMA
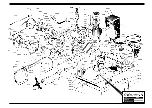
• Allentare la leva (10 - F. 1) e spostare (per tutta
la sua corsa) in basso, il gruppo guidalama.
• Rimuovere le viti (1 - F. 5)
• Sollevare il carter posteriore (1 - F. 6) della testa
operatrice ed accertarsi che risulti in condizio-
ni stabili e nell’impossibilità di ricadere invo-
lontariamente.
• Allentare energicamente (agendo verso il mo-
tore elettrico) la leva di tensione lama (6 - F. 1).
• Estrarre la lama (2 - F. 6) dalla puleggia
condotta (3) poi dai dispositivi guidalama (4 -
F. 6) e quindi dalla puleggia conduttrice (5).
• Inserire una nuova lama (sega a nastro) proce-
dendo all’inverso di quanto appena descritto.
• Verificare che la nuova lama risulti corret-
tamente inserita quindi, tirare energica-
mente (verso l’esterno) la leva di tensiona-
mento (6 - F. 1).
• Richiudere il carter (1 - F. 6) e fissarlo con le
due viti (1 - F. 5).
• Mettere in tensione la macchina ed effettuare
un’avviamento a vuoto, a brevi impulsi, la lama
si autocentrerà sulle pulegge.
• Verificare che la tensione della lama sia al
massimo, tirando nuovamente sulla leva (6
- F. 1).
Con la lama nuova, effettuare i
Con la lama nuova, effettuare i
Con la lama nuova, effettuare i
Con la lama nuova, effettuare i
Con la lama nuova, effettuare i
primi 4 - 6 tagli con pressione di
primi 4 - 6 tagli con pressione di
primi 4 - 6 tagli con pressione di
primi 4 - 6 tagli con pressione di
primi 4 - 6 tagli con pressione di
taglio moderata.
taglio moderata.
taglio moderata.
taglio moderata.
taglio moderata.
7.5
7.5
7.5
7.5
7.5
INTERVENTI DI
INTERVENTI DI
INTERVENTI DI
INTERVENTI DI
INTERVENTI DI
MANUTENZIONE
MANUTENZIONE
MANUTENZIONE
MANUTENZIONE
MANUTENZIONE
Data
Data
Data
Data
Data
Intervento
Intervento
Intervento
Intervento
Intervento
Operation
Operation
Operation
Operation
Operation
Eingriff
Eingriff
Eingriff
Eingriff
Eingriff
Firma
Firma
Firma
Firma
Firma
Date
Date
Date
Date
Date
Signature
Signature
Signature
Signature
Signature
Datum
Datum
Datum
Datum
Datum
Unterschrift
Unterschrift
Unterschrift
Unterschrift
Unterschrift
T. 7
T. 7
T. 7
T. 7
T. 7
7.3
7.3
7.3
7.3
7.3
EXTRAORDINARY
EXTRAORDINARY
EXTRAORDINARY
EXTRAORDINARY
EXTRAORDINARY
MAINTENANCE
MAINTENANCE
MAINTENANCE
MAINTENANCE
MAINTENANCE
• Includes the operations by skilled personnel for
repairs or replacements of worn, faulty parts
etc…
7.4
7.4
7.4
7.4
7.4
REPLACING THE BLADE
REPLACING THE BLADE
REPLACING THE BLADE
REPLACING THE BLADE
REPLACING THE BLADE
• Loosen the lever (10 – F.1) and move (all
along its stroke) the blade guide unit
downwards.
• Remove the screws (1 – F. 5)
• Lift the rear guard (1 – F. 6) of the operating
head and make sure that it is in stable
conditions and cannot fall accidentally.
• Loosen the blade tension lever (6 – F. 1)
energetically (acting toward the electric
motor).
• Remove the blade (2 – F. 6) from the driven
pulley (3) then from blade guide devices (4
– F. 6) and finally, from the driving pulley
(5).
• Insert a new blade (belt saw) following the
inverse order of what has just been described.
• Check that the new blade is correctly
inserted, then pull the tension lever (6 – F.
1) energetically (outwards).
• Close the guard (1 – F. 6) and fasten it with
the two screws (1- F. 5).
• Energise the machine and start without
load, at short impulses, the blade will be
will self-centre on the pulleys.
• Check that the blade tension is at its
maximum, pulling the lever again (6 – F.1).
With the new blade, make the first
With the new blade, make the first
With the new blade, make the first
With the new blade, make the first
With the new blade, make the first
4 – 6 cuts with a gentle cutting
4 – 6 cuts with a gentle cutting
4 – 6 cuts with a gentle cutting
4 – 6 cuts with a gentle cutting
4 – 6 cuts with a gentle cutting
pressure.
pressure.
pressure.
pressure.
pressure.
7.5
7.5
7.5
7.5
7.5
MAINTENANCE
MAINTENANCE
MAINTENANCE
MAINTENANCE
MAINTENANCE
OPERATIONS
OPERATIONS
OPERATIONS
OPERATIONS
OPERATIONS
7.3
7.3
7.3
7.3
7.3
AUSSERORDENTLICHE
AUSSERORDENTLICHE
AUSSERORDENTLICHE
AUSSERORDENTLICHE
AUSSERORDENTLICHE
WARTUNG
WARTUNG
WARTUNG
WARTUNG
WARTUNG
• Verlangt den Einsatz spezialisierten Personals
für Reparationen oder die Ersetzung
verschlissener, defekter Teile usw...
7.4
7.4
7.4
7.4
7.4
AUSWECHSELN DES BLATTES
AUSWECHSELN DES BLATTES
AUSWECHSELN DES BLATTES
AUSWECHSELN DES BLATTES
AUSWECHSELN DES BLATTES
• Den Hebel (10 - F.1) lockern und die
Blattführungseinheit (auf ihrer gesamten Lauflänge)
nach unten verschieben.
• Die Schrauben (1 - F.5) entfernen.
• Das hintere Gehäuse (1 - F.6) des Baueinheitskopfes anheben
und sicherstellen, daß dieser sich im stabilen Zustand
befindet, ohne die Möglichkeit, unbeabsichtigt umzustürzen.
• Den Blattspannhebel (6 - F.1) (durch Wirken in
Richtung des Elektromotors) deutlich lockern.
• Das Blatt (2 - F.6) zunächst von der getriebenen
Riemenscheibe (3), dann von den
Blattführungsvorrichtungen (4 - F.6) und schließlich
von der Leitriemenscheibe (5) abziehen.
• Ein neues Blatt (Bandsäge) einführen. Dabei in
umgekehrter Reihenfolge bezüglich der oben stehenden
Beschreibungen vorgehen.
• Sicherstellen, daß die neue Klinge korrekt eingesetzt
wurde. Anschließend den Spannhebel (6 - F.1) kräftig
(in Außenrichtung) anziehen.
• Das Gehäuse ( 1 - F.6) wieder schließen und mit den
beiden Schrauben (1 - F.6) befestigen.
• Die Maschine mit Spannung versorgen und einen
Leerstart mit kurzen Impulsen durchführen. Das Blatt
wird sich von selbst auf den Riemenscheiben zentrieren.
• Sicherstellen, daß das Blatt maximal gespannt ist,
indem der Hebel (6 - F.1) erneut angezogen wird.
Die ersten 4 - 6 Schnitte mit der neuen
Die ersten 4 - 6 Schnitte mit der neuen
Die ersten 4 - 6 Schnitte mit der neuen
Die ersten 4 - 6 Schnitte mit der neuen
Die ersten 4 - 6 Schnitte mit der neuen
Klinge unter mäßigem Sägedruck
Klinge unter mäßigem Sägedruck
Klinge unter mäßigem Sägedruck
Klinge unter mäßigem Sägedruck
Klinge unter mäßigem Sägedruck
durchführen.
durchführen.
durchführen.
durchführen.
durchführen.
7.5
7.5
7.5
7.5
7.5
WARTUNGSEINGRIFFE
WARTUNGSEINGRIFFE
WARTUNGSEINGRIFFE
WARTUNGSEINGRIFFE
WARTUNGSEINGRIFFE
I
UK
D
Summary of Contents for PH160
Page 51: ......

