background image

20-07316-01

5

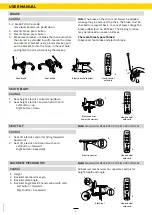
SEAT HEIGHT

BRAKE

Control

1.  Seat height, electric control for up/down.

2.  Seat height, electric hand control with cord.  

    Left button = up.  

    Right button = down.

Control

1-2. Brake, PLUS-frame 48  

move lever backwards, pedal down

3.   Electric brake, press button

4.   Electric brake, press button

5.  Brake lever bracket – to brake the chair even when 

the armrest is extended in width: loosen the screw 

on brake lever bracket using a 6 mm Hex key, pull 

out the bracket, fasten the screw in the next hole 

and tighten the screw hard using the Hex key.

Note! 

The brake on the chair must always be applied 

when getting in and out of the chair. The brake must be 

checked on a regular basis. In case of wear, change the 

brake rubber (part no. 801264). The braking function 

may be reduced on uneven surfaces.

There are three types of brake: 

Brake lever, foot brake and electric brake. 

1

1

2

4

SEAT TILT
Control

1.  Seat tilt, electric control for tilting forwards/

backwards.

2.  Seat tilt, electric hand control with cord.  

    Left button = forwards  

    Right button = backwards.

Electric control,

 under the armrest

Handbrake

Hand control  

with cord

Foot brake

5

USER MANUAL

2

Hand control  

with cord

2

Hand control  

with cord

Electric brake (option)

3

Electric control

1

Control

1.  Height

2.  Backrest mechanism angle

3.  Backrest plate angle.

4.  Backrest angle electric hand control with cord.  

    Left button = forwards.  

    Right button = backwards

All backrest mechanisms has separate controls for 

height, depth and angle. 

4

1

3

2

Electrical

Hand control  

with cord

Note!

 Standard for REAL 8200 PLUS EL 24V CLINICAL

Note!

 Standard for REAL 8200 PLUS EL 24V CLINICAL

BACKREST MECHANISM

Summary of Contents for REAL 8200 PLUS EL 24V SCREENING

Page 1: ...es to this manual and its contents ASSEMBLY INSTRUCTIONS INSTRUCTIONS FOR USE AND CARE REAL 8200 PLUS REAL 8200 PLUS SERIES REAL 8200 PLUS EL 24V SCREENING REAL 8200 PLUS EL 24V CLINICAL YOUR REAL 820...

Page 2: ...in the chair 5 The brake on the chair must always be applied when getting in and out of the chair The brake must be checked on a regular basis 6 Charge the chair according to the enclosed instructions...

Page 3: ...eat and it should be set to the lowest possible seat height The chair is tested and approved for use between 5 C and 40 C 41 F and 104 F and 15 to 90 non condensing humidity If the chair has been stor...

Page 4: ...sories Adjustments carried out by unauthorized service technicians Fading discoloration or natural variations occurring in skai leatherette leather and fabrics The warranty does not cover damage cause...

Page 5: ...bber part no 801264 The braking function may be reduced on uneven surfaces There are three types of brake Brake lever foot brake and electric brake 1 1 2 4 SEAT TILT Control 1 Seat tilt electric contr...

Page 6: ...on choose a wall socket that is easily accessible to plug the charger into The charger s cable is 1 8 m and must not be extended In case of emergency disconnect the chair by unplugging the charger fro...

Page 7: ...m which then shuts down one or all of the function channels and switches on a warning light on the hand control with cord The system will be reset automatically after 10 seconds If the error has been...

Page 8: ...ler in North America EMP Living LLC 14941 NE 147th CT Woodinville WA 98072 Phone 425 949 7195 Email info empliving com Web www empliving com Mercado Medic AB Phone 46 0 8 555 143 00 14 Tryffelslingan...

Reviews: