20-07316-01
6
USER MANUAL
Battery charger 2240-24V (part no. 805021) must be used to charge the chair. If using a different charger or
different batteries to those which are provided alongside the product by Mercado Medic AB, the warranty and
Mercado Medic AB’s product liability will cease to be valid for any cases regarding the battery, charging or other
electronic aspects of the chair. The battery should be charged on a daily basis. Fully charging the battery on a
daily basis will take between 2–6 hours. In order to preserve the battery’s service life, it is important that it never
becomes fully discharged as this can damage the battery cells. If the chair is equipped with a hand control with cord,
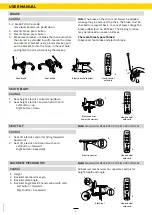
the battery level can be identified by checking the indication lights (1). On a full charge with a high electrical lifting
mechanism, you can raise the chair fully up/down up to 120 times with a load of
80 kg(176 lbs), or up to 90 times with a load of 150 kg(330 lbs).
How to charge the chair
Connect the contact plug (2) on the charger to the charging outlet (3) (the charging outlet is placed under the seat at
the rear on the right side). Then plug the charger into a wall socket. The LED on the charger will indicate that charging
is underway. When the LED changes colour from orange to green, the battery is fully charged. None of the electrical
functions will work while the chair is charging. The chair must be charged in a safe manner. For this reason, choose a
wall socket that is easily accessible to plug the charger into. The charger’s cable is 1.8 m and must not be extended.
In case of emergency, disconnect the chair by unplugging the charger from the wall socket. Do not sit on the chair
when it is charging.
Automatic battery deactivation
During longer periods of storage, the battery will automatically be deactivated after seven days. When the battery
is deactivated, it must be charged every four months in order to retain its functionality. To reconnect the battery
to the system again, connect the battery charger to the charging outlet and wall socket. Wait at least five seconds
before disconnecting the battery charger. The battery is now activated again and the system is ready for use. It is
recommended to leave the charger in place and fully charge the battery after the product has been stored with the
battery in its deactivated state.
ARMREST
1
1
2
2
Armrests PLUS
1
3
2
Foldable armrest
(Standard)
3
2
1
A
B
C
Control
1. To raise or lower armrest, loosen adjustment knob (1),
adjust the height of the armrest, and retighten (1).
2. The armrest width may be adjusted in or out from the
chair. To adjust, loosen adjustment knob (2), pull or
push armrests in or out, and retighten (2).
3. Only for foldable armrest: To fold back the armrest
pull out the adjustment sprint (3) and fold armrest
back. To raise it again, fold up the armrest to an
upright position and lock it with the adjustment
sprint (3). Make sure the armrests are locked in
position before use.
A. Charging is
required
B. Battery Level
C. Warning light
(internal error/
button lock)
1. Indication lights
2. Contact plug
3. Charging outlet
CHARGING


