20-07316-01
2
FAMILIARISE YOURSELF WITH YOUR REAL 8200 PLUS EL
IMPORTANT SAFETY INFORMATION
The REAL 8200 PLUS EL chair has replaceable components, accessories and functions with setting options for
individual customisation. The chair must only be used by the person for whom, and for the purpose for which, it is
intended. The chair is intended for indoor use only and must not be used outdoors. The chair must not be exposed to
extreme cold or heat, prolonged sunlight or other radiation. The chair must not be exposed to water, other fluids or
chemicals.
Warning! Metal surfaces may become very hot if they are exposed to direct sunshine.
Read this manual carefully before using the chair for the first time.
1. Adjust the armrests to a suitable height and lock the
armrest by turning the adjustment knob clockwise.
2. Fit the backrest tube in the intended bracket and
lock the adjustment knobs for the height adjustment
of the backrest.
3. Fit the brake lever in the intended bracket (left or
right side). Does not apply to electric brakes.
4. All adjustment knobs must be tightened before
sitting in the chair.
5. The brake on the chair must always be applied when
getting in and out of the chair. The brake must be
checked on a regular basis.
6. Charge the chair according to the enclosed
instructions before using it for the first time (applies
to electrical chairs).
7. The chair must not be used with the back and/or
armrests removed.
Checkpoints before use
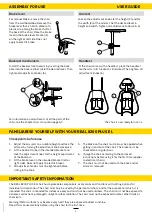
For manual brake, remove the chair
from the cardboard box. Remove the
brake lever that is held in place with
plastic wrap along the brake shaft at
the back of the chair. Place the brake
lever in the brake lever bracket (1)
on the right or left side. Does not
apply to electric brake.
ASSEMBLY FOR USE
USER GUIDE
Loosen the adjustment knobs for the height (2) and for
the width (3) of the armrest. Set the desired level in
height and width. Tighten all adjustment knobs (2 & 3).
1
Install the backrest mechanism by inserting the back
pole into the back recliner (4) to the desired level. Then
tighten all adjustment knobs (5).
If the chair comes with a headrest, place the headrest
mechanism in its bracket as illustrated. Then tighten all
adjustment knobs (6).
3
6
6
2
Brake lever
Armrest
Backrest mechanism
Headrest
For information on adjustments of all the parts of the
chair, see the chapter
User manual
on page 5-7.
The chair is now ready for use! >>
4
5


