2.2. Rotation lock/lubrication
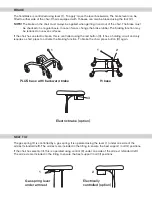
Check that there is no play in
the electric lifting mechanism in
the direction of rotation. If there
is, replace the electric lifting
mechanism. The electric lifting
mechanism can be sent to Mercado
Medic AB for repair/reconditioning.
2.3. Attachment/tightening
Check that the seat frame and
base are correctly assembled and
tightened.
2.4. Wiring/wear
Inspect cables for any signs of wear,
pinching or crushing.
3. Chassis
3.1. Welds
Check all welds carefully for signs of
cracks, corrosion, movement, etc.
3.2. Bolted joints
Check and tighten all bolted joints.
Replace screws that have damaged
heads or threads.
4. Brakes
4.1. Function/wear
Replace the brake rubber and check
that the brake is working properly.
4.2. Plastic plugs/guide bushings
Make sure that guide bushings and
plastic plugs are properly secured,
and replace worn or damaged parts.
5. Castors
5.1. Function/roll/swing
Remove hair and dust from the
castors and check castors and castor
housings for wear and play, which
may indicate defective bearings.
Check that the castors swivel and
the housings rotate as expected.
Replace castors if necessary.
5.2. Attachment/tightening
Check that the castors’ screws are
intact and tightened.
6. Seat frame
6.1. Mechanical/welds
Check all welded parts carefully
(especially when mounting tilt
mechanisms, as these parts carry
the most load).
6.2. Bolted joints/tightening
Check and tighten all bolted joints.
Replace screws that have damaged
heads or threads.
6.3. Plastic plugs/
guide bushings
Make sure that guide bushings and
plastic plugs are properly secured,
and replace worn or damaged parts.
6.4. Seat/replacement/cleaning
Replace the seat with a new one
and wash or replace any covers
6.5. Control/lubrication
Make sure that all knobs and wheels
on the seat frame are working and
that they lock correctly.
6.6. Gas spring tilt/function
If the chair is equipped with gas
tilt controls, check that these lock
securely and that there is no gradual
change in tilt when loaded. Check
and replace damaged wires and
sheaths.
6.7. Crank tilt controls/wear
If the chair is equipped with crank
tilt controls, check that there is
no play and that all screws are
tightened.
6.8. Coxit mechanism/control
Make sure that the knobs for the
flaps turn easily and are securely
locked with the counter nut.
7. Back mechanism
7.1. Function/wear
Check and replace any worn parts,
and make sure that moving parts
are working correctly.
7.2. Attachment/tightening
Check that all screws, knobs and
wheels lock properly and that the
spring button clips are working
correctly.
7.3. Plastic plugs/
guide bushings
Make sure that guide bushings and
plastic plugs are properly secured,
and replace worn or damaged parts.
7.4. Backrest/replacement/
cleaning
Replace the backrest with a new
one and wash or replace any covers
7.5. Gas spring lever/function
Check the gas pressure and stability
of the gas spring. Ensure that it
locks securely and that there is no
gradual change in the back angle
when loaded. Check and replace
damaged wires and sheaths.
8. Armrests
8.1. Function/wear
Check and replace any worn
parts and make sure that locking
mechanisms and moving parts are
working correctly.
8.2. Plastic plugs/
guide bushings
Make sure that guide bushings and
plastic plugs are properly secured,
and replace worn or damaged parts.
8.3. Armrest plates/
replacement/cleaning
Replace armrest plates with new
ones.
8.4. Armrest mechanics/
function
Check all welds and that there is
no damage to the tube system that
may impair or weaken the structure.
9. Accessories
9.1. Restoration
Remove the accessories that would
not normally be on the chair and
inspect them as shown below before
potentially returning them to stores.
9.2. Mechanics
Check all welds and that there is no
damage to mechanical parts that
may impair or weaken the structure.
9.3. Function/wear
Check and replace any worn
parts and make sure that locking
mechanisms and moving parts are
working correctly.
9.4. Padded parts
Discard padded parts to prevent
cross-infection, and discard or
wash covers according to washing
instructions.
10. Final inspection
10.1. Testing
Test the chair’s functionality
and that all individual functions,
electrical functions and brakes are
working correctly. If the chair is
to be stored for a period, the chair
must be put in sleep mode using the
appropriate 9V adapter to save the
batteries.
RECONDITIONING, CONT.


