R
the jack must be placed on a firm, flat and
non-slip surface. On a loose surface, a
large, flat load-bearing underlay must be
used. On a slippery surface, a non-slip
underlay must be used, e.g. rubber mats.
R
do not use wooden blocks or similar
objects as a jack underlay. Otherwise, the
jack will not be able to achieve its load-
bearing capacity due to the restricted
height.
R
make sure that the distance between the
underside of the tyres and the ground does
not exceed 3 cm.
R
never place your hands or feet under the
raised vehicle.
R
do not lie under the vehicle.
R
do not start the engine when the vehicle is
raised.
R
do not open or close a door or the boot lid
when the vehicle is raised.
R
make sure that no persons are present in
the vehicle when the vehicle is raised.
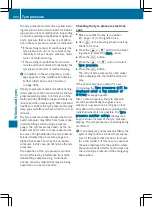
Vehicles with hub caps: the hub cap covers
the wheel bolts. Before you can unscrew the
wheel bolts, you must remove the hub cap.
Two different variants can be fitted.
Vehicles with plastic hub caps:
X
To remove: turn the centre cover of hub
cap
:
anti-clockwise and remove.
X
To fit: before fitting, ensure that hub
cap
:
is in the open position. To do so,
turn the centre cover anti-clockwise.
X
Put hub cap
:
in position and turn the
centre cover clockwise until you feel and
hear hub cap
:
engage.
X
Make sure that hub cap
:
is fitted
securely.
Vehicles with aluminium hub caps:
X
To remove: take socket
;
and wheel
wrench
=
from the vehicle tool kit
(
Y
page 417).
X
Position socket
;
on hub cap
:
.
X
Attach wheel wrench
=
to socket
;
and
loosen hub cap
:
anti-clockwise.
X
Remove hub cap
:
.
X
To fit: before fitting, check hub cap
:
and
the wheel area for soiling and clean if nec-
essary.
X
Put hub cap
:
in position and turn until it
is in the right position.
X
Position socket
;
on hub cap
:
.
X
Attach wheel wrench
=
to socket
;
and
tighten hub cap
:
.
The tightening torque must be 25 Nm.
i
Note that the hub cap should be tight-
ened to the specified torque of 25 Nm.
Mercedes-Benz recommends that you have
the hub cap fitted at a qualified specialist
workshop.
452
Changing a wheel
Wh
eels
an
d
tyre
s
Summary of Contents for 2013 S-CLASS
Page 2: ......
Page 3: ......
Page 5: ......
Page 33: ...30 ...
Page 119: ...116 ...
Page 163: ...160 ...
Page 191: ...188 ...
Page 372: ...Useful information 370 Stowage areas 370 Features 378 369 Stowing and features ...
Page 441: ...438 ...
Page 489: ...486 ...
Page 490: ...487 ...
Page 491: ...488 ...
Page 492: ......
Page 493: ......


