background image

Two-mass flywheels with manual

transmissions, engine 602.91 starting 

2
3
4
5
6

7
8
9

10
11
12

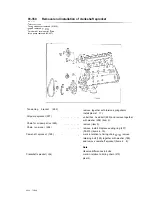
Stop damper
Primary flywheel weight


Radial ball bearing
Stretch bolt M 10 x 1 x 

57


Spacer bolt
Torsion damper

 device

Secondary flywheel 
Spacer bolt

Ring gear

Flywheels with automatic transmissions

A Flywheel, engine 602
B Flywheel, 

 603

03.10 


Summary of Contents for 602

Page 1: ...Mercedes Benz Mercedes Benz of North America Inc Montvale NJ 07645 ...

Page 2: ...tronic or mechanical including photocopying record ing or by any information storage and retrieval system or translation in whole or part is not permitted without written authorization from the publisher Published by Mercedes Benz of North America Inc Printed in U S A Part number LZ S 2517 091 ...

Page 3: ...gine and vehicle identification table for model and component information Special tools required in performing certain service jobs are identified in the manual and are recommended for use Any part numbers given are only used for identification and easier differentiation between individual components and are not intended for ordering purposes If your Mercedes Benz model differs from the specificat...

Page 4: ...train 05 Diesel Injection System 07 1 Air Intake System Air Filter Turbocharger 09 elt Drive 13 Intake and Exhaust Manifolds mission Control System 14 Electrical System Preglow 15 ngine Lubrication System 18 ngine Cooling System 20 Engine Suspension 22 Accelerator Control 30 Fuel Tank and Lines 47 Exhaust System 49 ...

Page 5: ...General technical data 00 ...

Page 6: ...General technical data 00 Job No Instructions for use of service manual 00 005 Engine and vehicle identification 010 Vehicle identification number locations 015 Technical data 020 ...

Page 7: ...irst locate the Group No in the Group Index Individual groups are separated by an easily visible dividing page which is followed by the job index page The exact job required is found in the job index The initial page of a typical job description appears as follows 03 320 Installation of Crankshaft Job Title appears on same line as Group No 03 9 320 l Technical data tightening torques and tools are...

Page 8: ...201 128 190 D 2 5 Turbo Federal 602 961 124 133 300 D Turbo 603 960 124 193 300TD Turbo 603 960 126 125 300 SDL Turbo 603 961 201 126 I 190 D 2 5 Federal I 602 911 201 126 I 190 D 2 5 Federal I 602 911 124 128 300 D 2 5 Turbo Federal 602 962 126 135 350 SDL Turbo Federal 603 970 124 128 300 D 2 5 Turbo Federal 602 962 126 134 350 SD Turbo Federal 603 970 126 135 350 SDL Turbo Federal 603 970 00 01...

Page 9: ...3 Vehicle Identificatron No 4 Engine No 5 Body No and Paintwork No 6 InformatIon Tag California version Vacuum line routing for emission control system 7 Emrsslon Control Tag 1 Certification Tag left door pillar 2 Identification Tag left window post 3 Vehicle Idenkficatron No 4 Engine No 5 Body No and Paintwork No 6 lnformatron Tag California version Vacuum line routing for emission control system...

Page 10: ...dy No and Paintwork No 6 lnformatron Tag Caltfornia version Vacuum line routing for emrssron control system 7 Emrssron Control Tag Model 126 When ordenng spare parts please specrfy chassis and engine numbers Certification Tag left door pillar ldentlficatron Tag left wrndow post Vehicle ldentrfication No Engrne No Body No and PaMwork No Emrssron Control Tag lnformatron Tag California version Vacuum...

Page 11: ...nt 6 multi component pump thermosta pump thermosta with bypass line fan with bypass line fan with visco fan clutch with visco fan clutch 4600 t 50 120 4600 pump thermosta pump thermosta with bypass line fan with bypass line fan with visco fan clutch 00 020 l ...

Page 12: ... arrangement Overhead Overhead Overhead Camshaft arrangment 1 overhead camshaft 1 overhead camshaft 1 overhead camshaft Cooling Coolant circulating pump thermostat with bypass line fan with visco fan clutch finned tube radiator Coolant circulating pump thermostat with bypass line fan with visco fan clutch finned tube radiator Coolant circulating pump thermostat with bypass line fan with visco fan ...

Page 13: ...ng approx I During oil and filter change approx I Marks on dipstick max min approx I Oil to air cooler with hoses Cooling system with heater approx I 7 0 I 8 0 I 8 0 6 Oi4 0 I 6 5i4 5 I 6 514 5 5 513 5 6 0 4 0 0 7 I 1 1 I 0 65 8 0 8 0 9 0 10 0 12 5 Filling capacities continued 350 SDL Turbo 603 970 90 l 2 5 603 961 Engine Fuel tan k reserve approx I 90 l 2 5 Engine oil initial filling approx I Dur...

Page 14: ...y Voltage Capacity 1 2 v 62 Ah M Y 1986 92 Ah from M Y 1987 12 v 92 Ah 1 2 v 1 2 v 92 Ah 1 2 v 92 Ah 12V 2 2 kW 1 2 v 1 5 kW Starter Bosch 12 v 2 2 kW 14V70A 14V70A 14v 80A 14V70A 14V70A Alternator Electrical system Model I 126 125 California 126 134 1 135 Federal Sales designation 300SDL Turbo 350 SD Turbo 350 SDL Turbo 603 970 Battery Voltage Capacity 1 2 v 62 Ah 1 2 v 62 Ah Starter Bosch 12 v 1...

Page 15: ...Crankcase and Cylinder Head 01 ...

Page 16: ...g and replacement of cylinder sleeves 115 Planing crankcase parting surface 120 Removal and Installation of steel balls in main oil duct 130 Replacement of freeze plugs in crankcase 140 Removal and installation of timing cover 2 1 0 Removal and installation of end cover 222 Removal and installation of oil pan 310 Repair notes for cylinder heads and cylinder head gaskets 400 Refinishing prechamber ...

Page 17: ...3 14600 92 14600 12314600 90 14600 120 4600 2497 602 911 84 0 187 0 602 961 Federal 5 201 128 84 0 187 0 602 962 Federal 5 124 128 2996 84 0 187 0 107 4600 14314600 603 960 124 133 124 193 6 300 TD Turbo 87 0 84 0 110 4600 148 4600 273 2400 201 2400 603 961 Federal 126 125 6 2996 87 0 184 0 107 4600 143 4600 265 12400 195 12400 603 961 126 125 6 2996 California 603 970 Federal 310 12000 228 12000 ...

Page 18: ...capsule at bottom of engine compartment rear 2 Noise capsule front and rear 1 2 Remove sheet metal screws arrows reinstall and remove capsule install Note Install engine compartment capsule so that edges of side part of capsule engage in bottom part of capsule 01 10 006 2 ...

Page 19: ... is risk of injury whenever the engine is running and the hood is open Opening hood 1 To unlock the hood pull the lever 533 on the left below the instrument panel in the direction of the arrow The hood opens to the safety hook stop Model126 Model 124 01 10 008 l ...

Page 20: ...er arm must not be pivoted forward when the hood is lifted Moving hood into vertical position Model 124 production up to August 1988 4 Push lock lever 537 on the left hood support 536 in direction of arrow Lift hood slightly upward to keep the lock lever 537 from reengaging again Repeat the preceding at the right hood support and set the hood in a vertical position 5 To close the hood push in lock...

Page 21: ...ood in a vertical position 7 To close the hood push the lock lever 538 at the left hood support in the direction of the arrow and close the hood by pushing down forcibly Model 201 8 Pull lock 541 on hood damper 540 in direction of arrow and set the hood in a vertical position 9 When the hood is set vertical a lock engages on the left hood support 10 Close hood Push in the lock lever arrow and clos...

Page 22: ......

Page 23: ...with engine at operating temperature Nozzle holder 1 remove install 07 230 Plug connector X27 for starter harness disconnect reconnect items 3 4 Note The plug connector X27 illustrated in the figure is installed on model 124 The installation point and version of the plug connector differs depending on the model 01 10 010 l ...

Page 24: ...ne over at least 9 revolutions with the shutoff lever on the injection pump pushed to stop items 8 9 Note Check compression in remaining cylinders in same manner Measured compression values compare with specified test values item 10 Note If one or more cylinders do not have the minimum compression determine cause Test values with engine at operating temperature approx 80 C bar Compression pressure...

Page 25: ...2 Remove all nozzle holders 07 230 Models 124 and 126 3 Connect contact handle for compression pressure recorder 001 589 78 21 00 disconnect plug connector X27 on left side of engine compartment and connect connection line 04 of contact handle to plug Kl50 with adapter line 124 589 36 63 00 05 602 589 00 6300 ol Model124 Model126 01 10 010 3 ...

Page 26: ...n line from contact handle to positive pole K130 on battery arrow 6 Crank engine a number of times with starter with transmission in neutral and shutoff lever on injection pump arrow pressed to stop to remove combustion residues in the precombustion chamber of the cylinder Note Always hold shutoff lever on injection pump depressed when cranking engine This prevents fuel from being pumped and there...

Page 27: ... 602 589 00 63 00 8 Crank engine at least 8 revolutions to test compression 9 Perform test on remaining cylinders in same manner 10 After completing the compression test compare pressures measured with specified values Note If one or more cylinders do not have the minimum compression pressure check cylinder for leakage 01 015 and determine cause 11 Install in reverse order 01 10 OlO ...

Page 28: ...all 07 230 Coolant expansion tank 1 AWarning Open cap 2 on coolant expansion tank only at coolant temperatures below 90 C Remove cap 2 install Add coolant if necessary items 3 4 Air cleaner on naturally aspirated engines 6 and on Turbo engines 3 remove air cleaner cover install item 5 Oil filler cap 5 remove install item 6 01 10 015 l ...

Page 29: ...ressure loss Total engine max 25 Valves and cylinder head gasket max 10 Piston rings max 20 Tightening torques Union nuts on injection lines reference value Nm 1 0 2 0 Nozzle holders in prechambers 70 10 Nozzle holders for angular injection 30 Special tool 1 000589650900 Commercially available tools Cylinder leakage tester e g Bosch EFAW 210 A Sun CLT 228 Adapters and connectors e g Bosch Order no...

Page 30: ...n retaining strap on air cleaner cover on naturally aspirated engines or unscrew hex head bolts on air cleaner cap on Turbo engines remove air cleaner cap and take out filter cartridge 6 Remove 011 filler cap 7 Move piston in cylinder to be checked to TDC ignition stroke 8 Bolt appropriate adapter 01 with straight or angular connector 02 into precombustion chamber of cylinder to be checked 9 Calib...

Page 31: ...e present the possible causes can be limited by spraying engine oil on the piston crown of the cylinder being tested The oil seals the gap between the piston and cylinder If pressure loss is no longer present for a short time the cause is in all probability the piston piston rings or cylinder running surface The position of the piston ring gaps can result in incorrect determination of the cause If...

Page 32: ...12 Perform test on other cylinders in engine ignition sequence lgnltlon sequence engme 602 r 0 153624 lgnttlon sequence engme 603 PO1 0117 13 13 Assemble in opposite order 01 10 01515 ...

Page 33: ......

Page 34: ...check visually for damage for this purpose insert the probe 01 of the illumination unit through the precombustion chamber bore into the cylinder Note When inspecting differentiate between Optical stripes and Scoring Optical stripes can result from the ring gap if honing marks are still visible the engine is okay Scoring marks honing marks no longer visible repair engine 01 10 02011 ...

Page 35: ...Commerciallvavailable tool Cylinder illumination unit e g Karl Storz Gmbt i D 7200 Tuttlingen Motoskop TW cold light with lens probes 103 26 CW 570 mm and 103 26 CT 210 mm 01 10 020 2 ...

Page 36: ...rally aspirated engines Air intake hose 5 Air cleaner cover 4 Turbo engines Intake hose 2 Radiator 16 Transmission oil lines I disconnect positive and negative terminals reconnect items 1 4 remove attach item 5 remove together with filter cartridge attach item 5 1 to exhaust gas turbocharger remove attach item 6 remove install 20 420 on vehicles with automatic transmission unbolt install and plug ...

Page 37: ...ocket 103 589 01 09 99 torque wrench 001 589 72 21 00 and holding tool 603 589 00 40 00 remove install 13 342 remove install 25 Nm item 12 Note Do not unbolt the refrigerant lines on the compressor Fasten compressor to chassis at side remove between engine and chassis disconnect reinstall item 13 for engine control unhook hook in item 14 unhook hook in item 15 Note Adjust control linkage 30 300 be...

Page 38: ...9 unbolt oil lines between cooler and engine reinstall item 24 PO l 0226 57 Turbo engine with automatic transmission and trailer hitch in combination with air conditioner Transmission oil air cooler 17 oil lines and hoses between cooler and engine remove replace item 25 Model 201 up to 03 85 Mount for engine stop 25 remove install 25 Nm item 26 Note Check engine stop adjust 130 Nm 22 220 adjustmen...

Page 39: ...n solenoid valve Y3 1 yl disconnect wire reconnect item 30 1 Speedometer shaft 19 or inductive speedometer sensor L2 remove reinstall item 31 Engine speed sensor L3 and starter ground strap remove reinstall item 32 Lateral exhaust support 23 remove reinstall item 33 Heat baffle plates 22 on center tunnel remove install item 34 Drive shaft 492 remove reinstall 40 Nm and 60 Nm item 35 Note Replace s...

Page 40: ...2 Only for engines with exhaust gas recirculation and side part on oil pan 3 1 st version color code black Specified viscosity classes for engine oil according to SAE for continuous ambient temperatures Exact adherence to the SAE class specified for the various ambient temperatures would result in frequent oil changes The temperature limits for the SAE classes should therefore be regarded as guide...

Page 41: ...ansmission flange 40 Hex nuts drive shaft on transmission flange engine 603 96 60 Hex head bolts drive shaft intermediate bearing 25 Clamping nut drive shaft intermediate bearing 30 40 Hex head bolts cross member center piece 45 Hex head bolts engine support rear 45 Hex head bolts engine mount rear 25 Hex nut engine mount rear 70 Adjustment bolt engine mount rubber rear 30 Allen bolt engine mount ...

Page 42: ...ard plate for unit compartment firewall Dimensions approx 320 X 380 X 1 Removal installation 1 Disconnect positive and negative cables on battery Models 124 and 126 2 Remove cable cover on unit compartment firewall for this purpose remove plastic screws arrows and remove cover Model 201 3 Remove cable cover on unit compartment firewall for this purpose remove rubber sealing strip 29 over cable cov...

Page 43: ...e intake hose to exhaust gas turbocharger 7 On vehicles with automatic transmission plug oil cooler lines with clamps 000 589 40 37 00 arrow 8 Remove radiator 20 420 Caution On vehicles with air conditioner attach guard plate to condenser immediately after removing radiator 9 Loosen and remove all coolant hoses between engine and chassis PlS 2os 13 P27 2048 13 01 10 03019 ...

Page 44: ...move Allen bolt arrow Remove fan Installation note Tightening torque 25 Nm Vehicles with air conditioning 12 Remove poly V belts 13 342 remove hex head bolts arrows for refrigerant compressor and attach refrigerant compressor at side on chassis Note Do not unbolt refrigerant lines on refrigerant compressor Installation note Tightening torque for hex head bolts on refrigerant compressor 25 Nm 13 Lo...

Page 45: ...g rod arrow on control shaft Installation note Adjust control cable 30 300 16 Disconnect all electrical lines between engine and chassis for this purpose disconnect plug connectors and connections 17 Disconnect plugs on oil pressure switch 43 and oil level sensor 44 18 Remove connection cables on starter 45 and remove harness from holder 46 above starter PO1 2454 13 01 10 030 11 ...

Page 46: ...pump or tandem pump using hand pump 112 589 00 72 00 22 Unscrew oil lines for power steering on power steering pump arrows or on tandem pump Installation note Tightening torque 30 Nm Replace oil which has leaked out Power steeringpump Vehicles with level control and orASB 23 Remove oil lines and hoses arrows for hydraulic pump or tandem pump between engine and chassis Hydraulic pump Tandem pump 01...

Page 47: ...er in right wheelhouse between radiator and engine Model 201 up to 03 85 26 Remove Allen bolts arrows on mount for engine stop and remove mount Installation note Tightening torque 25 Nm Check engine stop with adjustment gauge 201 589 04 23 00 and adjust 22 220 Tightening torque for adjustment bolt 130 Nm Model 201 up to 03 85 27 Remove engine shock absorber left for this purpose remove hex head bo...

Page 48: ... press shock absorber upward out of mount on frame cross member 49 Installation note Tightening torque 10 Nm Vehicles with manual transmission 29 Unhook shift linkage 21 on transmission 29 1 Unbolt hydraulic lines on clutch master cylinder arrow Installation note Bleed clutch master cylinder 01 10 030114 ...

Page 49: ...f transmission 31 Unbolt speedometer shaft or speedometer inductive sensor arrow and remove the two bottom hex head bolts for the starter Position speedometer shaft or connection wire to side 32 Unbolt engine speed sensor L3 and starter ground strap arrow on chassis 33 Remove hex head bolts arrows for lateral exhaust support on transmission and remove support 34 Unbolt heat baffle plates on center...

Page 50: ...nge Installation note Tightening torque 25 Nm 37 Loosen clamping nut 500 with open end wrench 126 589 00 01 00 SW46 or 201 589 00 01 00 SW41 and torque wrench 001 589 66 21 00 Push drive shaft back as far as possible in direction of arrow Installation note Tightening torque 30 40 Nm Model 126 38 Unbolt hex head bolts 51 on cross member center piece 50 and remove cross member center piece P41 2041 ...

Page 51: ...plate on unit compartment firewall 39 Fasten engine hoist cables to front and rear suspension eyes on engine Align engine hoist so that engine is positioned horizontally Suspension eye front Suspensioneye fear 01 10 030 17 ...

Page 52: ...ing torque Hex nuts 70 Nm Hex head bolts 45 Nm Check adjustment bolt on rubber mounts tightening torque 30 Nm 41 Remove Allen bolts for front engine mounts from frame cross member from bottom Installation note Tightening torque Model 124 and 201 Model 126 40 Nm 70 Nm Allenbolt engine mount left Allen bolt engine mount right P22 2012 n 01 10 030118 ...

Page 53: ...ay attention to rear suspension eye on engine and engine oil filter 43 Install in opposite order After installation 44 Check engine oil add if required or refill engine oil and fill up cooling system 44 1 Perform pressure test on cooling system 20 017 pressure tester 124 589 15 21 00 44 2 Start engine and check engine oil and cooling systems for leakage 01 10 030119 ...

Page 54: ...ntilation naturally aspirated engine standard version Engine 602 126 011 separator 127 Return pipe 140 Dlstrlbution pipe A Blow by gasses B Fresh am The crankcase ventilation on standard version naturally aspirated engines is a closed maintenance free system 01 10 04011 ...

Page 55: ...sses are distributed uniformly to all cylinders by the intake manifold and drawn into the combustion chambers together with the intake air The oil deposited in the oil separator runs back to the cylinder head through the return pipe 127 POl o155 57 Crankcase ventilation standard version turbo engines Engines 602 96 603 96 603 97 126 011 separator b To arr cleaner housmg A Blow by gasses B Fresh ai...

Page 56: ...il the blow by gasses flow from the cylinder head cover to the intake hose Naturally aspirated and turbo engines with exhaust gas recirculation a POl 0156 57 Crankcase ventilation on engines with exhaust gas recirculation Engine 602 91 126 011 separator 127 Return pipe 140 Dlstnbutlon pipe 141 Pressure control valve a Vent hole dia 3 mm A Blow by gasses f3 Fresh air 01 10 040 3 ...

Page 57: ...from that of the standard version by addition of a built in pressure control valve 141 The pressure control valve is required because on engines with exhaust gas recirculation an additional throttle valve installed in the intake system results in significantly higher vacuums If the vacuum were too high the engine oil would be sucked out of the crankcase The pressure control valve prevents this by ...

Page 58: ...ssure control valve is designed as a diaphragm type valve and built into the oil separator in the cylinder head cover A hole is present in the cylinder head cover to vent the diaphragm chamber in the pressure control valve arrow This hole must not be plugged by dirt or preservation agents 141a Diaphragm 142 Spring 143 Holder a Vent hole 01 10 040 5 ...

Page 59: ...te Because of increased pressure difference between the intake manifold and the crankcase a stronger compression spring 142 with a higher spring rate was used The following table indicates the vehicle and engine models in which the modified springs were first installed in addition to engines 602 962 and 603 970 beginning model year 1990 Production breakpoint 01 88 Model 124 133 124 193 124 128 126...

Page 60: ...N d _c _ POl 0158 57 Cylinder bores clean thoroughly Cylinder bore Measure cylinder bore diameter with internal measuring instrument at 3 measuring points c d e in longitudinal direction A and transverse direction B Note Compare measured cylinder bore diameters with standard or repair stage specifications for engine except for engines with cylinder sleeves 01 10 110 l ...

Page 61: ...r is equal to the wear max permissible wear 0 2 mm The original diameter can be measured at the piston top land after it has been cleaned thoroughly the top land is the area between the piston crown and the top surface of the block in the TDC position on ignition stroke oring and honing Engines without cylinder sleeves PO1 0231 37 Cylinder bore diameter 0 measure 01 10 110 2 ...

Page 62: ...in longitudinal and or transverse direction 0 2 mm Standard and repair stage diameter D for cyl nder bores Version Cylinder 1 G p code Standard Repair stage 0 7 mm 1 4 5 6 602 603 603 970 Cylinder dia D in mm Cylinder dia D in mm 87 000 87 006 89 000 89 006 over 87 006 87 012 over 89 006 89 012 over 87 012 87 018 over 89 012 89 018 87 700 87 706 89 700 89 706 87 706 87 712 89 706 89 712 87 712 87 ...

Page 63: ...h model or engine the new version was introduced Engine 603 970 was introduced into production without cylinder sleeves Installation of cylinder sleeves is not permissible Production breakpoint Commercially available tool Internal measuring instrument for 50 150 mm dia with 0 01 mm increments and measuring point pressure relief e g Hommel Handel D 5000 Koln 71 Sunnen Grm 2125 01 10 110 4 ...

Page 64: ...leeves 68 press out punch 603 589 00 15 00 item 1 Block 69 clean basic bores for sleeves and check diameter see table with internal measuring instrument items 2 and 3 Note If the permissible values are exceeded replace block Cylinder sleeves press in and maintain pressure for approx 7 seconds to seat sleeve punch 603 589 00 15 00 item 4 01 10 115 l ...

Page 65: ... over 87 012 87 018 Bore dia B 92 650 92 750 mm Bore dia ID 90 550 90 650 mm Bore dia E 90 000 90 935 mm Depth A sleeve seat 3 8 4 0 mm Depth C sleeve seat 4 77 5 23 mm Permissible out of round of basic bore in block 0 01 mm Permissible out of round and conicity of cylinder bore 0 07 mm Permissible roughness of cylinder bore R3Z Permissible waviness of cylinder bore l loning angle Roughness of blo...

Page 66: ... 71 pressure relief Sunnen Grm 2125 Replacement 1 Press out cylinder sleeves 2 Thoroughly clean basic bore 3 Measure basic bore D in block If the limits are exceeded see table the block cannot be reused 4 Position new cylinder sleeves and press in with press After pressing in cylinder sleeves maintain pressure for approx 7 seconds with press setting pressure POl 2253 13 01 10 115 3 ...

Page 67: ...ock parting surface Guide milling cutter or grinding wheel carefully over cylinder bores 6 Bore out cylinder sleeves in two steps Leave at least 0 03 mm additional material in the bores for honing 7 Chamfer cylinder sleeves 8 Hone cylinder bores 9 Measure cylinder bores and select matching pistons 01410 01 10 11514 ...

Page 68: ...checked and pistons removed 03 316 PO1 0233 57 Parting surface 1 plane according to operating instructions for planing tool used Note Observe specified dimensions and machining data Cylinder bores 2 ch amfer at top of cylinder After reassembly check engine timing 05 215 01 10 120 l ...

Page 69: ...ngitudial direction 0 06 in transverse direction 0 06 Permissible roughness of upper parting surface 0 006 0 016 Permissible deviation in parallel between upper parting surface and lower parting surface in longitudinal direction 0 05 Chamfer of cylinder bores see figure Distance between piston crown and block parting surface Projection max 0 965 Projection min 0 735 Cylinder bore chamfer I PO3 009...

Page 70: ... If not damaged the steel balls can be reinstalled a number of times In the event of leakage reseat steel balls approx 1 mm deeper dimension marked on punch Steel ball front 17 mm dia 10 knock out insert Punch 601 589 08 15 00 items 1 6 Note Leaky steel balls replace with plug remedy measures items 7 9 After reassembling engine warm up engine and check for leakage in area of steel balls Tightening...

Page 71: ...octite 241 002 989 94 71 Special tool Knocking out 1 Knock out both steel balls from rear toward front with suitable steel rod Note The steel balls can be reused a number of times Replace damaged balls under all circumstances Inserting 2 Thoroughly clean seat for block 3 Insert steel ball with slight on punch 601 589 08 15 00 steel ball in engine quantity of grease POl 2267 13 01 10 13012 ...

Page 72: ...fficiently after inserting or if leakage is present following leakage test replace steel ball with plug Replacing steel ball with plug 6 Knock steel ball out again 7 Cut thread in hole for leaky ball Note Front bore M 18 X 1 5 10 m m deep Rear bore M 16 X 1 5 14 mm deep 8 Thoroughly clean oil duct screw in front plug with gasket and rear plug with sealant 002 989 94 71 tightening torque 50 Nm 01 1...

Page 73: ...4 mm dia 8 Freeze plug front 17 mm dia 8a Freeze plug rear 34 mm dia 11 Freezeplugs 8 8a 8b 11 PlB 2036 131 Freeze plug right 34 mm dia 8b remove knock in Installation punch 102 589 12 15 00 17 mm dia or punch 102 589 00 15 00 34 mm dia items 1 6 Note Seal freeze plugs with sealant 002 989 94 71 Allow sealant to harden for approx 45 minutes 01 10 14011 ...

Page 74: ...Note The number of freeze plugs differs on the individual engine models The figure shows engine model 603 as an example Sealant Loctite 241 002 989 94 71 Special tools 102 589 12 15 00 102589001500 01 Removal 1 Position chisel with small blade or screw driver in deep drawn edge of freeze plug 01 10 14012 ...

Page 75: ...ce must be free of grease Installation 5 Coat sealing surface with sealant 002 989 94 71 6 Knock in new freeze plug with install ation punch 102 589 12 15 00 17 mm dia or 102 589 00 15 00 34 mm dia Caution Allow sealant to harden for approx 45 minutes before filling coolant 7 After reassembling engine allow engine to warm up and check for leakage at new freeze plug installed 01 10 140 3 ...

Page 76: ...lt tensioning device removed 13 345 Piston vacuum pump removed 43 618 Power steenng pump or tandem pump removed 46 710 Hydraulrc pump on cylinder head removed 05437 Alternator removed 15 510 Engtne 011 drained POl 0250 57 Air conditioning Condenser Caution Attach guard plate Cylinder head cover 125 remove if not yet removed install 10 Nm item 1 Note On turbo engines the charge air pipe must be rem...

Page 77: ...el 126 and remove mount install 45 or 25 Nm item 4 I mark position and unbolt reinstall item 5 Note Check TDC sensor adjustment readjust if required 03 345 remove reinstall 25 Nm item 6 remove Note install 10 Nm item 7 Check engine stop adjust 130 Nm 22 220 adjustment gauge 201 589 04 23 00 Engine shock absorbers 24 left and right remove install 10 Nm item 8 Front suspension eye on engine hook in ...

Page 78: ...all 25 Nm item 17 remove install item 17 Caution When removing timing case cover pay attention to cylinder head gasket and oil pan gasket Avoid damaging Replace damaged cylinder head gasket Note Clean parting surface on timing case cover seal cover with sealant 001 989 95 20 Check crankshaft radial seal in timing case cover remove if required install sleeve 601 589 03 14 00 item 17 After installat...

Page 79: ...olts cylinder head cover 10 Cylinder head bolts in timing chain case 25 Hex head bolts mount alternator 45 Hex head bolts oil pan M6 10 M8 25 Hex head bolts for mounting injection pump 25 _ Hex head bolts for mounting timing case cover 25 Hex head bolts for engine shock absorber mount 10 Hex nuts engine shock absorber 10 Decial tools 601 589 03 14 00 03 001 589 66 21 00 00 01 10 21014 ...

Page 80: ...Hazet D 5630 Remscheid Order no 426 7 _ ____ Self made tool _ _ _ Guard plate for air conditioner condenser Dimensions approx 480 x 600 x 1 Removal installation Caution On vehicles with air conditioning attach guard plate to condenser before starting work 1 Remove cylinder head cover if not already removed Installation note Tightening torque 10 Nm Note On turbo engines the charge air pipe arrow mu...

Page 81: ...x head bolts arrows on mount for alternator and remove mount Installation note Tightening torques Mounting bolts for mount Mounting bolt on timing case cover 45 Nm 25 Nm 5 Mark position of mount for TDC sensor 42 or 44 and unbolt mount Installation note Check TDC sensor and adjust if required 03 345 01 10 210 6 ...

Page 82: ...tment bolt 130 Nm Model 201 up to 03185 7 Remove engine shock absorber on left remove hex head bolts arrows on mount and remove engine shock absorber from frame cross member Installation note Tightening torque 10 Nm Model 126 8 Remove engine shock absorbers 24 on left and right unscrew hex nuts 50 and press shock absorber upward out of mount on frame cross member 49 Installation note Tightening to...

Page 83: ... eye arrow 10 Remove Allen bolts for front engine mount from frame cross member from bottom Installation note Tightening torque Model 124 and 201 Model 126 40 Nm 70 Nm Allen bolt engine mount left Allen bolt engine mount right Pi 2012 13 01 10 21018 ...

Page 84: ...ining bolts Installation note Tightening torque M6 10 Nm M8 25 Nm 14 Lower engine back onto front engine mounts 15 Remove hex head bolts arrows for mounting injection pump Remove square nuts on injection pump flange Installation note Tightening torque 25 Nm L _ I PO 2212 13 16 Remove Allen bolts arrows in timing chain case Installation note Tightening torque 25 Nm POl 2365 13 I 01 10 210 g ...

Page 85: ...s Installation note Clean gasket residues off of parting surface on timing case cover Check crankshaft radial seal in timing case cover and replace if required installation sleeve timing case cover Tightening torque 601 589 03 14 00 Coat parting surface of sealant 001 989 25 20 25 Nm 18 Assemble in opposite order 19 After installation warm up engine and timing case cover for leakage with check POl...

Page 86: ...attons Flywheel removed 03 410 d 22 PO1 0139 15 Hex head bolts 55 in oil pan remove reinstall 25 Nm item 1 Hex head bolts 21 Hex head bolts 21 in end cover 20 remove reinstall 10 Nm item 2 Note Coat threads of hex head bolts with sealant 002 989 20 10 01 10 222 l ...

Page 87: ...dues off of parting surface on end cover and coat parting surface of cap with sealant 002 989 00 20 10 Check crankshaft radial seal and remove if required install installation sleeve 601 589 03 43 00 Sealant Omnifit 002 989 00 20 10 Tightening torques Nm Hex head bolts end cover 10 Hex head bolts oil pan 25 Special tools 601 589 03 43 00 001 589 72 21 00 03 00 01 10 2221 2 ...

Page 88: ...over off of crankcase at tabs arrows and remove crankshaft radial seal from crankshaft journal Note When pressing the end cover on and off avoid damagingthe oil pan gasket Installation note Clean gasket residues off of parting surface on end cover Check crankshaft radial seal and re place if required Coat parting surface on end cover with sealant 002 989 00 20 10 and slide end cover together with ...

Page 89: ......

Page 90: ...01 006 Model 124 and 201 Torsion bar on front axle removed Models 124 201 126 and 201 128 Steer rod left and steer shock absorber right rem Fan cowl loosened Q5b PO1 0238 57 Battery disconnect negative cable reconnect item 1 Engineoil drain fill item 2 Note Tightening torque for oil drain plug 3 25 or 30 Nm Observe specified oil capacity 01 10 310 l ...

Page 91: ...ove install 10 Nm item 4 remove install 10 Nm item 5 remove reinstall item 6 disconnect plug reconnect item 7 between transmission and oil cooler or transmission air oil cooler unbolt at oil pan install and remove at radiator reinstall item 8 Note Plug oil lines before removal clamp 000 589 40 37 00 remove install item 9 Note Replace gasket 45 for oil pan side section Tightening torque for hex hea...

Page 92: ...s Round handle 1 1 st version color code red 2nd version color code black 3rd version color code brown 2 Only for engtneswith exhaust gas recirculation and side section on 011 pan 3 1 st version color code black Tightening torques Nm Oil drain plug on oil pan M 12X1 5x13 3 0 M 14X1 5x22 2 5 Allen bolts mount engine stop front 10 Adjustment bolt engine stop front 130 Hex nuts engine shock absorber ...

Page 93: ...ry 2 Drain engine oil Installation note Tightening torque for oil drain plug M 12x1 5x13 30 Nm M 14X15x22 25 Nm Observe specified oil capacity when filling engine Model 201 up to 03185 3 Remove Allen bolts arrows on mount for front engine stop and remove mount Installation note Tightening torque 25 Nm Check engine stop with adjustment gauge 201 589 04 23 00 and adjust 22 220 Tightening torque for ...

Page 94: ...ross member Installation note Tightening torque 10 Nm Model 126 Remove engine shock absorbers 24 left and right unscrew hex nut 50 and press shock absorber upward out of mount on frame cross member 49 Installation note Tightening torque 10 Nm 6 Unbolt engine speed sensor L3 and ground strap for starter arrow on chassis PO1 024915 01 10 31015 ...

Page 95: ...oil cooler clamp 000 589 40 37 00 screw oil lines off of oil pan and radiator Installation note Check transmission oil level add if required POl 2373 13 POl 0143 53 Oil pan with attached side section 9 Remove hex head bolts 41 and remove oil pan side section 45b together with gasket 45c Installation note Replace gasket 45 Tightening torque 10 Nm 01 10 31016 ...

Page 96: ...e Allen bolts for front engine mount from frame cross member from below Installation note Tightening torque Model 124 and 201 Model 126 40 Nm 70 Nm Allen bolt enginemount left Allen bolt engine mount right 12 Lift engine at front with engine hoist as far as possible 01 10 31017 ...

Page 97: ...oil pan 45 from crankcase toge ther with oil pan gasket 45a remove oil pan toward front of vehicle turn crankshaft slightly if required Installation note Clean gasket residues off of parting surface on oil pan Replace oil pan gasket 15 Assemble in opposite order 16 After assembly warm up engine and check oil pan for leakage 45a PO 1 023913 01 10 31018 ...

Page 98: ...the higher combustion pressures On turbo engines the diameter d of the pre combustion chamber bore is 15 mm on naturally aspirated engines 14 mm The cylinder heads on turbo engines are pro vided with an identification strip This identi fication strip arrow is located on the parting surface for the cylinder head cover at the front right Caution Do not mix up cylinder heads for turbo engines and nat...

Page 99: ...the cylinder head gaskets with stainless steel inserts are available as replacement parts for both the naturally aspirated and turbo engines Cylinder head gasket with Viton sealing ring A Viton sealing ring is inserted at the rear oil return passage to prevent oil leakage A 1st version with sheet metal jacket B 2nd version with V ton sealing ring Production breakpoint 03 87 W1 0124 13 Engine end n...

Page 100: ... bolt length is M 8 x 50 pre viously M 8 x 30 Production breakpoint 09 87 Engine end no Vehicle ident end no 201 126 1602 911 1052292 011264 I not avadable Production change for protection against cracks in water jacket The bolt flutes on the exhaust side have been reinforced and the recesses hollows between the coolant ducts on the outlet side filled to prevent cracks in the cylinder head water j...

Page 101: ...e at the rear right to better prevent water and oil leakage Production breakpoint 1 O 88 manual transmission Engine end no automatic transmission Vehicle ident end no not available Production breakpoint 05189 not avallable Production breakpoint 09189 Model Engine manual transmission Engine end no automatic transmission Vehicle ident end no iO1 1261602 911 1083460 016487 I not available 01 10 40014...

Page 102: ...head gasket engines 602 603 except for engine 603 970 The combustion chamber insert dotted line has been modified at the 1st cylinder on the cylinder block side POl 0070 13A not avadable not avadable 01 10 40015 ...

Page 103: ...d Silicone sealing strip position changed on both sides A 1st version Gotze B 2nd version Elrmg not available Improvement to passage supports in water jacket The passage supports in the cylinder head water jacket were improved on the turbo engines not available 01 10 400 6 ...

Page 104: ...nd exhaust passages have been reinforced Modified cylinder heads can be recognized by the cast no on the intake side see table Engine previous cast no new cast no 602 602 016 03 01 602 016 07 01 602 Turbo 602 016 06 01 602 016 08 01 603 Turbo 603 016 15 01 603 016 17 01 not avadable not avadable 01 lO 400 7 ...

Page 105: ...reased to reduce the thermal load in the cylinder head Production breakpoint 06 88 Model Engine Engine end no Vehicle ident end no manual automatic transmission transmission A F 126 1 1603 970 If rom start of production I 201 126 1602 911 065342 013489 I not avadable 01 10 40018 ...

Page 106: ...ug or seal off toward combustion chamber item 2 Countersinking tool 601 589006600 01 02 03 bolt into precombustion chamber mounting bore to be refinished down to stop items 3 4 Interval X measure between top of shaft 01 and top of sleeve 02 item 5 Note When the cylinder head is installed measuring interval X replaces measuring the projection dimension C 01 10 410 l ...

Page 107: ...uired spacer ring Countersinking tool unscrew and clean chips out of mounting bore item 8 Engine turn over with starter to throw out any chips which may have got into the combustion chamber item 9 Spacer ring select according to difference in measurements and install item 10 Note See table for thicknesses of available spacer rings Refinished precombustion chamber mark with punch in area of mountin...

Page 108: ... before this can be recognized by the markings punch marks in the area of the prechamber mounting bores or on the spacers installed In this case it is necessary to remove the cylinder head to refinish again The prechamber projection dimension C 7 6 8 1 mm can only be measured precisely with the cylinder head removed Maintenance of this projection dimension ensures that the necessary distance betwe...

Page 109: ...ustion chamber e g with rag so that chips cannot get into the combustion chamber 3 Remove protective sleeve from countersinking tool 601 589 00 66 00 4 Install countersinking tool 601 589 00 66 00 into the prechamber mounting bore to be refinished down to the stop 5 Measure interval X between top of shaft 01 and top of sleeve 02 and note value Note When the cylinder head is installed measuring the...

Page 110: ...ng Example Calculate material removed Dimension before refinishing Dimension after refinishing 25 7 mm 25 5 mm Material removed 0 2 mm Note In this example the thickness of the spacer ring to be installed is 0 3 mm Select the spacer ring so that it is at least 0 1 mm thicker and max 0 3 mm thicker than the amount of material removed 8 Remove countersinking tool 601 589 00 66 00 and remove chips No...

Page 111: ...turn over engine with starter to throw out any chips which may have got into the combustion chamber 10 Insert proper spacer ring 11 Mark cylinder head with punch mark above each prechamber seat refinished arrows 12 Install in reverse order 01 10 41016 ...

Page 112: ... Remove cylinder head only after engine has cooled off Battery 120 disconnect negative cable if not already disconnected item 1 Naturally aspirated engines Air intake hose 11 and air cleaner cover 10 _ if not already removed remove together with filter cartridge install item 2 Turbo engines Intake hose 1 to exhaust gas turbocharger remove install item 3 Fuel filter 12 remove install items 4 5 35 3...

Page 113: ...ve line to air guide housing install items 7 33 Side exhaust support 5 on transmission unbolt bolt on 25 Nm items 8 32 Exhaust pipe 4 unbolt from exhaust manifold 3 bolt on 25 Nm items 9 31 Pipe elbow 7 for heater feed remove install items 10 11 29 Note Replace O ring Glow plugs unbolt connection lines 9 bolt on items 12 37 Intake manifold 8 on naturally aspirated engines or charging air manifold ...

Page 114: ... 589 02 34 00 and threaded insert 123 589 00 34 00 items 14 30 PO1 4244 57 Note When installing coat collar on slide rail bolts with sealant Slide rail 15 for timing chain remove from timing chain case install items 15 28 Allen bolts 16 in area of timing chain case unbolt bolt on 25 Nm items 16 27 01 10 415 3 ...

Page 115: ... 22 Note Clean parting surfaces on cylinder head and check for cracks Install cylinder head with new gasket After assembling engine check cooling and engine oil systems for leakage item 38 Tightening torques and rotation angles tightening in stages Nm Cylinder head bolts with 12 point Initial tightening torque Stage 1 15 Allen head engine cold Stage 2 35 Rotation angle Stage 3 90 Interval for sett...

Page 116: ... head bolt dimensions and maximum permissible lengths L New state Max permissible length L in mm M 10x80 83 6 M 10x102 1056 M 10x115 118 6 Tightening sequence engine 602 Tightening sequence engine 603 01 10 41 ...

Page 117: ...21 00 00 Commercially available tool 7 mm hex socket on flexible shaft for hose clamps with worm drive e g Hazet D 5630 Remscheid Order no 426 7 Removal AWarning Remove cylinder head only when engine is cool 1 Disconnect negative cable on battery 01 10 41516 ...

Page 118: ...r with filter cartridge if not already removed Turbo engines 3 Remove intake hose to exhaust gas turbocharger 4 Disconnect fuel lines arrows from fuel filter and remove lines from fuel filter 5 Unbolt hex head bolts 116 from fuel filter and remove fuel filter from cylinder head 01 10 415 7 ...

Page 119: ...gas recirculation naturally aspirated engines 7 Remove line arrow from exhaust gas recirculation valve to air guide housing 8 Unbolt hex head bolts 1 for side exhaust support 5 from transmission Loosen hex nuts 2 on exhaust pipe 9 Unbolt exhaust pipe at exhaust manifold 01 10 415 8 ...

Page 120: ...head 14 Knock slide rail bolts 221 222 out of cylinder head with impact puller 116 589 20 30 00 threaded rod 116 589 02 34 00 and threaded insert 123 589 00 34 00 Note If the slide rail bolts are too tight puller 115 589 20 33 00 can also be used 15 Remove slide rail for timing chain from timing chain case 16 Remove M 8 x 30 Allen bolts arrows from the area of timing chain case Note Longer bolts M...

Page 121: ... the length L exceeds the maximum dimension use new cylinder head bolts for installation Installation 21 Position new cylinder head gasket on cylinder block 22 Position cylinder head Note When positioning the cylinder head use fitted sleeves for locating cylinder head 23 Oil threads and head contact surface of cylinder head bolts 24 Install cylinder head bolts by hand making note of different bolt...

Page 122: ... 1 7 9 15 17 21 M 10x115 a Timing case area M 8x30 or M 8x50 b Fuel filter M 8X80 Engine 603 Bolt diagram Hole Bolt size 3 5 11 13 19 21 M 10x80 2 4 6 8 10 12 14 16 18 M 10x102 20 22 24 26 1 7 9 15 17 23 25 M 10x115 a Timing case area b Fuel filter M 8x30 or M 8x50 M 8x80 PO1 0128 13 01 10 41511 ...

Page 123: ... and rotation angles for cylinder head bolts Stage 1 15 Nm Stage 2 35 Nm Stage 3 90 Setting time 10 min Stage 4 90 27 Tighten Allen bolts arrows in area of timing chain case tighten in specified sequence tight ening torque 25 Nm 28 Install slide rail for timing chain in timing chain case and knock in slide rail bolts 221 222 Note Coat collar on slide rail bolts with sealant 01 10 415 12 ...

Page 124: ...ntake manifold naturally aspirated engines or charge air manifold turbo engines 14 180 31 Bolt exhaust pipe onto exhaust manifold tightening torque 25 Nm 32 Bolt side exhaust support 5 onto transmission Tighten hex head bolts 1 and hex nuts 2 tightening torque 25 Nm Engines with exhaust gas recirculation naturally aspirated engines 33 Attach line arrow from exhaust gas recirculation valve to air g...

Page 125: ...ll fuel filter tighten hex head bolts 116 36 Connect fuel lines 37 Bolt connection lines onto glow plugs 38 After assembling engine check cooling and oil system for leakage after warming up engine Note It is not necessary to retorque the cylinder head bolts 01 10 41504 ...

Page 126: ...gular Injection example engine 601 example engine 601 Glow plugs R9 remove reinstall 20 2 Nm item 1 Vertical injection Threaded ring 112 remove reinstall 90 110 Nm pin wrench 615 589 00 07 00 item 2 AWarning When screwing in or out assure that the pin wrench is seated in the grooves in the threaded ring 01 10 417 l ...

Page 127: ...te Install prechamber so that the lug on the collar of the prechamber is located in the recess in the cylinder head Prechamber mounting bore in cylinder head clean check and cover item 5 Note Refinish prechamber sealing surface if required 01 410 Prechamber survey 601 09 or 23 601125 601 26 603 9622 603 9702 starting 09188 601 30 With exhaust gas recmulatlon startmg 02 89 01 10 417 2 ...

Page 128: ...entiation vertical and angular injection A Prechamber vertical injection Code 601107 601117 601 09 601123 F O10112 17 B Prechamber angular injection inclined 5 Code 601 l 4 601 05 x Cone y Recess 01 10 417 3 ...

Page 129: ...e 601125 601 26 601130 x Cone y Recess Differentiation combustion neck diameter The individual combustion neck diameters d differ on naturally aspirated engines and turbo engines d 14 mm naturally aspirated engines d 15 mm turbo engines PO50130 15 01 10 4174 ...

Page 130: ...Combustion bore L Combustion bore M Combustion bore N Combustion bore 0 Bore for glow plug __ 601107 or 17 601 109 or 23 790 770 14 0 150 195 195 372 392 390 390 290 290 10 o 10 o POl O136 15 601 14 25 7 O 14 o 178 390 370 2 5 10 o 601115126 790 15 o 198 370 390 2 5 10 o 601130 790 15 o 178 390 390 2 5 10 o Tightening torques Glow plugs Threaded ring vertical injection Threaded ring angular inject...

Page 131: ... I Removal installation 1 Remove glow plugs R9 Installation note Tightening torque 20 2 Nm Vertical injection 2 Bolt threaded end 03 of pin wrench 615 589 00 07 00 into threaded ring of prechamber PO5 2132 13 01 10 417 6 ...

Page 132: ...ve 02 with hex head bolt 01 2 3 Remove threaded ring with open end wrench on hex end of sleeve 02 Installation note Oil threaded ring Tightening torque 90 110 Nm Angular injection 3 Remove threaded ring with splined wrench 603 589 00 09 00 Installation note Oil threaded ring Tightening torque 70 Nm 4 Bolt impact puller 602 589 00 33 00 into prechamber and knock out prechamber 01 10 417 7 ...

Page 133: ...mbers Note The spherical pin must not be burned or scaly If the combustion tips are burned or cracked in the bottom section of the prechamber check the following 1 Oil level at oil temperature of approx 80 C If the quantity of oil in the oil pan is too high correct oil level 2 Check piston vacuum pump for damage or replace vacuum box on injection pump To determine with component is unfit for use c...

Page 134: ...moved 01 417 Cylrnder head pressure tested 01 420 1 Mating surface 1 Valve seats 2 refinish until minimum interval a is reached 05291 After assembly check engine timing 05215 PO1 Xl246 57 plane according to operating instructions of tool manufacturer Note Observe permissible minimum height H and machining data 01 10 418 l ...

Page 135: ...e in mm 2 Minimum distance a recess with new valves and new valve seats in mm Intake Exhaust 0 1 to 1 0 Max distance a recess with new valves and machined valve seats in mm Intake Exhaust 1 0 1 It IS not permwble to machine the upper mating surface of the cylinder head Commerciallv available tools Cylinder head clamping fixture e g Hunger D 8000 Munchen 70 Order No 211 60 000 Valve seat machining ...

Page 136: ...aring basic bores D measure Note It is only possible to rebore the camshaft bearing bores once to max 0 5 mm oversize Observe repair stage dimensions Camshaft bearing basic bores D bore out according to operating instructions for tool used Caution When boring ensure that the mating surface at the rear of the cylinder head cover and the mount for the sealing plate at the front are not damaged 01 10...

Page 137: ...ring diameter D 30 95 31 04 Journal diameter Dl 29 934 30 95 Repair stage Camshaft bearing diameter D 31 45 31 54 Journal diameter Dl 31 434 31 45 Camshaft bearing bores Roughness 0 003 0 006 Permissible out of round 0 012 New value Wear limit Bearing play radial 0 050 0 091 0 15 axial 0 030 0 100 0 15 Note If bearings have seized or are scored deeply the camshaft bearings in the cylinder head can...

Page 138: ...lt onto cylinder head with rubber sealing plate 601 589 00 25 00 unbolt Connection for cooling water return fitting and heater feed line on cylinder head plug tightly Compressed air connect to fitting 3 on pressure plate and allow compressed air to flow into cylinder head at pressure of 2 bars Cylinder head 1 with pressure plate 2 fasten to suspension device 115 589 34 63 00 and immerse in water p...

Page 139: ...k locate exit point for air bubbles more precisely if possible Data Test pressure with air under water 2 bar Special tools 601 5890100 25 00 115 589 34 63 00 0 l Commercially available tool Electrically heated water basin e g Otto Dtirr D 7123 Sachsenheim Ochsenbach 01 10 420 2 ...

Page 140: ......

Page 141: ...ion of crankshaft and connecting rod bearings 320 Modifications to crankshaft 321 Replacing front crankshaft radial sealing ring 324 Removal and installation of pilot bearing in crankshaft 330 Removal and installation of crankshaft pulley and hub 341 Checking and correcting adjustment of TDC sensor 345 Removal and installation of crankshaft sprocket 350 Removal and installation of flywheel and dri...

Page 142: ...olts initially tighten to 30 Nm and then tighten to rotation angle of 90 100 AWarning Do not use torque wrench with flexible shaft for rotation angle tightening Note Estimate angle of rotation For this purpose insert adjustable torque wrench in break position locked into ratchet Position adjustable torque wrench with plug in ratchet lengthwise in relation to engine and continue to turn until it is...

Page 143: ... 9x1 Necked down shaft dia c in new condition 7 4 0 1 Minimum necked down shaft dia c Length L in new condition 52 0 3 Tightening torques and rotation angles Initial tightening torque Rotation angle Special tool 001 589 72 21 00 00 03 10 31012 ...

Page 144: ...ove 30 Nm item 1 Basic bore D measure max 51 619 mm if dimension is exceeded machine bearing cap down max 0 02 mm item 2 Connecting rod bushing 169 press in approx 2450 N and machine or ream out items 3 4 Connecting rod 166 touch up lateral thrust surfaces item 5 Connecting rod 166 square with connecting rod tester items 6 8 Caution The connecting rod bearing bore and connecting rod bushing bore m...

Page 145: ... Engine 603 96 30 500 602 96 30 525 1 st version 29 560 29 600 Connecting rod bushing 0 2nd version 28 575 28 600 Engine 603 96 30 575 30 600 Connecting rod bushing 0 D 2 1 st version 27 018 Engine 27 024 602 91 2nd version 26 000 26 000 Engines 602 96 603 96 97 28 000 28 000 Roughness of connecting rod bushing inside 0 005 Permissible offset of connecting rod bearing bore in relation to connectin...

Page 146: ...d connecting rods Connecting rods which have been overheated due to a damaged bearing blue discoloration cannot be reused Matching connecting rods and connecting rod bearing caps are marked arrow The connect ing rod shafts should not have any transverse score marks or notches Replacement connecting rods are supplied with machined connecting rod bushings PO3 0099 15 PO 2088 13 Connecting rod width ...

Page 147: ...ated before machining to reduce the tendency to warp Production beakpoint 1 l 85 not registered Engine 603 960 starting 01188 On these engines there are 3 bores arrows with a dia of 4 5 mm in the connecting rod eye for lubrication of the piston pin P03 0101 13 03 10 313 4 ...

Page 148: ...quipped with 2 bores arrows with a dia of 4 5 mm Engines 602 91 603 91 Shaft cross section of piston rods reduced stan dardized with M 102 and material changed 49 Mn VS 3 was CK 45 V 7 50 Production breakpoint 09 12 86 not reglstered Engine 602 91 Shaft cross section was changed back material 49 Mn VS 3 03 10 31315 ...

Page 149: ...89 66 21 00 00 Commercially available tools Connecting rod straightener e g Hahn Kolb D 7000 Stuttgart Model BC 503 Runout gauge e g Carl Mahr D 7300 Esslingen Model 844 N Reconditioning 1 Install connecting rod bearing cap without connecting rod bearing For this purpose lubri cate threads and bolt head contact surface and tighten to 30 Nm 03 10 31316 ...

Page 150: ...rust surfaces of connect ing rod 166 on surface plate Dl 02 165 165 a 166 167 168 169 B D L Connectmg rod bushing basic bore Connectmg rod bushmg 0 Upper connecting rod bearmg shell Lower connecting rod bearmg shell Connecting rod Sleeve Connecting rod bolts Connecting rod bushing Connecting rod width Basic bore Center of connecting rod bearing bore to center of connecting rod bushing bore Squarin...

Page 151: ...8 Check offset of connecting rod bearing bore in relation to connecting rod bushing bore and correct if required 03 10 31318 ...

Page 152: ...ting rod bearing shells 165 165a remove oil connecting rod bearing position connecting rod bearing cap 166 a so that code numbers match on connecting rod 166 item 11 remove together with connecting rod 166 toward top item 2 check piston rings 178 179 180 for easy motion check gap tolerance and axial play Oil piston and cylinder Caution Do not heat piston Attach clamping strap 000 589 04 14 00 and ...

Page 153: ...nce between connecting rod and crankshaft item 13 move to TDC and measure distance between piston crown and crankcase mating surface item 14 Projecting length max 0 965 mm Projecting length min 0 735 mm Cross reference pistons cylinders Engine Piston code number 602 96 603 96 09 01 ooq 134 Group code letter Piston dia Cylinder dia A 86 970 86 976 87 000 87 006 upon 86 982 86 988 upon 87 012 87 018...

Page 154: ...ines 602 961 603 96 27 995 28 000 Distance piston pin eye 1 st version 2nd version 22 05 22 35 24 1 24 3 Piston pin clearance in piston Connecting rod in piston end play 1 st version 0 126 0 274 2nd version 0 050 0 402 Groove 1 0 25 0 45 1 0 Piston ring gap clearance Groove 2 0 20 0 40 1 0 Groove 3 0 20 0 40 1 0 Groove 1 0 090 O 122 0 20 Piston ring side clearance Groove 2 0 050 0 085 0 15 Groove ...

Page 155: ...nnecting rod 166 together with piston 177 in upward direction Caution Do not mix up upper and lower connecting rod bearing shells 165 165a 175 Piston pm 176 Piston pm retainer 178 Piston ring 179 Piston ring 180 Piston ring 3 Remove piston pin retainer arrow and press out piston pin remove piston from connecting rod 4 Recondition and square connecting rod 03 313 175 c 165 33 165a ____ 168 PO3 0105...

Page 156: ...cylinder bores with group code letters A or 6 When repairing hone cylinder bores according to dimensions of present pistons X plus piston clearance 5 Position piston on connecting rod so that arrow 1 points toward front of vehicle and retaining grooves 2 in connecting rod point toward left side of engine Caution Do not heat pistons 6 Coat piston pins with oil and press in by hand PO3 2106 03 10 31...

Page 157: ... circumference of piston 10 Attach clamping strap 000 589 04 14 00 and install piston The arrow on the piston crown must point toward the front of the vehicle 11 Position connecting rod bearing caps on connecting rods with codes arrow on same side 12 Check connecting rod bolts replace and tighten 03 310 13 Turn crankshaft and check clearance between connecting rod and crankshaft 14 Measure distanc...

Page 158: ...ular oil pockets previously flat oil pockets for improved lubrication Production breakpoint 08 85 not reglstered Engine 602 91 The piston skirt has been provided with a larger recess arrow for better clearance on engines with oil injection nozzles or exhaust gas recirculation P03010313 03 10 317 l ...

Page 159: ...ton code 16 Mahle co Piston code 17 Alcan co 178 Bevelled rrng with expander 3 mm thick running surface chrome plated 179 Taper face ring with lnstde bevel 2 mm thrck running surface chrome plated 180 Rectangular nng 2 5 mm thick running surface chrome plated These pistons can also be installed in engines with cylinder sleeves PO3 0104 13 17a0 179 2iiffE Q c PO3 0104 13 Engine 602 91 Temporary ins...

Page 160: ...Piston code 14 KS co not reglstered Production breakpoint 06 88 Piston code 14 KS co l not reglstered Production breakpoint 1 l 88 Piston code 14 KS co Model Engtne Engine end No Vehicle ident end No manual automatic transmission transmission A F 201 126 067047 to 013749 to t 070443 014296 not registered 03 10 317i3 ...

Page 161: ... 88 Piston code 14 KS co l not reglstered Engines 602 961 603 96 97 starting 12 87 turbo Piston pins The size of the piston pin has been increased to reduce the surface pressure Engine 602 961 603 96 Dl 28 mm 02 13 5 mm L 70 mm Engine 602 91 01 26 mm 02 14 mm L 55 mm PO3 0165 13 03 10 317t4 ...

Page 162: ... annular channel is deleted on engine 603 970 Only the piston crown is supplied with oil A recess is located on the piston skirt arrow for the oil injection nozzle The prechamber recess in the piston crown has a diameter of 18 mm normally aspirated engine 17mm Piston crown On engines 602 96 and 603 97 from the start of production and on engine 603 96 starting 08188 moose horn recess pistons are in...

Page 163: ...es 00 Engine 602 96 13 Engine 603 96 rings B Star recessed piston PO3 0107 w PO3 0104 13 178 179 180 Bevelled nng with expander 3 mm thick runntng surface chrome plated 1 Taper face ring wtth inside bevel 2 mm thick 1Rectangular nng with InsIde bevel 2 5 mm thick running surface molybdenum coated 03 10 317 6 ...

Page 164: ...rescent powder magnaflux or use penetration method perform with impact hardness tester 000 589 20 21 00 Distance A 5 6 mm when hardening journals without hardened fillets maintain distance A between hardened runout and fillet radius Journals can be hardened inductively or with flame Caution Harden journals with hardened fillets arrows inductively only 03 10 318 l ...

Page 165: ... 25 032 I_ 27 00 25 00 56 950 46 950 4th repair stage 56 965 46 965 Up to 06184 2 Stafttng 07184 Test values Permissible deviation of crankshaft main and rod journals in mm I 0 005 Permissible conicity of crankshaft main and rod journals in mm I 0 01 Permissible roughness of crankshaft main and rod journals Ra in mm I 0 005 0 015 Permissible deviation of flywheel flange from true in mm I 0 02 Perm...

Page 166: ... Special tool Note When testing and reconditioning crankshafts proceed in sequence shown in diagram below 03 10 31813 ...

Page 167: ...Diagramm A Testing grinding Visual check Heavy damage Crack test Cracks present I Yes I No Hardness test All bearing journals Scleroscope hardness min 55 on 213 of journal circumference 03 10 31814 ...

Page 168: ...ournals Check whether regrinding is still possible within last specified repair stage 4 Yes I No I Scrap I Grind crankshaft Crack test Cracks present Lapping Dimension check Dimensions okay Yes I No 03 10 31815 ...

Page 169: ... Hardening Check whether regrinding is still possible within specified repair stage 4 Induction hardening Facilities available I Check hardness by etching 03 10 31816 ...

Page 170: ...nt Paint or fluorescent powder cleaning agent developer Hardness test Test hardness with impact hardness tester 000 589 20 21 00 scleroscope hardness The minimum hardness of 55 should be present on 213 of journal circumference Hardening Journals without hardened fillets can be hardened inductively or flame hardened Journals with hardened fillets arrows must always be hardened inductively PO OOYl 1...

Page 171: ...ric acid vJO3 Dark spots should surface not appear on the journal Unhardened fillets will become dark In the case of hardened fillets they should appear as bright as the surface of the journals We recommend comparing the etching test with a journal tested via metallographic microsection Then carefully wash off nitric acid with alcohol Corrosion protection Crankshafts which are not installed again ...

Page 172: ...sages In crankcase and crankshaft cleaned Crankshaft tested 03 318 Connectmg rods recondltloned 03 313 4 4a PO3 0109 31 Crankshaft bearing caps 2 3 install without bearing shells observe markings tighten Tightening torque or rotation angle Crankshaft bearing bolt M 12 4 90 Nm Crankshaft bolt M 11 4 a 55 Nm 90 100 03 10 320 l ...

Page 173: ...t bearing caps 2 3 Crankshaft bearing caps 2 3 Crankshaft 145 I measure bearing journals determine bearing clearance item 5 measure width and match appropriate thrust washers item 7 remove crankshaft bearing bolts 4 and 4a remove caps remove lower bearing shells 147 and insert crankshaft 145 with thrust washers 148 148a position lower bearing shells 147 items 8 9 The oil grooves must point toward ...

Page 174: ...not mix up upper and lower rod bearing shells Connecting rod bearing diameter measure and note value item 15 Connecting rod bearing journals measure new value 47 950 mm determine bearing clearance wear limit 47 965 mm item 16 Connecting rod radial clearance measure new value 0 030 to 0 055 mm wear limit 0 08 mm item 16 Pistons 177 attach to connecting rod 166 together with piston pins 175 and pist...

Page 175: ...aft bearing journal dia Fitted bearing Associated thickness of thrust Width washers of journal Connecting rod bearing journal dia Connecting rod bearing journal width Standard dimension 26 52 24 532 2 15 26 50 24 50 27 96 2 6 6 2 24 632 2 20 26 60 24 60 57 965 47 965 28 04 2 25 2 6 7 2 24 732 P 26 70 24 70 or or 2 35 2 6 9 2 24 932 26 90 24 90 28 30 1 st repair stage 57 465 2nd repair stage 47 650...

Page 176: ...adial New value Wear limit 0 01 0 030 0 055 0 08 Bearing play axial New value 0 100 0 254 0 12 0 26 Wear limit 0 30 0 50 1 For radial play set to medium value Bearing shells 1st repair stage 2nd repair stage 3rd repair stage 4th repair stage 2 37 2 50 2 62 2 75 Width of bearing Thickness of fitted shells in mm bearing thrust washers in mm 17 30 17 50 I 2 15 or 2 20 2 25 or 2 35 or 2 40 Wall thickn...

Page 177: ... indicated by a color code Only connecting rod bearing shells with the color code yellow are available as replacement parts Color code Dimension Red 1 804 to 1 808 mm Yellow 1 808 tol 812 Blue 1 812 to1 816 Engines 602 96 603 96 and 603 96 97 Upper connecting rod bearing shells from Glyco with improved coating cathode dust coating method 03 10 32016 ...

Page 178: ...rect installation position Dimension A 3 2 mm for all engines Dimension B 2 5 mm 602 96 603 96197 3 5 mm 602 91 PO3 0095 13 Production breakpoint 05 86 Engines 602 96 and 603 97 from star t of productlon Note The axial forces of the crankshaft are taken up by the thrust washers PO3 0115 13 03 10 32Oi7 ...

Page 179: ... one of the dimensions shown in the table section Data Match thrust washers to respective journal width table 2 Bearing cap 4 Crankshaft bearing boltM 12x60 4a Crankshaft bearmg bolt M 11 x 62 4b Washer 145 Crankshaft 146 Beartng shell 148 Upper thrustwasher 48a Lower thrust washer Thrust washers of the same thickness must always be installed on both sides Do not regrind thrus washers 146 cb 9 148...

Page 180: ...1 pan side next to basic bore The standard dimension crankshaft bearing shells with color codes blue yellow and red are available as parts They must be matched according to the table This eliminates the necessity of measuring the bearing clearance Punch marks for matching crankshaft bearing shells When ordering crankshaft bearing shells the code 52 for blue 54 for yellow und 56 for red must be ind...

Page 181: ...11 Initial tightening torque 55 Nm Rotation angle 90 100 Initial tightening torque 30 Nm Rotation angle 90 100 320 Nm Special tools Commercially available tools Connecting rod straightener 000 589 51 37 00 000 589 04 14 00 03 03 13 001 589 72 21 00 00 e g Hahn Kolb D 7000 Stuttgart Model BC 503 Internal gauge e g Carl Mahr D 7300 Esslingen Model 844 N Micrometer screw e g Carl Mahr D 7300 Esslinge...

Page 182: ...bearing caps are also identified from front to rear with the code numbers 1 2 3 4 etc and must not be mixed up 2 Lubricate crankshaft bearing bolts for crankshaft bearing caps and tighten Tightening torque and rotation angle Crankshaft bearing bolts M 12 90 Nm crankshaft bearing bolts M 11 55 Nm 90 100 3 Measure basic bore in directions A B and C at two levels conicity POl o179 13 If specified val...

Page 183: ... caps and tighten Tightening torque and rotation angle Crankshaft bearing bolts M 12 90 Nm Crankshaft bearing bolts M 11 55 Nm go 100 Caution Observe order of crankshaft bearing caps Do not interchange upper and lower crankshaft bearing shells 6 Engine 602 Fitted bearing bearing 4 03 10 320112 ...

Page 184: ...Engine 603 FItted bearing bearmg 5 A Upper bearing shells crankcase 5 Measure crankshaft bearings and note values 6 Lower bearing shells cap shells I PO3 2020 13 03 10 320 13 ...

Page 185: ...es 7 Measure width of fitted bearing journal and find proper thrust washers see table section Data 8 Removecrankshaft bearing bolts remove lower crankshaft bearing shell oil crankshaft position in crankcase and oil lower crankshaft bearing shell and reposition Caution The two oil grooves arrows in the thrust washers should point toward the crankshaft cheeks 9 Oil thrust washers and slide into groo...

Page 186: ...lts M 12 90 Nm Crankshaft bearing bolts M 11 55 Nm 90 100 12 Measure crankshaft end play 13 Turn crankshaft by hand and assure that it runs free PO3 2113 1 Installation of connecting rod bearings and connecting rods 14 Insert connecting rod bearing shells install connecting rod bearing caps with bearing shells and tighten connecting rod bolts to 30 Nm Connecting rod bearing shells are available on...

Page 187: ...terial than the lower shells To prevent misassembly the upper locating groove is 0 7 mm narrower 15 Measure connecting rod bearing diameters and note 16 Measure connecting rod bearing journals Determine connecting rod bearing radial clearance The bearing clearance can be corrected by changing the bearing shells whereby it should be attempted to achieve the mean value of the specified bearing clear...

Page 188: ...tly at piston pin Assure that connecting rod moves freely in relation to crankshaft Use dial gauge holder 363 589 02 21 00 Caution Disassemble oil pump and clean replace if re quired Replace oil pressure valve Disassemble oil filter and clean Install initial operation oil filter cartridge Change oil filter cartridge and oil after 1000 l 500 km 03 10 320 17 ...

Page 189: ...oke was in creased to 94 2 mm and the web width b reduced to 21 75 mm to increase the displacement 3 5 I on the 603 970 engines Engine 602 96 crankshaft webs On engine 602 96 starting 12187 the web width D was increased by 8 mm for a total of 90 mm D 90 mm engine 602 961 03 10 321 l ...

Page 190: ...Engine 602 91 flywheel locating pin Cylindrical pin in crankshaft for locating the flywheel and driven plate Production breakooint 01186 Vehicle ident end No l not registered 03 10 32112 ...

Page 191: ...This page int ntiowally left blank 03 10 32113 ...

Page 192: ...161 a with vibration damper 163 and Allen screws 162 and washers 162 b remove install 03 341 item 2 Note The vibration damper for engine 602 is not interchangable with that from motor 603 Do not interchange during repairs Hub 157 with hex head bolts 160 and Belleville washers 159 remove install item 3 Note The cylindrical pin 158 centers the crankshaft pulley and vibration damper 03 10 324 l ...

Page 193: ...in a groove left on the hub by the standard crankshaft radial seal Part No for repair crankshaft radial seal 010 997 34 47 or 010 997 68 47 Tightening torques Nm Allen bolts for crankshaft pulley 25 Mounting bolt for hub 320 Special tools 001 589 66 21 00 00 601 0 400 10358 33OO j Commercially available too tool 601 589 03 14 00 001 589 74 21 00 03 00 ____ _ Adapter 314 square socket to 1 2 square...

Page 194: ...centers the crankshaft pulley and vibration damper 4 Press out crankshaft radial seal with screw driver Do not damage crankshaft journal or mounting bore Installation note Deburr and clean mounting bore for crankshaft radial seal Coat sealing lip of new crankshaft radial seal with oil and press in with special tool 601 589 03 14 00 Assure that the crankshaft radial seal is seated properly 5 Reinst...

Page 195: ...ft radial seal 600 remove replace Check running surface on crankshaft flange clean mounting bore coat sealing lip of crankshaft radial seal with oil and press in with special tool 601 589 03 43 00 items 2 8 Caution Ensure that radial seal is seated properly Crankshaft radial seal 600 check for leakage with engine running item 10 03 10 327 l ...

Page 196: ...e hub by the standard crankshaft radial seal A Standard crankshaft radial seal B Repair crankshaft radial seal Special tools Renewal 1 Remove flywheel or flywheel and driven plate 03 410 2 Press crankshaft radial seal out of end cover with screwdriver Do not damage crankshaft flange or end cover Cover crankshaft flange with rag 03 10 32712 ...

Page 197: ...haft radial seal and opposite running surface lightly with oil do not use grease 7 Slide crankshaft radial seal arrow over inner part of installation tool 601 589 03 43 00 8 Press crankshaft radial seal against stop in end cover with outer part of installation tool 601 589 03 43 00 Note Assure that crankshaft radial seal is properly seated 9 Install flywheel or flywheel and driven plate 03 410 10 ...

Page 198: ... discs and cemented into the crankshaft Replacement parts Designation Part No Spacer ring 102 031 02 51 Locking ring 102 031 01 33 Ball bearing 115 980 01 15 Engines 602 603 from start of production For repair these parts can also be installed in engines produced earlier Cement PO3409 13 130 a Spacer ring Loctite 241 002 989 94 71 Special tools 03 10 33012 ...

Page 199: ...h locking ring use internal puller 000 589 25 33 00 and countersupport 000 589 33 33 00 Installation note Knock in spacer ring flush Coat new ball bearing with cement 002 989 94 71 and knock into crankshaft with suitable punch on outer race 2 Install in opposite order 03 10 33013 ...

Page 200: ...Engines 602 603 Crankshaft pulley 161 a and vibration damper 163 remove install use washers 162 b and Allen screws 162 25 Nm Use lock 601 589 02 40 00 items 1 3 Note The crankshaft pulley and vibration damper are centered by the cylindrical pin 158 Do not mix up vibration dampers 03 10 341 l ...

Page 201: ...60 161a 162 162b Timing case cover Crankshaft radial seal Crankshaft Woodruff key Woodruff key Crankshaft sprocket Hub Cylindrical pm 8 x 8 mm Bellevrlle washer BoltM 18x1 5x50 Crankshaft pulley Dra 152 mm engines 601 602 Dia 173 mm engine 603 Allen bolt M 8 x 28 Washer B 8 Engine 602 The vibration damper on engine 602 has a 35 mm wide machined recess arrow on the front and are therefore lighter A...

Page 202: ... vibration damper of engine 603 96 is a single mass vibration damper and identical with that of the naturally aspirated engine except for the resonant frequency Do not interchange Engine 603 96 Color grey PO3 0166 15 Tightening torques Allen bolts on pulley Nm 25 Crankshaft flange bolt 320 Special tools 001 589 74 21 00 00 Commercially available tool 103589003300 03 601 589 03 14 00 03 Adapter 314...

Page 203: ...ques Hex head bolt 160 Allen bolts 162 320 Nm 25 Nm 4 Pull hub off of crankshaft journal with puller 103 589 00 33 00 5 Replace crankshaft radial seal 03 324 6 Install in opposite order 31 28 155 l55a 160 159 162 162 PO3 0120 1s 28 31 145 155 155a 156 157 158 159 160 161a 162 162b Timing case cover Crankshaft radial seal Crankshaft Woodruff key Woodruff key Crankshaft sprocket Hub Cyllndncal pin 8...

Page 204: ... 345 Checking and correcting adjustment of TDC sensor 01 PO3 0124 15 Holder for TDC sensor engines 602 and 603 from start of productlon Cylinder 1 turn to approx 10 BTDC ignition stroke item 1 03 10 34511 ...

Page 205: ... mm on engines 602 and 603 or until dial gauge moves back 3 65 mm on engines 601 921 603 97 item 4 Note Corresponds to crankshaft position of 20 ATDC Holder for TDC sensor 42 or 44 install locating device 603 589 01 21 00 item 5 Note The pin on the crankshaft pulley or on the vibration damper must catch in the groove on the locating device if not correct position of holder Holder for TDC sensor 42...

Page 206: ... the TDC sensor is fastened to the timing case cover 44 Holder TDC sensor engines 602 and 603 from start of productlon Check adjustment of holder and correct if required a When holder is replaced b When crankshaft and hub vibration damper and crankshaft pulley are replaced PO3 2138 l c When timing case cover is removed installed or replaced 0310 3450 ...

Page 207: ... Bolt gauge 601 589 07 21 00 up to precombustion chamber bore and attach dial gauge to gauge with 5 mm pretension small pointer on dial gauge If the cylinder head is removed the measuring pin on the dial gauge can be positioned directly on the piston crown Set dial gauge holder 363 589 02 21 00 on crankcase mating surface 03 10 345i4 ...

Page 208: ...m on engine 603 97 Note After the dial gauge has moved back crankshaft position 20 ATDC the pin in the crankshaft pulley or in the vibration damper should be located exactly below the TDC sensor arrow 5 Position locating device 603 589 01 21 00 in holder for TDC sensor The pin on the crankshaft pulley or on the vibration damper must catch in the groove in the locating device If the pin on the cran...

Page 209: ...mper catches in the groove in the locating device 603 589 01 21 00 42 Holder for TDC sensor engine 601 921 7 8 Screw holder for TDC sensor down tight Remove dial gauge and gauge 601 589 07 21 00 and locating device 603 589 01 21 00 44 Holder for TDC sensor start of productlon engines 602 603 from 03 10 34516 ...

Page 210: ...ain tensioner 224 Camshaft sprocket 188 Crankshaft sprocket 156 remove together with torsion spring 261 install items 1 17 unbolt hex head bolt 259 and remove together with washer 258 item 2 remove item 3 remove install Replace sealing ring 237 05 310 items 4 13 mark in relation to timing chain 210 remove retaining bolt 190 together with washer 189 and remove camshaft sprocket items 6 8 Note Obser...

Page 211: ...chain and tighten Remove hex head bolts 190 and washers 189 Hex head bolt 65 Nm 12 point bolt 25 Nm 90 rotation angle item 13 continue to turn and check adjustment markings at TDC position item 15 install with chain for oil pump drive 263 and tighten hex head bolt 259 25 Nm item 16 Note Install chain sprocket so that arch points toward oil pump allow to run and check for leakage item 18 Bolt for c...

Page 212: ... 25 Special tools 116 589 07 15 00 i 35 Removal 1 Remove clamping bracket 262 and torsion spring 261 2 Remove hex head bolt 259 with washer 258 and remove oil pump sprocket 257 3 Remove chain for oil pump drive 263 4 Remove chain tensioner 05 310 5 Mark position of timing chain and crankshaft sprocket in relation to one another 001 589 66 21 00 00 03 10 350 3 ...

Page 213: ...n to sag c 9 Pull off crankshaft sprocket with puller 601 589 07 33 00 10 Check condition of retaining wedge in crankshaft replace if required Installation 11 Transfer color code from old crankshaft sprocket to new crankshaft sprocket 12 Knock crankshaft sprocket onto crankshaft with installation punch 116 589 07 15 00 Pay attention to retaining wedge PO 20 J 13 03 10 35014 ...

Page 214: ...tensioner and replace sealing ring 05 3 10 15 Continue to turn crankshaft and check adjustment marking at TDC arrows 16 Install chain for oil pump drive together with oil pump chain sprocket and tighten Note Install oil pump sprocket so that arch points toward oil pump arrows Tightening torque 25 Nm 17 Attach clamping bracket 262 spring 261 and torsion PlS 2031 13 I 03 10 35015 ...

Page 215: ... 02 40 00 in flywheel ring gear and remove flywheel together with driven plate 150a 150 and spacer disc 150b items 1 2 Driven plate 153 engine 603 970 unbolt reinstall Position lock 601 589 02 40 00 in teeth on driven plate and remove driven plate and spacer disc 150b items 1 2 149 149a 149b 152a 15oc PO 57 03 10 410 l ...

Page 216: ... 91 check max length 57 2 mm necked down shank diameter min 8 1 mm replace stretch bolts if required item 2 Initial torque 40 Nm rotation angle 90 100 Stretch bolts 152 152a 152 manual and automatic transmission Driven plate 2nd version Part number 102 032 00 71 Thread D lM 10x1 Necked down New state 1 8 5 0 2 shank dia d Length L New state I 22 0 2 Max length I 22 5 automatic transmission Driven ...

Page 217: ...Flywheels for manual transmissions Engine 602 D 252 94 252 98 mm Dl 223 00 223 07 mm H 57 mm 03 10 41013 ...

Page 218: ... B 145 149 150a 151 152a 152b Flywheel engine 602 91 Flywheel engme 602 96 Crankshaft Flywheel Driven plate Rmg gear Stretch bolt Cylindmalpm Engine 603 96 145 Crankshaft 149 Flywheel 150a Driven plate 151 Rmg gear 152a Stretch bolt 152b Cylmdrlcal pm PO3 0126 15 152b 145 l52a PO3 0127 15 03 10 41014 ...

Page 219: ...Stop damper Primary flywheel weight Fitted pin Radial ball bearing Stretch bolt M 10 x 1 x 57 Self allgnlng beanng Spacer bolt Torsion damper Friction device Secondary flywheel weight Spacer bolt Ring gear Flywheels with automatic transmissions A Flywheel engine 602 B Flywheel engine 603 03 10 41015 ...

Page 220: ...el 40 90 100 Special tools 1 601 589024000 1 1 001 5896621 00 Removal installation 1 Remove hex head bolts 55 and insert lock 601 589 02 40 00 into ring gear on flywheel and tighten with hex head bolts 55 Installation note Flywheels do not require balancing Flywheels are not interchangeable PO3 209 13 03 10 41017 ...

Page 221: ... renew stretch bolts if required Tightening torque and rotation angle Initial torque 35 Nm rotation angle 90 100 Driven plate engine 603 97 Screw out stretch bolts 152 remove spacer disc 150b and driven plate 153 Installation note Check stretch bolts max length 22 5 mm necked down shank dia min 8 mm stretch bolts if required replace Tightening torque and rotation angle Initial torque 35 Nm rotatio...

Page 222: ...lts and remove two mass flywheel Installation note Check stretch bolts max length 57 2 mm necked down shank dia min 8 1 mm replace stretch bolts if required Tightening torque and rotation angle Initial torque 40 Nm rotation angle 90 100 3 Install in opposite order 03 10 410 g ...

Page 223: ...aterial removal causes dimension a to exceed max causing dimension b to be less than 15 6 mm replace flywheel measure engine 602 22 5 mm engine 603 19 4 mm Maximum material removal 1 mm if material removal is greater than 1 mm replace flywheel Caution If the clutch surface A is refinished the mounting surface B must be refinished by the same amount so that distance a is maintained 03 10 420 l ...

Page 224: ... up to 15 6 0 4 Permissible deviation from flat on clutch surface or clutch attachment surface 0 05 mm Note Flywheels for manual transmissions with burned spots scoring or cracks on the clutch surface should be refinished by precision turning If the scoremarks or cracks are greater than the maximum permissible material removal dimension replace flywheel After machining the clutch surface should no...

Page 225: ...urface for ring gear on flywheel before installing ring gear drill hole into old ring gear and break up with a chisel or heat quickly and then remove immediately Heat new ring gear and install on flywheel Temperature for shrink fit 220 C Lateral runout on ring gear max 0 4 mm Temperature measuring chalk Color No 2815 220 white thermochrome e g AW Faber Castell D 8504 Stein bei Nurnberg 03 10 430 l...

Page 226: ...point while heating with hot plate or heating furnace Use temperature measuring chalk in accordance with directions Use open flame only In exceptional cases Apply flame to inside of ring gear only After replacing ring gear it is not necessary to balance the flywheel 03 10 43012 ...

Page 227: ...ine Timing Valvstr ...

Page 228: ...s 250 Checking valve springs 260 Renewal of valve stem seals 270 Checking and machining valves 280 Checking and renewal of valve guides 285 Replacing1 of valve seat inserts 290 Machining valve seats 291 Removing and installing chain tensioner 310 Renewal of timing chain 320 Removal and installation of tensioner rail 330 Removal and installation of guide rail 341 Removal and installation of pressur...

Page 229: ...e tappet 203 bring to operating temperature 80 C check Caution Do not overfill remove install remove install 10 Nm check with a mandrel to do this first check on the cylinder which is exactly on Ignition TDC cam tips for inlet and exhaust valve pornt upwards Caution Unnecessary rotation of the engrne causes the valve clearance compensating elements to sink 05 10 211 1 ...

Page 230: ...ll in the same posrtion again magnetic lifter 102 589 02 61 00 determine The dimension Ll is the difference between the dimensions L and L2 Reference value 18 19 mm Number 12 14 clean The valve tappet must be replaced if oil loss cannot be eliminated Data 1st Design 2nd Design from 08 84 3rd Design from 01 90 Plunger b dimension W 2 mm 8 0 8 6 9 1 Guide sleeve g dimens f 4 1 mm 12 5 13 2 13 2 Note...

Page 231: ...ts have been installed with a ventilation bore d 0 2 mm in order to prevent tappet rattle during short distance operation a Reservoirchamber b Plunger C Working chamber Production breakpoint 09187 1 not recorded 05 10 211 3 ...

Page 232: ... plunger b and the working chamber c have been reduced and the reservoir chamber a enlarged Less oil is needed in the working chamber due to the reduced stroke Therefore the working chamber fills up more quickly after initial engine starting Production breakpoint 01190 l not recorded Tightening torque Nm Hexagon bolts for cylinder head cover 10 05 10 211 4 ...

Page 233: ...e 80 C 2 Check engine oil level making absolutely sure it is not overfilled Turbo engine 3 Remove charge air pipe 4 Remove cylinder head cover Caution Turning the engine unnecessarily causes valve play compensating elements to sink The engine must not be turned by the camshaft timing gear bolt 5 First check the cylinder which is exactly on TDC Cam tips for inlet and outlet valves point upwards 051...

Page 234: ...oke of the valve tappet must be measured Measuring pre stroke 7 The basic setting of the dial gauge has to be undertaken before measurement To do this insert the dial gauge in the measuring bridge 601 589 08 21 00 and push in until there is a preload of approx 1 mm The probe in the measuring bridge must be in the basic position lower stop The basic setting must not be changed during measurement 8 ...

Page 235: ...e valve tappet Reference value 0 25 2 0 mm Example No 1 Cylinder A exhaust E Inlet Dimension Y mm 2 82 2 98 Dimension X mm 1 95 1 92 Pre stroke mm 0 87 1 06 11 If the valve tappet sinks too quickly or if the dimension differs from the reference value lift out valve tappet with the magnetic lifter 102 589 03 40 00 Note location of valve tappet J _ __ 0510 211 7 ...

Page 236: ...with rotary movements using pliers Do not damage guide sleeve 15 Pull plunger out of the guide sleeve and remove compression spring 16 Blow through all individual parts with compressed air Blow air through valve tappet at the oil supply bore and ventilation bore arrows 17 Remove snap ring from the guide sleeves and pinch slightly at the edges arrows and reassemble on the guide sleeve 18 Install gu...

Page 237: ...ide sleeve into the valve POS 2011 13 tappet Fit guide sleeve Into valve tappet until the snap ring engages press in if necessary 21 Recheck dimension Ll 22 Check oil supply to cylinder head To do this unscrew sealing plug of the oil channel in cylinder head Blow compressed air into the oil channel while checking exit bores arrows at the seat for the valve tappet for air 23 Lubricate valve tappet ...

Page 238: ...nder inlet valve Dial gauge with 3 mm preload on valve tappet Engine turn in direction of rotation Caution Engine must not be turned by the camshaft With 2 mm valve stroke engine must be at 12 after TDC Timing Not used 3 With Ml 1 thread from 111 88 On used camshafts 5 Repalrcamshafts with 0 5 mm larger bearing diameter and Ml0 thread 6 Repaircamshafts with 0 5 mm larger beanngdiameter and Ml 1 hr...

Page 239: ...rming chain should be checked for elongation if the test values differ The timing chain is to be replaced with more than 4 at the crankshaft Checking Caution The engine must not be turned by the camshaft timing gear bolt Do not turn engine backwards during measurement otherwise measuring errors result 1 Turn crankshaft in direction of rotation of the engine until cam tip of the 2nd cam points upwa...

Page 240: ...til the large pointer is on 0 Caution The probe pin of the dial gauge must be exactly vertical to the valve tappet 5 Turn crankshaft further in direction of rotation of engine unttl the small pointer of the dial gauge has moved back by 2 mm to 1 mm In this position the marking at the crankshaft pulley or vibration damper must be at 11 12 after TDC If this value is more than 12 the camshaft is to b...

Page 241: ...ad cover 125 remove install 10 Nm Engine position on ignition TDC of No 1 cylinder Caution The engine must not be turned by the camshaft timing gear bolt Chain tensioner 224 remove install replace sealing ring 237 05310 With self levelling suspension Drive of the pressure 011 pump 400 remove install 05437 0510 220 1 ...

Page 242: ...aft timing gear ensure that the straight pin 187 is not pushed out towards the rear Camshaft bearing cap 80 81 82 remove install note sequence hexagon bolts 84 and washers 84a 25 Nm Caution Note torquing diagram Camshaft 185 remove install Check for ease of movement Lock washer 186 check Valve tappet 203 remove install check Magnet lifter 102 589 03 40 00 After installation allow engine to run che...

Page 243: ...03 Camshaft timing gear seat 0 025 0 025 2nd and 5th bearing 2nd and 6th bearing 0 030 position 3rd and 5th beanng 0 045 position 4th bearing position 0 060 Diameter of camshaft bearing pins repair stage 0 5 mm 31 445 31 434 Camshaft code numbers The code number is stamped on the flange next to the TDC notch arrow TDC marking arrow and code number 135 10 220 3 ...

Page 244: ...gear bolt A revised washer with a larger outer diameter c has been fitted in order to prevent the camshaft timing gear bolt loosening A 1 st Design B 2nd Design Production breakpoint 12 86 c9 PO50205 l 3 Model Engine not recorded Engine end No Vehicle Identification end No Manual Automatic transmission transmission A F 007763 1 033213 008022 I l 05 10 220 4 ...

Page 245: ...nes Tightening torques Hexagon bolt A 65 Nm hexagon necked down bolt 6 Pre torque 25 Nm Torsion angle 90 Caution Note revised plain washer Use the plain washer A for the hexagon bolt and plain washer B for the bihexagon necked down bolt ql y _swl3_ 52 4 0 I Use carrier A for previous hexagon bolt carrier 1 B for bihexagon necked down bolt pf33oo213 05 10 2205 ...

Page 246: ...agon bolts on cylinder head cover 10 Hexagon bolts on camshaft timing gear 65 Bihexagonal head bolt on camshaft timing gear 25 90 Hexagon bolts on camshaft bearing cap 25 Special tools 001 589 66 21 00 00 Removal 102 589 03 40 00 05 001 589 72 21 00 00 Turbo engine 1 Remove install charge air pipe 2 Remove cylinder head cover 05 10 2206 ...

Page 247: ...ension 5 Remove pressure oil pump 05437 6 Align camshaft timing gear and timing chain 7 Unscrew hexagon bolt or bihexagonal head bolt on camshaft timing gear whilst holding the camshaft with a mandrel 8 Remove camshaft trming gear and allow timing chain to sag Note The timing chain is prevented from twisting when the timing case cover is assembled Caution Note different bolt and washer I i 0510 22...

Page 248: ... hexagon bolts on camshaft bearing caps 3 4 and 5 in increments of one turn respectively until counterpressure is reduced light arrows Engine 603 Unscrew both hexagon bolts on camshaft bearing caps 1 5 and 6 dark arrows Loosen both hexagon bolts on camshaft bearing caps 2 3 4 and 7 in increments of one turn respectively until counterpressure is reduced light arrows 10 Remove camshaft upwards 1 2 3...

Page 249: ...ndition visual inspection replace if necessary Caution Install valve tappet in the same position again Installation 14 Insert lock washer for axial fixing arrow in cylinder head 15 Lubricate camshaft and place on the cylinder head so that the TDC marking arrow pornts vertrcally upwards 16 Install camshaft bearing caps Note marking on beanng caps 0510 2209 ...

Page 250: ...tening torque 25 Nm 17 Install camshaft timing gear according to marking and trghten Check strarght pin for correct seating Tightening torques and angle of rotation Hexagon bolt 65 Nm Bihexagonal head bolt 25 Nm 90 18 Install chain tensioner 05 310 With self levelling suspension 19 Install pressure oil pump 05 437 20 Position engine on TDC of the No 1 cylinder and check markings arrows 21 Install ...

Page 251: ...er head 70 Valve tappet 203 I Valve springs 198 Valve stem seals 199 200 clamp Assembly table 601 589 01 59 00 support bridge 601 589 02 59 00 remove rnstall Magnetic lifter 102 589 03 40 00 remove install check 05 260 Lever press 601 589 02 61 00 magnetic lifter 102 589 03 40 00 Color marking downwards replace 05 270 05 10 250 1 ...

Page 252: ...601 589 02 59 00 lever press 601 589 02 61 00 Magnetic lifter 116 589 06 63 00 Color marking downwards Valve stem seals 199 200 replace 05 270 Since 03 86 the lower valve spring retainers have been revised They are now the same as those on the engines 102 and 103 standardization Production breakpoint 03186 124 133 6 0 3 9 6 0 I I 000016 x 124 193 126 125 001093 201 126 602 911 I I 015830 003949 21...

Page 253: ...tandardization with engines 102 and 103 Production breakpoint 08188 transmission 124 133 6 0 3 9 6 0 I I 018302 124 193 201 126 067330 013824 t 201 128 6 0 2 9 6 1 I I 003806 I not recorded Note Color markings of valve springs yellow green or violet green or yellow blue or violet blue 05 10 253 3 ...

Page 254: ...llation Fh 7 1 Clamp cylinder head on assembly table 601 589 01 59 00 wtth 4 cylinder head bolts 2 Remove valve tappets Magnetic lifter 102 589 03 40 00 Installation note Lubricate valve tappets Note sequence 3 Attach support bridge 601 589 02 59 00 to cylinder head 4 Press valve spring retainers downwards with lever press 601 589 02 61 00 05 10 2504 ...

Page 255: ...8 Replace valve stem seals 05270 9 Installation takes place in the reverse sequence Cylinder head installed Removal and installation 1 Remove valve tappets with magnetic lifter 102 589 03 40 00 Installation note Lubncate valve tappets note sequence 2 Place piston of the cylinder concerned on TDC Use retaining gear 603 589 01 40 00 instead of camshaft timing gear or camshaft in order to turn the en...

Page 256: ...ess 601 589 02 61 00 5 Remove valve totters with magnetic lifter 116 589 06 63 00 6 Remove valve springs and valve spring retainers Installation note Install valve springs with the color markings downwards 7 Check valve springs 05 260 8 Replace valve stem seals 05 270 9 Installation takes place in the reverse sequence 05 10 2506 ...

Page 257: ... achieved replace valve spring Valve spring data Part No 601 053 01 20 1 st design 601 053 03 20 2nd design Color marking yellow green or violet green yellow blue or violet blue Spring force at preloaded length 27 27 New value N 710 790 680 740 Limit 648 612 Conventional tool Spring test scales e g Berco Model CM130 05 10 26081 ...

Page 258: ...ndrel 601 589 02 43 00 Note color marking Valve stem Valve stem seal designs Distinguishing features Intake valve stem seal 199 Chamfer arrow shouldered d 7 3 mm Wire ring phosphated black Color brown d I de burr at groove Exhaust valve stem seal 200 Chamfer arrow straight d 8 2 mm Wire rtng bright galvanized yellow Color brown _d 1 PO5 0040 13A 05 10 2 o 1 ...

Page 259: ... dimensions are installed due to automatic cylinder head assembly Production breakpoint 1 l 85 not recorded Inlet valve stem seals without gas lip have been fitted since 09 89 and exh aust valve stem seals without gas lip since 04 90 05 10 270 2 ...

Page 260: ...on breakpoint 09 89 Inlet Model 124 128 124 133 124 193 126 135 201 126 201 128 1 from st not reel PO5 0087 33 Engine Manual transmission Engine end No Automatic transmission 003020 016477 602 961 1 000177 007086 of productlon led Vehicle identification end No A F 05 10 270 3 ...

Page 261: ...xhaust Model 124 128 124 133 124 193 126 135 201 126 201 128 1 from stal not recoi Engine 602 962 603 960 603 970 602 911 602 961 of production led Vehicle identification end No 017538 r 002151 007954 601 589 02 43 00 05 10 270 4 ...

Page 262: ...ved 01 415 Valve springs removed 05 250 Valves removed Valves Intake valve 195 exhaust valve 196 clean check visually Valve stem check for eccentricity max 0 03 mm Valve seat check for eccentricity max 0 03 mm grind Dimensions and angles check table PO50191 15 05 10 280 1 ...

Page 263: ... 0 D 1 with with I with I with Valve seat reinforcement Sodium filled without with I without with 106 6 106 2 106 6 106 6 106 6 106 2 106 2 106 2 Valve length L I 1 Width of valve seat 2 0 12 0 12 0 Max permitted eccentricity on valve stem and valve seat 0 03 0 03 0 03 0 03 Marking on end of stem E 601 02 E 601 04 1 A 601 05 I A 601 05 From 04 87 only exhaust valves with valve heads from revised m...

Page 264: ...ntal supervisor and dispatched to Mercedes Benz AG Werk Marienfelde DaimlerstraOe 145 Anlieferstelle KST 3153 Arbeitsvorbereitung TAI PO 0196 15 196 Exhaust valve The locatron of the hydraulic valve clearance compensating elements must be checked after machining or replacing the valves and corrected if required 05211 Conventional tools Valve grinder or Valve poppet turning equipment e g Krupp D 53...

Page 265: ...e replaced 2 Measure eccentricity on valve stem Replace valve if eccentricity exceeds 0 03 mm 3 Machine valve seat Note operating instructions for the machining equipment and adjustment angle a 45 15 4 Measure eccentricity on valve seat and height h of valve head If eccentricity is more than 0 03 mm or the height h less than 1 6 mm valve should be replaced h POS 0035 13 05 10 280 4 ...

Page 266: ...4 clean Cylindrical brush 000 589 10 68 00 Valve guide 204 inside 0 check Plug gauge 102 589 00 23 00 intake 117 589 03 23 00 exhaust Replace valve guide if reject pin of plug gauge fits completely in the valve guide Replacement Valve guide 204 drive out drive home Drift 103 589 03 15 00 intake 103 589 02 15 00 exhaust Punch 601 589 06 15 00 intake 601 589 02 15 00 exhaust Ream Reamers 000 589 21 ...

Page 267: ... mm 115 589 00 53 00 Guide sleeves 102 589 00 63 00 intake 102 589 08 63 00 exhaust Broach 14 40 mm 115 589 01 53 00 Guide sleeve 601 589 15 63 00 Valve seat insert 206 check for eccentricity 05 291 Valve guides grey cast iron 14 240 14 251 14 200 14 211 601 050 08 24 i D l POs o187 15 Length L 05 10 285 2 ...

Page 268: ...03 23 00 000 589 21 53 00 05 05 05 I 103 589 03 15 00 05 103 589 02 15 00 05 J _ 1 000 589 10 53 00 102 589 08 63 00 Conventional tool 115 589 00 53 00 05 Cylinder head clamping fixture e g Hunger D 8000 Mijnchen 70 Part No 221 60 000 05 lO c 853 ...

Page 269: ...basic bore and complete broach with ample supplies of paraffin Insert broach into the guide sleeve so that when the guide sleeve rests on the valve seat insert 3 the first cutter of the broach is located in the base bore In so doing note that the correct side of the guide sleeve is put on the valve seat Centre guide sleeve by rotary movements in the valve seat insert Note Dnve the broach quickly t...

Page 270: ...h punch and hammer when the valve guides are not super cooled and the cylinder head is not heated up Coat valve guides with wax or 011 before driving home Assignment of guide sleeve valve seats Valve seat Intake Exhaust Intake Exhaust r PO5 0164 11 Guide sleeve Part No 102 589 00 63 00 601 589 15 63 00 Basic bore 0 in cylinder head 14 2 mm 14 4 mm 05 10 2855 ...

Page 271: ...equipment Basic bore D2 check table Bore out required Caution Machine basic bore for minimum overlap is not to the repair stage if the valve seat insert if achieved Number 3 Valve seat insert supercool with liquid nitrogen and insert into basic bore AWarning Do not touch supercooled valve seat inserts with bare hands Valve seat insert must be square to the cylinder head Valve seats machine 05291 0...

Page 272: ...alid up to the upper 133 4 133 4 edge of cylinder head on reworked cylinder head parting surface a 37 30 37 30 Note Exhaust valve seat inserts are made from centrifugally cast material on the naturally aspirated engines and srntered metal on turbo engines The intake valve seat inserts are made from sintered metal on all engines 0 5 1 0 2 9 0 2 ...

Page 273: ...nd corrected if necessary 05211 Conventional tools Cylinder head clamping fixture e g Hunger D 8000 Munchen 70 Part No 221 60 000 Seat insert lathe tool size 2 e g Hunger D 8000 Munchen 70 Part No 220 03 l 10 Valve seat turning equipment model VDSNL 1 45 30 e g Hunger D 8000 Munchen 70 Part No 236 03 308 Test set for valves e g Hunger D 8000 Munchen 70 Part No 216 93 300 65 correction steel No 13 ...

Page 274: ...ed machine basic bore for valve seat insert 4 Turn basic bore D2 with the seat insert lathe tool so that the bore is properly cleaned up 5 Measure machine base bore 6 Turn valve seat insert repair stage so that the specified overlap is produced Compensate height of reworked front face If applicable 7 Heat up cylinder head to approx 80 C in water bath 8 Supercool valve seat insert with liquid nitro...

Page 275: ...ce with tool manufacturer s operating instructions Refer to data for adjustments Note Only loosen the pilot when eccentricity of the valve seat has been checked Eccentricity of valve seat check Number 2 Valve seat width b measure correct if required Number 3 Valves insert and measure distance A 05 10 291il ...

Page 276: ...seats and reground valves PO50142 13 The gap a reduces by the same amount as cylinder head parting surface has been reworked a PO5 0133 13 I Conventional tools Cylinder head clamping fixture e g Hunger D 8000 Munchen 70 Part No 211 60 000 Valve seat turning equipment model VDSNL l 45 30 e g Hunger D 8000 Munchen 70 Part No 236 03 308 Test set for valve seats e g Hunger D 8000 Munchen 70 Part No 21...

Page 277: ...ining valve seats 1 Machine valve seat 45 see tool manufacturer s operating Instructions Caution Only loosen pilot 5 when eccentricity of the valve seat has been checked 6 Clamping fixture 8 Forward feed operation 2 Check eccentricity of valve seat max 0 03 mm Slide fitting sleeve 19 and dial gauge holder 20 and dial gauge 18 onto the pilot 5 3 Measure valve seat width b and if required make a 15 ...

Page 278: ...4 Insert valves and measure distance a Distance a 0 1 0 5 mm If a IS outside tolerance replace valve seat insert 05290 05 10 291 4 ...

Page 279: ...OS 31 0 Removing and installing chain tensioner 244 215 PO5 0182 37 Chain tensioner 224 remove install 65 Nm Replace sealing ring and install chain tensioner filled with SAE 10 engine oil 0510 3101 ...

Page 280: ...nd with little effort after filling with oil Note A revised valve disk 231 has been fitted in the chain tensioner in order to avoid peak pressures of the chain tensioner on the tensioner rail 225 226 227 228 229 230 231 232 233 233a 234 235 236 a b A B Sealing plug Alumlnlum gasket A 25x30 5 mm 0 ball Ball guide Compression spring Compressionspring Valve disk 0 rrng Plunger Filler piece Compressio...

Page 281: ...of 27 x 32 mm previously 25 x 30 This revision prevents the formation of burrs on the sealing ring picture circular cut out when tightening the chain tenstoner This chain tensioner can also be installed In vehicles of earlier manufacture 237 PO5 0206 13 dl 32 mm d 2 27 mm A Previous design B Rewsed design Production breakpoint 07187 not recorded 05 10 3103 ...

Page 282: ...Special tool f 05 10 310 5 ...

Page 283: ... Flat Rates 05 7601 244 215 PO50182 37 Chain tensioner 244 Remove and install 05 310 Camshaft timing gear 188 check for scores and pitting Number 2 Timing chain separate mount new timing chain with connecting link to the old timing chain turn engine and raise old timing chain and detach Numbers 3 5 Caution The trmlng chain must remain In engagement on the camshaft and crankshaft gear as the engine...

Page 284: ...nk pins individually with assembly tool 000 589 58 43 00 Numbers 6 10 Tightening torque of spindle 30 35 Nm check Number 11 turn crankshaft check adjustment marking at TDC position Number 13 Model Engine Manual transmission Engine end No Automatic transmission 005200 005645 126 125 006408 006754 Vehicle identification end No A F 351660 024286 358256 024446 290826 293731 335707 287778 338278 291247...

Page 285: ...ction breakpoint 02 89 not recorded Since 09 89 timing chains Daido Company have been installed again Production breakpoint 09 89 124 133 I 603 g60 I 023241 066158 122989 124 193 126 135 603 970 I f 488196 t 201 126 1602 911 1082936 016428 533524 666204 not recorded G5 10 320 3 ...

Page 286: ...have no grooves W r The outer clip of revised connecting link A must be pressed on and riveted with assembly tool 000 589 58 43 00 The former assembly tool 000 589 57 43 00 for connecting link with stop spring B can be modified with the conversion kit 000 589 58 43 80 Part No of the assembly tool is to be changed to 000 589 58 43 00 Special tools 000 589 5 8 4 3 0 0 001 589 72 21 00 _A 0 5 1 0 320...

Page 287: ... the old timing chain until the connecting link is located at the uppermost position of the camshaft timing gear Pull out the released end of the old timing chain evenly to match pulling on the new timing chain Caution The timing charn must remain engaged with the camshaft and crankshaft gear while engine is turned 5 Detach old timing chain and connect the ends of the new timing chain with a conne...

Page 288: ...ool 000 589 58 43 00 on connecting link and press on clip up to the stop Caution Put clip on so that both rivet pins engage 9 Turn punch 02 of assembly tool 000 589 58 43 00 so that the notch arrow points forwards 10 Place assembly tool exactly over the center of the pins Rivet the connecting link pins individually whilst tightening spindle to approx 30 35 Nm Reference value PO5 2056 13 05 10 3206...

Page 289: ... tensioner 05 310 13 Turn crankshaft and check adjustment marking at TDC posltton of engine Note If adjustment markings do not align the camshaft timing 05215 and start of delivery of the injection pump 07 1 l 11 must be checked I I I I L_LL _ 3 p PO6 2206 13 05 10 320 7 ...

Page 290: ... rail Preceding work Cylinder head removed 01 4 15 Tlmlng case cover removed 01 210 Chain tensioner removed 05 310 244 215 PO5 0182 37 Tensioner rail 215 pull off reinstall Note Plastic support of the tensioner rail cannot be replaced 05 10 330 1 ...

Page 291: ...g Production breakpoint 08186 Model Engine I I Engine end No Vehicle ldentlficatlon end No Manual Automattc transmission transmission A F 124 133 I 603 g60 I 003526 313431 019062 124 193 126 125 1603 961 004997 1278305 201 126 602 911 025293 006190 332559 266086 I not recorded 05 10 330 2 ...

Page 292: ...g wear Dotted line shows former desrgn PO5 0215 15 Production breakpoint 09 86 Model Engrne Engine end No Vehicle identrficatron Manual Automatic end No transmission transmissron A F 124 133 I 603 960 I 004863 342586 023347 124 193 126 125 6 0 3 9 6 1 I I 006205 389319 201 126 028504 006859 333489 286635 0510 3303 ...

Page 293: ...l in cylinder head 188 PO 01 99 35 Cylinder head cover 125 With self levelling suspension Pressure oil pump drive remove install bolt 132 10 Nm remove rnstall 05437 Camshaft timing gear 188 mark at timing chain Remove install camshaft timing gear Drfferent bolts 190 and washers 189 with different tightening torques Hexagon bolt 65 Nm Bihexagonal head bolt 25 Nm 90 05220 Numbers 3 5 05 10 341 1 ...

Page 294: ...together with stud 115 589 01 34 00 If the bearing pins have seized Tightening torques and angle of rotation Nm Hexagon bolts on cylinder head cover 10 Hexagon bolt on camshaft timing gear 65 Brhexagonal head bolt on camshaft timing gear 25 90 Special tools 1 1 6 5 8 9 2 0 3 3 0 0 L P5 I L 1 1 5 5 8 9 2 0 3 3 0 0 1 1 5 5 8 9 0 1 3 4 0 0 001 589 66 21 00 05 05 00 001 589 72 21 00 05 10 341 2 ...

Page 295: ...ile holding camshaft with a mandrel 5 Remove camshaft timing gear and allow timing chain to sag Caution Note different bolt and washer 05220 6 Drive out both bearing bolts with the Impact puller 116 589 20 33 00 and 116 589 01 34 00 and remove guide rail Check guide rail and replace if necessary Caution Seized bearing bolts can also be pulled out with puller 115 589 20 33 00 and stud 115 589 01 34...

Page 296: ...to the marking and tighten noting the color markings Tightening torque and angle of rotation Hexagon bolt 65 Nm Brhexagonal head bolt 25 Nm 90 9 Position engine on ignrtron TDC of No 1 cylinder and check marking arrows AWarning Do not turn engrne by camshaft timing gear bolt With self levelling suspension 10 Install pressure oil pump drive 05 437 11 Install cylinder head cover 10 Nm PO5 2258 13 05...

Page 297: ...d 05 310 B Removal and installation of guide rail in timing case POMrn 15 Guiding rail 218 pull off from guiding blade bolt 222 put on Check guiding rail renew If necessary Note Since 09 86 unhardened straight pins have been fitted for the guiding rail bearing 05 10 341 5 ...

Page 298: ...ine Engine end No Vehicle identlficatlon Manual Automatic end No transmission transmission A F 124 133 I 603 g60 I 003526 313431 019062 124 193 126 125 6 0 3 9 6 1 I I 004997 278305 201 126 602 911 025293 006190 332559 266086 135 10 341 6 ...

Page 299: ...1 Nm put pressure 011 pump to one side with lines connected O ring 404 Carrier 403 Bolt 407 Carrier sleeve 406 Note Do not unbolt the upper and lower bolt with continuous thread vrsrble between housrng and cover replace remove install check unbolt reinstall Note different bolt 05 220 Tightening torque and angle of rotation Hexagon bolt 25 Nm Bihexagonal necked down bolt 25 Nm 90 remove install Use...

Page 300: ...r has been revised as a result of this change A Prewcus Design B Rewsed Design Production breakpoint 1 l 88 ul t _ I i_ _I 10 4 Model Engine 124 Manual transmission Engine end No Automatic transmission 000187 019336 Vehicle identlficatlon end No 1 201 602 911 070124 014216 602 961 004561 not recorded Special tool 001 589 72 21 00 00 I _ ...

Page 301: ...ystern Air r Turbocharger 09 ...

Page 302: ...harger boost pressure 09 100 Removal and installation of turbocharger 09 150 Function of engine overload protection Turbodiesel 09 200 Testing engine overload protection Turbodiesel 09 250 Removal and installation of air cleaner 09 400 Removal and installation of air cleaner Turbodiesel 09 400 0911 ...

Page 303: ...l 2 Productron breakpornt at a later point In time KKK Kuhnle Kopp und Kausch 3 For Callfornla with air recirculation valve Engine 602 961 Garrett TB 025 Boost pressure control Turbine housing valve Fresh air Inlet Compressed air Bypass passage Exhaust Inlet Exhaust outlet 011 feed 011 discharge Engine 603 96 Garrett TB 03 a Boost pressure control valve C Compressor housing h Turbine housing 09 10...

Page 304: ...ine exhaust gas is used for driving a turbine which in turn drives a compressor through a shaft The EGT is installed between the exhaust manifold and the exhaust pipe It is connected to the engine oil circuit for lubrication and cooling Po o4313 A boost pressure control valve fitted to the turbine housing or separately ensures that a boost pressure of 0 95 bar is not exceeded if a problem develops...

Page 305: ...pprox 135 000 rpm The fresh air drawn in by the compressor wheel d is compressed and sent to the engine I d e C nfm I k j h i P07 0473 57A Functional diagram turbocharger KKK K24 Engine 603 96 a Boost pressure control valve C Compressor housing d Compressor wheel e Control line f Axial bearing g Beanng bushing h Turbtne houslng I Turbine wheel I Spnng k Diaphragm I Valve m Charge housing Shaft Fre...

Page 306: ...ge air pipe S66 Pressure switch engine overload protection Y30 Switch over valve engme overload protectlon Boost pressure control valve Compressor wheel Control line Air admIssIon Turbine wheel Compressor Inlet fresh air Compressor outlet compressed arr Exhaust gases to turbine wheel Exhaust outlet 09 10 III 050 4 ...

Page 307: ...KK with air recirculation valve California Model year 1986187 9 h k m Control valve exhaust gas control flap AIM recwculatlon valve Compressor houslng Compressor wheel Connector hose Axial bearing Bearing bush Turbine houslng Turbine wheel Compressron sprtng Diaphragm Boost pressure control valve lntermedrate housrng K Compressor Inlet fresh air Compressor outlet compressor air Bypass passage boos...

Page 308: ...re is reached the boost pressure control valve begins to open and allows the exhaust gas to flow along the bypass passage c Part of the exhaust gas flows directly into the exhaust system resulting in a constant boost pressure level Boost pressure diagram full load h I i 14 Connecting hose a Boost pressure control valve e Control line h Turbine housing 1 Spnng k Diaphragm I Valve C Bypass passage E...

Page 309: ...the turbine wheel i is accelerated producing a boost pressure up to a certain value via the compressor wheel d The compressed charge air is passed through the charge air pipe to the individual cylinders The boost pressure allows an increased quantity of fuel to flow through the ALDA unit at the injection pump Although boost pressure exists in the decelera tion mode fuel injection is stopped as a r...

Page 310: ... 59 Tester 001 connect disconnect Pulse generator 021 connect disconnect Tester 020 with Y distributor connect to measuring point A and test boost pressure Tester 020 with Y distributor connect to measuring point B and test boost pressure 09 10 III 100 l ...

Page 311: ...ing line from boost pressure control valve to compressor housing Switchover valve of engine overload protection 09 250 White vacuum line and rubber connections If all components are in working order replace turbocharger Test data Boost pressure at full load in drive position 3 at n 4000 rpm 0 85 0 95 bar gauge pressure Special tool 603 589 03 21 00 Commercial tester Digital tester or tachometer in...

Page 312: ... red violet brown on EGR valve 60 and red violet blue on air recirculation valve Clip 119 on corrugated pipe 61 drive onto the platform or inspection pit detach attach remove install 09 400 loosen and detach attach intake hose 167 remove install 9 bolts of which 6 are accessible from above 3 accessible from below Figure 4 detach attach loosen tighten Tightening torque 45 Nm 09 10 III 15011 ...

Page 313: ...ence values Removal installation Note For the conversion the car must be driven onto an inspection pit or platform 1 Completely remove noise encapsulation from below 2 Remove air cleaner entirely remove install remove install Tightening torque 25 Nm unbolt bolt on Tightening torque 45 Nm unbolt bolt on and remove at the same time with trap oxidizer remove install Replace gasket 138 d detach attach...

Page 314: ...etach vacuum lines red violet brown on EGR valve and red violet blue on air recirculation valve 6 Loosen clips B on corrugated pipe and remove corrugated pipe 7 Unbolt trap oxidizer from exhaust manifold remove trap oxidizer and supporting bracket at the same time 8 Remove charge air connecting line 138 a 09 10 III 150 3 ...

Page 315: ... mounting brackets 134 on the exhaust manifold and turbocharger 13 Loosen bolts of exhaust pipe accessible from above arrows 14 Loosen bottom bolt of exhaust flange 15 Unbolt mounting 177 from alternator flange to turbine housing on both components 16 Remove turbocharger 17 Install corrugated pipe with flange onto new turbocharger 18 Clean sealing surfaces mechanically 09 10 III 150 4 ...

Page 316: ...ther with corrugated pipe 22 Install partition panel 23 Connect vacuum line red violetbrown to EGR valve and vacuum line red violetblue to air recirculation valve 24 Connect intake hose to air flow sensor and tighten hose clip 25 Install air cleaner complete 26 Completely reinstall bottom section of noise encapsulation 09 10 III 15015 ...

Page 317: ...e and the fuel quantity is limited to that of a naturally aspirated engine Location of Components 1 Injection pump 2 Governor 3 Fuel pump 6 Stop unit 65 Vacuum COntfOl Valve 103 ALDA unit Y22 Actuator Y30 Switch over valve engine overload protection 54 5 2 50 4 8 4 6 4 4 4 2 4 0 3 8 36 I 34 i 3 2 3 0 2 8 1 1 1 1200 1600 2 0 0 0 2 4 0 0 2 6 0 0 3 2 0 0 3 6 0 0 4 0 0 0 4 4 0 0 4 8 0 0 mm PO9 0025 13...

Page 318: ...S66 Switch engme overload protectlon Pressure vacuum diagrams refer to 07 1 500 Wiring diagrams refer to 07 1 400 09 10 III 2001 2 ...

Page 319: ...charger 138 Charge air pipe S66 Pressure switch engine overload protection Y30 Switch over valve engine overload protectlon Boost pressure control valve Compressor wheel Control line Air admIssIon Turbine wheel Compressor Inlet fresh air Compressor outlet precompressed air Exhaust gases to turbine wheel Exhaust outlet 09 10 III 250 l ...

Page 320: ...ect pressure switch to cable of nozzle tester KDJE P 400 Connect ohmmeter to pin of pressure switch and to housing Build up pressure of 1 l 2 0 15 bar at nozzle tester the pressure switch must not have any continuity Replace pressure switch if necessary Special tools I201 589 00 99 00 Commercial tester Digital multimeter e g Sun DMM 5 Valve tester e g Bosch KDJE P 400 Bosch Order Designation Optio...

Page 321: ...5b Bolt 9 Bracket 2 off 95 Air guide housing 94 Sealing boot 93 Rubber 4 off 96 Intake scoop 102 91 Pin 102a installation position open close remove reinstall remove reinstall remove reinstall remove reinstall remove reinstall remove reinstall remove reinstall remove reinstall ensure proper seating replace according to condition remove reinstall replace according to condition 09 10 II 40011 ...

Page 322: ...eaner cover 90 and filter element 91 of revised material Production breakpoint December 1989 Model Engine Engine end no Engine end no Manual transmission Automatic transmission 201 126 602 911 086698 016956 09 10 II 40012 ...

Page 323: ... Air flow sensor B2 1 Wire clip 92 Air cleaner cover 90 a Washer 95 b Bolt 95 c remove install Ensure correct position during installation remove install remove install remove install remove install slacken tighten remove install remove install renew according to condition bolt on unbolt remove install unclip clip in place remove install remove install remove install 09 10 III 40013 ...

Page 324: ...Repair Instruction When the engine is running the fender cover right must be removed otherwise the fresh air intake arrow is blocked 09 10 Ill 40014 ...

Reviews: