background image

2

1

3

4

5

6

Door Panel

01GRODBDP2413X1796-V1

Window Panel

01GRODBWS1459X1816-V1

QTY 2

Plain Panel

01GRODBPS1459X1816-V1

QTY 2

Back Panel

01GRODBBPP2413X1796-V1

Gable Top

01GRODBPGT2418X810-V1

QTY 2

Door

01MBDR1770X676-V1

QTY 2

Floor

01TAGF2388X1499-V1

QTY 2

Sml Roof

01GRODB1008-V3SR

QTY 2

Lrg Roof

01GRODB1008-V3LR

QTY 2

Window

01OW-V1

QTY 2

11

12

Gable Strip - 12x121x2300mm QTY 2

WB-2300mm

Cover Strip - 12x56x1765mm QTY 6

S1256-1765mm

24

Turn Button QTY 2

PI-07-0034

25

T-hinge QTY 6

PI-07-0021

26

Casement Stay QTY 2

PI-07-0007

Nail Bag

50mm Screw x64 

40mm Screw x38 

Felt Tacks x190

30mm Screw x110

60mm Screw x18

30mm Black Screw x16

16mm Screws x14

Pre Assembly

Remove transportation blocks from the bottom of each 

panel before beginning assembly. Each Panel should have 

two blocks.

20mm Screw x22

PI-07-0191

P 2

01GRODB1008-V4

Overall Dimensions:

Length = 3055mm 

Width = 2583mm 

Height = 2588mm

Base Dimensions: 

Length = 2998mm 

Width = 2388mm 

Please retain product label and instructions for future reference


Before assembly  

please make sure you have a 

suitable base ready to erect your 

building 


MADE IN GREAT BRITAIN

7

8

10

13

14

15

16

17

18

Door Strip - 12x45x1764mm QTY 2

S1245-1764mm

Door Strip - 12x45x1449mm

S1245-1449mm

Window Strip - 12x56x1037mm

S1256-1037mm

Barge Board - 12x95x691mm

S1295-691mm

Barge Board - 12x95x760mm QTY 2

S1295-760mm

Fascia Board - 12x95x835mm QTY 4

S1295-835mm

9

19

Fascia Board - 12x95x739mm 

S1295-739mm

 QTY 4

21

22

Butt Hinge QTY 4

PI-07-0066

Barrel Bolt QTY 2

PI-07-0068

23

20

Door Cloaking Strip 

F2744-1670mm

Hasp & Staple Lock

Summary of Contents for 01GRODB1008-V4

Page 1: ...based treatment this only helps to protect the product during transit and for upto 3 months against mould To validate your guarantee and ensure longevity of the product it is ESSENTIAL the building is...

Page 2: ...ve transportation blocks from the bottom of each panel before beginning assembly Each Panel should have two blocks 20mm Screw x22 PI 07 0191 P 2 01GRODB1008 V4 Overall Dimensions Length 3055mm Width 2...

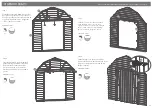
Page 3: ...lustration and fix in place using 40mm screws 6x40mm Screws Pre drill hole 40mm screw 14 13 13 Step 3 Fix the door strips onto the front gable using 4x30mm screws for each strip Ensure that there is a...

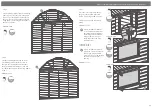
Page 4: ...a P 4 Please retain product label and instructions for future reference Pre drill hole Pre drill hole Step 7 Place the cover strip 13mm above the gap in the window panel and fix into place using 3x30m...

Page 5: ...a tongue and groove fixing 8x50mm Screws 7 7 Step 9 Place the assembled plain gable and first plain side onto the floor and fix in place Fix the corners with 50mm screws Do not secure the building to...

Page 6: ...3 Place the lrg roofs onto the gables as shown in the illustration Ensure the roof framing sits into the cut out sections and rest on the framing Fix each sml roof section to the gable using 7x30mm sc...

Page 7: ...scia Ensure to screw through the boards into the framing 24x40mm Screws Pre drill hole 40mm screw Step 18 Fix the barge boards to the front of the building using 3x20mm screws per board 9x20mm Screws...

Page 8: ...12x20mm Screws 26 Step 22 Attach the turn buttons to the top and bottom of the slave door using 1x30mm black screw per turn button Ensuring the turn buttons catch the master door 2x30mm Black Screws...

Reviews: