background image

P 7


P 9


Please retain product label and instructions for future reference


8x8 Summer 

House

10x8 Summer 

House

IMPORTANT:

 Pre-drill before fixing screws.

34

34

34

34

Pre drill 

hole

30mm 

screw

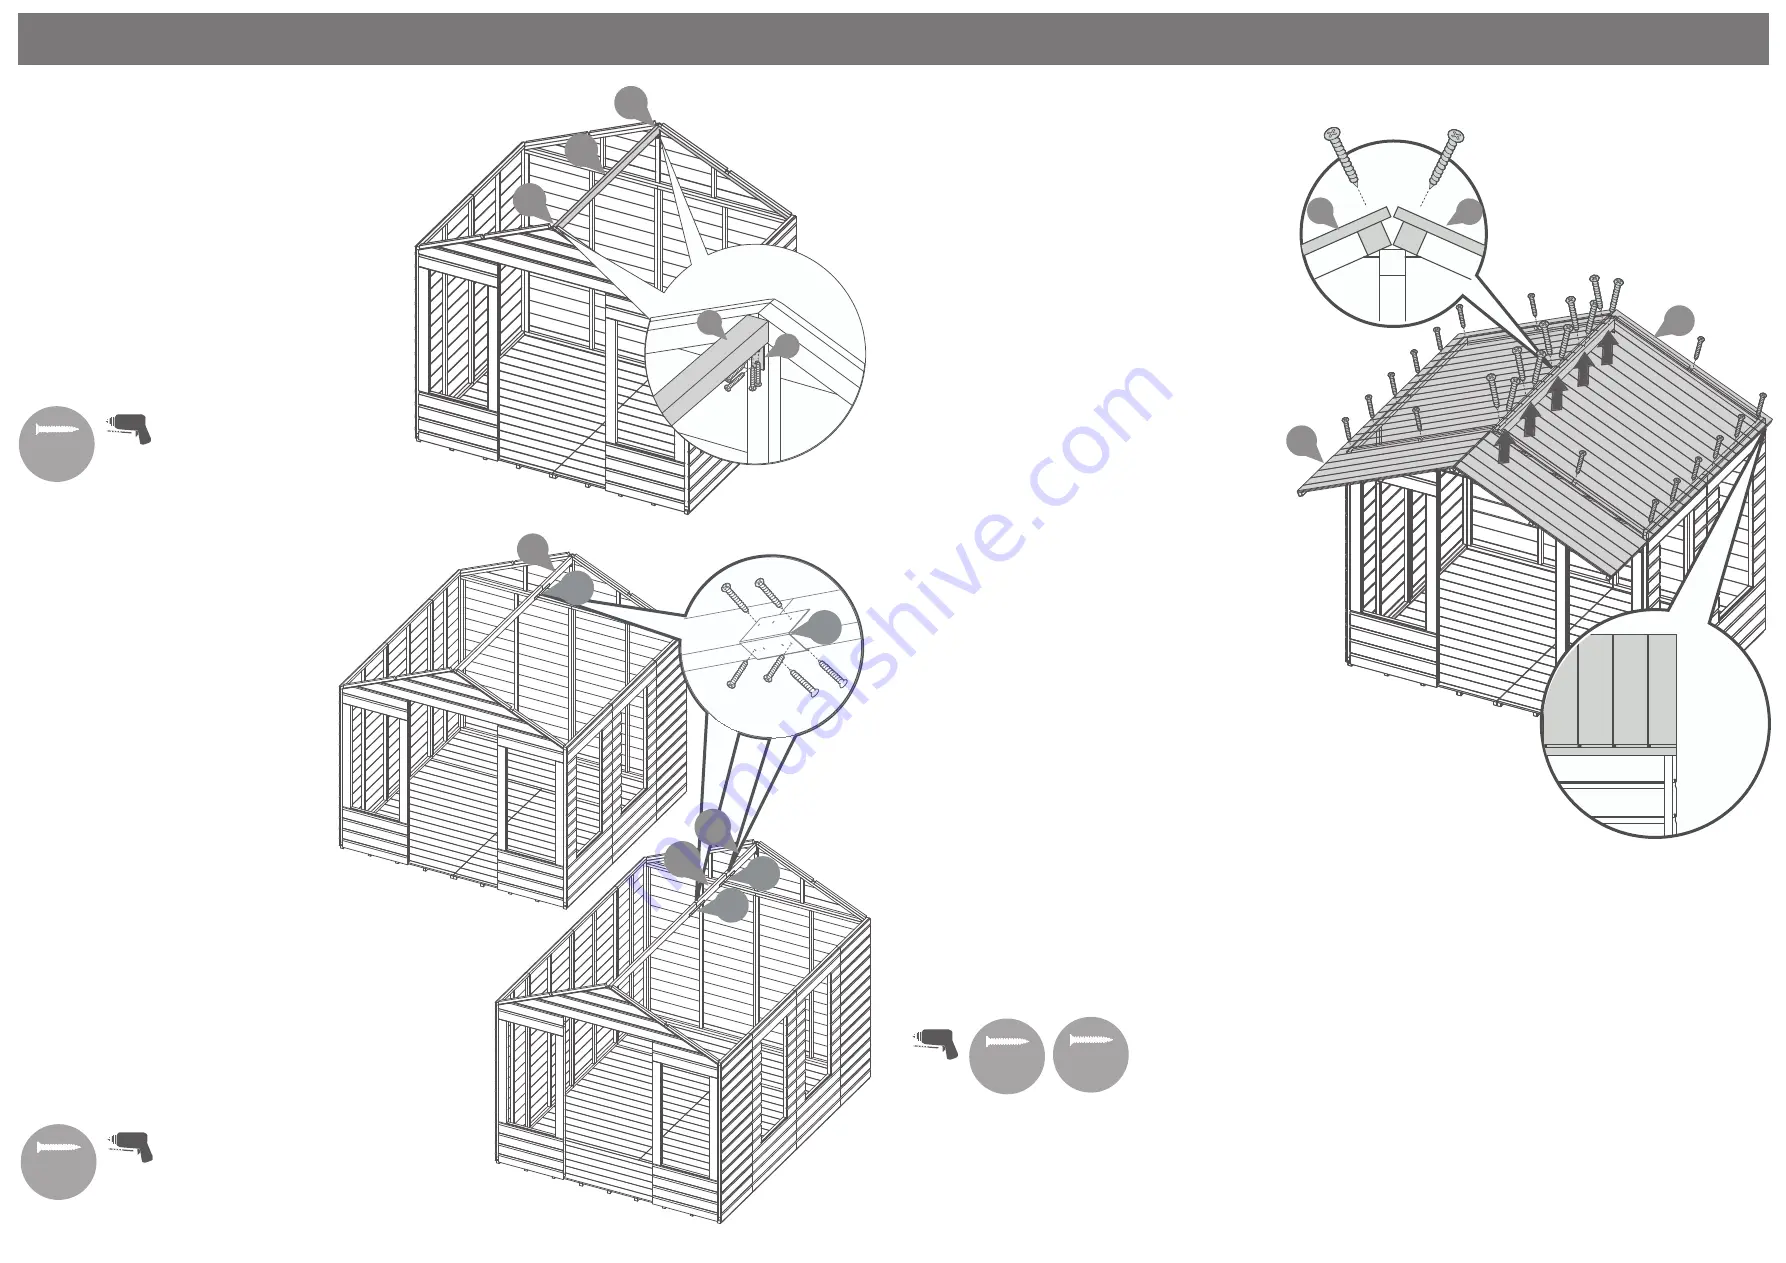
Step 8

Parts Needed- No.19 QTY 1


- No.24 QTY 2


Fix the Corner Braces 

(No.24)

 to each end 

of the Ridge Bar 

(No.19)

 using 2x30mm 

screws per corner brace.

Fix the Ridge bar to the top of each Gable 

using 2x30mm screws per corner brace.

Ensure it is flush to the gable framing as 

shown.

8x30mm Screws

Pre drill 

hole

30mm 

screw

2ft EXTENSION PACK

Step 8a

8x8 Summer House Parts Needed


- No.33 QTY 1


- No.34 QTY 1

10x8 Summer House Parts Needed


- No.33 QTY 2


- No.34 QTY 2

Fix the Ridge bar Extension 

(No.33)

 to the 

Ridge Bar 

(No.19) 

using U Channels 

(No.34)

, secure the U Channels using 

6x30mm screws per U channel 

Fix the Corner Braces  to each end of the 

assembled Ridge Bar using 2x30mm screws 

per corner brace.

Fix the Ridge bar to the top of each Gable 

using 2x30mm screws per corner brace. 

Ensure it is flush to the gable framing as 

shown.

14x30mm Screws (8x8 Summer House) 

20x30mm Screws (10x8 Summer House) 

19

24

24

19

24

33

33

33

40mm 

screw

Pre drill 

hole

5

5

Step 9

Parts needed - No. 5 QTY 2

For 2ft Extension Pack, go to Step 9a 

on the next page

Place the Roof Panels 

(No. 5)

 on top of the 

building making sure the framing in the roof 

panels sits firmly within the Gable Tops 

(No.10 

and No.11)

 and on top of the Ridge Bar 

(No.19)

.  

**Make sure that you have got the roof 

panels the correct way round with the recess 

at the top of the apex as shown in the 

diagram.**

**The edges of the roof panels must be flush 

with the outer cladding of the Plain Gable 

Top (No.10).** 

From the top, fix directly through the roof 

panels 

(No.5) 

and into the ridge bar 

(No.19) 

the


below using 5x60mm screws per roof 

panel.

It is essential that the ridge bar 

(No.19) 

and 

roof panel 

(No.5) 

framing pull together when 

fixed with 60mm screws. You may require 

another person pushing the ridge bar 

(No.19) 

up from below to achieve this.

HINT - Follow the nailing line of the framing on 

the roof panel so that you are more likely to fix 

into the ridge bar below. 

Fix the remaining sides of the roof panels using 

40mm screws, ensuring to go through to the 

framing below.

16x40mm Screws

10x60mm Screws

60mm 

screw

5

5

Summary of Contents for 03DTSHAX0608FGD4MW-V1

Page 1: ...d avoid placing your garden building underneath large trees to prevent the tree causing damage to the building TIMBER As with all natural materials timber can be affected during various weather condit...

Page 2: ...Pack Required 03DTSHAX0608FGD4MW V1 QTY 1 03DTSHAX0208NWPB V1 QTY 2 10x8 Summer House Overall Dimensions Width 2494mm Depth 2457mm Height 2344mm Base Dimensions Width 2350mm Depth 2390mm Pack Required...

Page 3: ...Frame Strip 12x40x1740mm QTY 2 S1240 1740mm 17 Door Cover Trim 12x43x940mm QTY 1 S1243 940mm 18 Fascia 12x95x1365mm QTY 4 S1295 1365mm 19 Ridge Bar 27x70x1703mm QTY 1 F2770 1703mm Corner Brace QTY 2 P...

Page 4: ...lain Panel Extension QTY 2 AI S11SHPP600X1717 V1 32 Floor Blocks QTY 8 F2828 400mm 33 34 U Channel QTY 3 PI 07 0031 Ridge Bar 27x70x599mm QTY 1 F2770 599mm If 2ft Extension Pack has been purchased Ple...

Page 5: ...together using 10x50mm screws through the floor bearers in an alternating pattern 10x50mm Screws 6 50mm screw 6 2ft EXTENSION PACK Step 1a Parts needed No 6 QTY 2 No 29 QTY 1 No 32 QTY 8 Place the fl...

Page 6: ...rusing3x50mmscrews PlacetheSidepanel No 2 ontothefloorand fixalongthesideinalternatingpatternusing 3x50mmscrews Donotsecurethebuildingtothefloor untiltheroofhasbeenfitted Positionthepanelssothereisequ...

Page 7: ...g on all sides 6x50mm Screws a a a a a a Pre drill hole 50mm screw 2ft EXTENSION PACK 10x8 SUMMER HOUSE ONLY Step 4a Parts Needed No 31 QTY 2 Place the Plain panels Extensions No 31 onto the floor Fix...

Page 8: ...re drill hole 40mm screw 12 Step 6 Parts Needed No 12 QTY 1 Place the Door Framing No 12 onto the floor between the Front Window Panels Ensure the framing is flush to the Window Panel framing Ensure t...

Page 9: ...20x30mmScrews 10x8SummerHouse 19 24 24 19 24 33 33 33 40mm screw Pre drill hole 5 5 Step 9 Parts needed No 5 QTY 2 For 2ft Extension Pack go to Step 9a on the next page Place the Roof Panels No 5 on...

Page 10: ...ay out of the Roof extensions already laid on the bulindg fix the remaining roof extensions onto the builing and secure to the ridge bar using 2x60mm screws per Roof Extension It is essential that the...

Page 11: ...om internally of the Window No 4 as shown with 1x30mm screw per block 4 Window blocks should be used per window Place the Window into the window hole in the Front and Side Window Panel and fix by scre...

Page 12: ...key holes 4x20mm Black screws Pre drill hole 20mm screw Step 14 Parts Needed No 15 QTY 1 No 16 QTY 2 On the inside of the building fix the Door Frame Strips No 15 and No 16 to the top and sides of the...

Page 13: ...ews Pre drill hole 20mm screw 23 28 28 Step 18 Parts Needed No 14 QTY 7 Fix the Cover trims No 14 to each corner and over the panel joins secure using 3x30mm screws per cover trim Cover trims may need...

Page 14: ...rews IMPORTANT Pre drill before fixing screws HANDLE WITH CARE 1 2 3 4 Step 20 Parts Needed No 27 QTY 1 Cut the Felt No 27 into 3 sheets of 2510mm and lay onto the roof in the order shown in the diagr...

Page 15: ...score around protective cover on glazing and carefuly peel covering back P15 Please retain product label and instructions for future reference Step 20b Parts Needed No 35 QTY 4 Place the Veranda No 35...

Page 16: ...he Window framing using 6x20mm screws as shown in the diagram Further secure the crosses by screwing 1x10mm screw at each meeting point as shown in the diagram 24x20mm screws 8x10mm screws Pre drill h...

Page 17: ...gh the roof fram ing Fix the Diamond Finials No 26 to the Fascias using 2x30mm screws per finial 10x30mm Screws 18 26 18 18 18 26 It is ESSENTIAL that you apply wood treatment immediately after the bu...

Page 18: ...2 1 3 4...

Page 19: ...1 2...

Reviews: