background image

P 4

Please retain product label and instructions for future reference


For assistance please contact customer care on: 01636 821215

Mercia Garden Products Limited, 

Sutton On Trent, 

Newark, 

Nottinghamshire, 

NG23 6QN

www.merciagardenproducts.co.uk

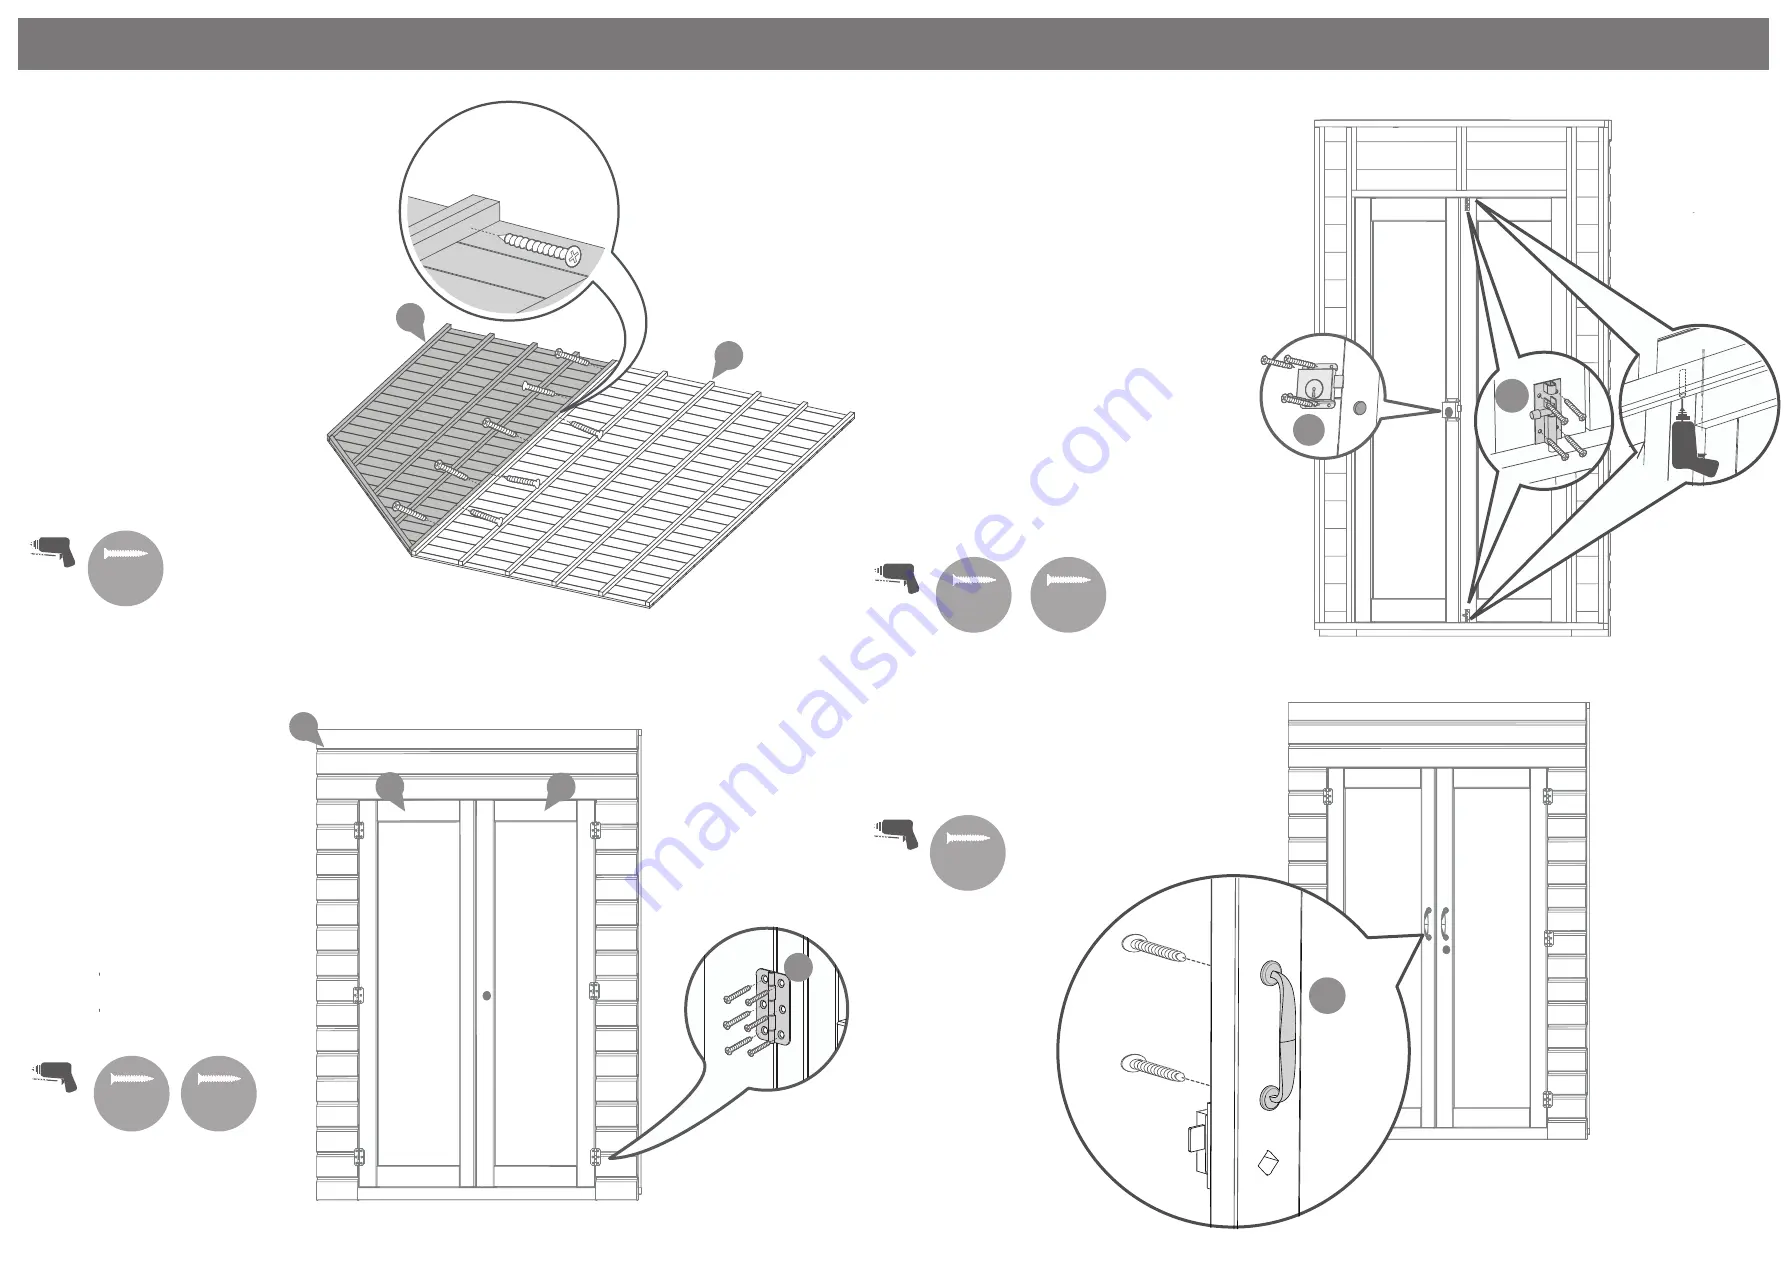
Step 1

Before fixing the two floor panels 

(No. 9 & 10)

 together place them 

both on a level surface framing side 

up (as illustrated). 

Fix the two floors 

(No. 9 & 10)


together using 50mm screws as 

shown making sure to alternate 

which side you fix from.

Once fixed turn the floors the 

opposite way up on a firm and level 

base, ensure the base has suitable 

drainage  free from areas where 

standing water can collect.  (See front 

page on base requirements). 

8x50mm Screws


10

 9

50mm 

screw

Pre drill 

hole

Step 2

Lay the Door Panel 

(No. 2)

 on a 

flat surface and place both doors 

(No. 11 & 12)

   into the door 

aperture. Position the doors so 

that they are equally spaced 

within the opening.

Fix the hinges 

(No. 31) 

to the 

doors using 25mm screws. 

Ensuring the doors are 

positioned equally fix the hinges 

to the door panel using 30mm 

screws.

18x25mm Screws

18x30mm Screws

Pre drill 

hole

2

11

12

31

30mm 

screw

25mm 

screw

Step 3

30

29

Fix the press lock 

(No. 30) 

to the door using 

4x16mm  screws ensuring the key hole lines up 

with the hole in the door. 

Fit the barrel bolts 

(No. 29)

 to top and bottom of 

the door as shown in the diagram. Use 4x10mm 

screws per barrel bolt.

Drill a hole into the framing above and below the 

barrel bolts for the bolts to secure into.

Ensure doors open and close freely.

Wood is a natural product and is  subject to 

movement with changing weather conditions. It 

is important that you fit the turn buttons and 

tower bolts as per the fitting instructions.

4x16mm Screws

8x10mm Screws

16mm 

screw

Pre drill 

hole

10mm 

screw

Pre drill holes then fix Chrome 

Handle 

(No. 33)

 using 35mm bolt 

as shown in diagram.

4x35mm Bolts

Pre drill 

hole

35mm

bolt

33

Step 4

Summary of Contents for 03TGCOR0909DDFW-V1

Page 1: ...extended periods of warm sunshine and sheltered as much as possible during rain or snow Once your garden building has been installed it will need to be treated as soon as possible and annually to prev...

Page 2: ...03TGCORPGR1417X2017 V1 Large Gable Left QTY 1 AI 03TGCORPGL1389X2094 V1 Small Gable Left QTY 1 AI 03TGCORPGL1417X2017 V1 Large Roof QTY 1 AI 03TAGROOF1685X2889 V1 Small Roof QTY 1 AI 03TAGROOF1204X288...

Page 3: ...PI 07 0114 Press Lock QTY 1 PI 07 0162 Rounded Butt Hinge QTY 6 PI 07 0066 L Bracket QTY 2 PI 07 0012 Chrome Handle QTY 2 PI 07 0081 Turn Button QTY 2 PI 07 0034 34 35 Locating Block 28x28x239mm QTY 2...

Page 4: ...the doors using 25mm screws Ensuring the doors are positioned equally fix the hinges to the door panel using 30mm screws 18x25mm Screws 18x30mm Screws Pre drill hole 2 11 12 31 30mm screw 25mm screw...

Page 5: ...corners together with 3x 60mm screw a shown in diagram Do not fix the panels to the floor untill the roof has been fitted 3x60mm Screws c Pre drill hole 60mm screw 5 17 Pre drill hole Step 7 Place the...

Page 6: ...e framing sits flush with the gable framing and fix in place with 4x50mm screws Place the front right window framing No 19 on top of the window panel opposite the left gables ensure the framing sits f...

Page 7: ...n the illustration using 6x30mm screws Ensure to fix the framing the opposite direction to the roof bearers Fix the locating blocks No 35 to the opposing sides to the roof framing these blocks are to...

Page 8: ...e fascia width as guide for overhang Fix each sheet using felt tacks along where sheet overlap Use felt tacks at 100mm intervals 200x10mm felt tacks Step 15 HANDLE WITH CARE 1 2 3 4 100cm 20cm 20cm 20...

Page 9: ...s No 22 to the window sides of the building using 3x40mm screws per fascia Fit the fascia No 21 to the front of the building using 3x40mm screws 19x40mm Screws Step 18 22 40mm screw Pre drill hole 22...

Page 10: ...refuly peel covering back Step 21 Attach the remaining rain guard No 14 above the doors fixing in place using 3x60mm 3x60mm Screws 60mm screw 14 14 Pre drill hole Step 22 On the inside of the building...

Page 11: ...2 1 3 4...

Page 12: ...1 2 REGISTER FOR YOUR ANTI ROT GUARANTEE TODAY PLEASE SCAN HERE...

Reviews: