background image

Side

Rear

Front

P4

Please retain product label and instructions for future reference


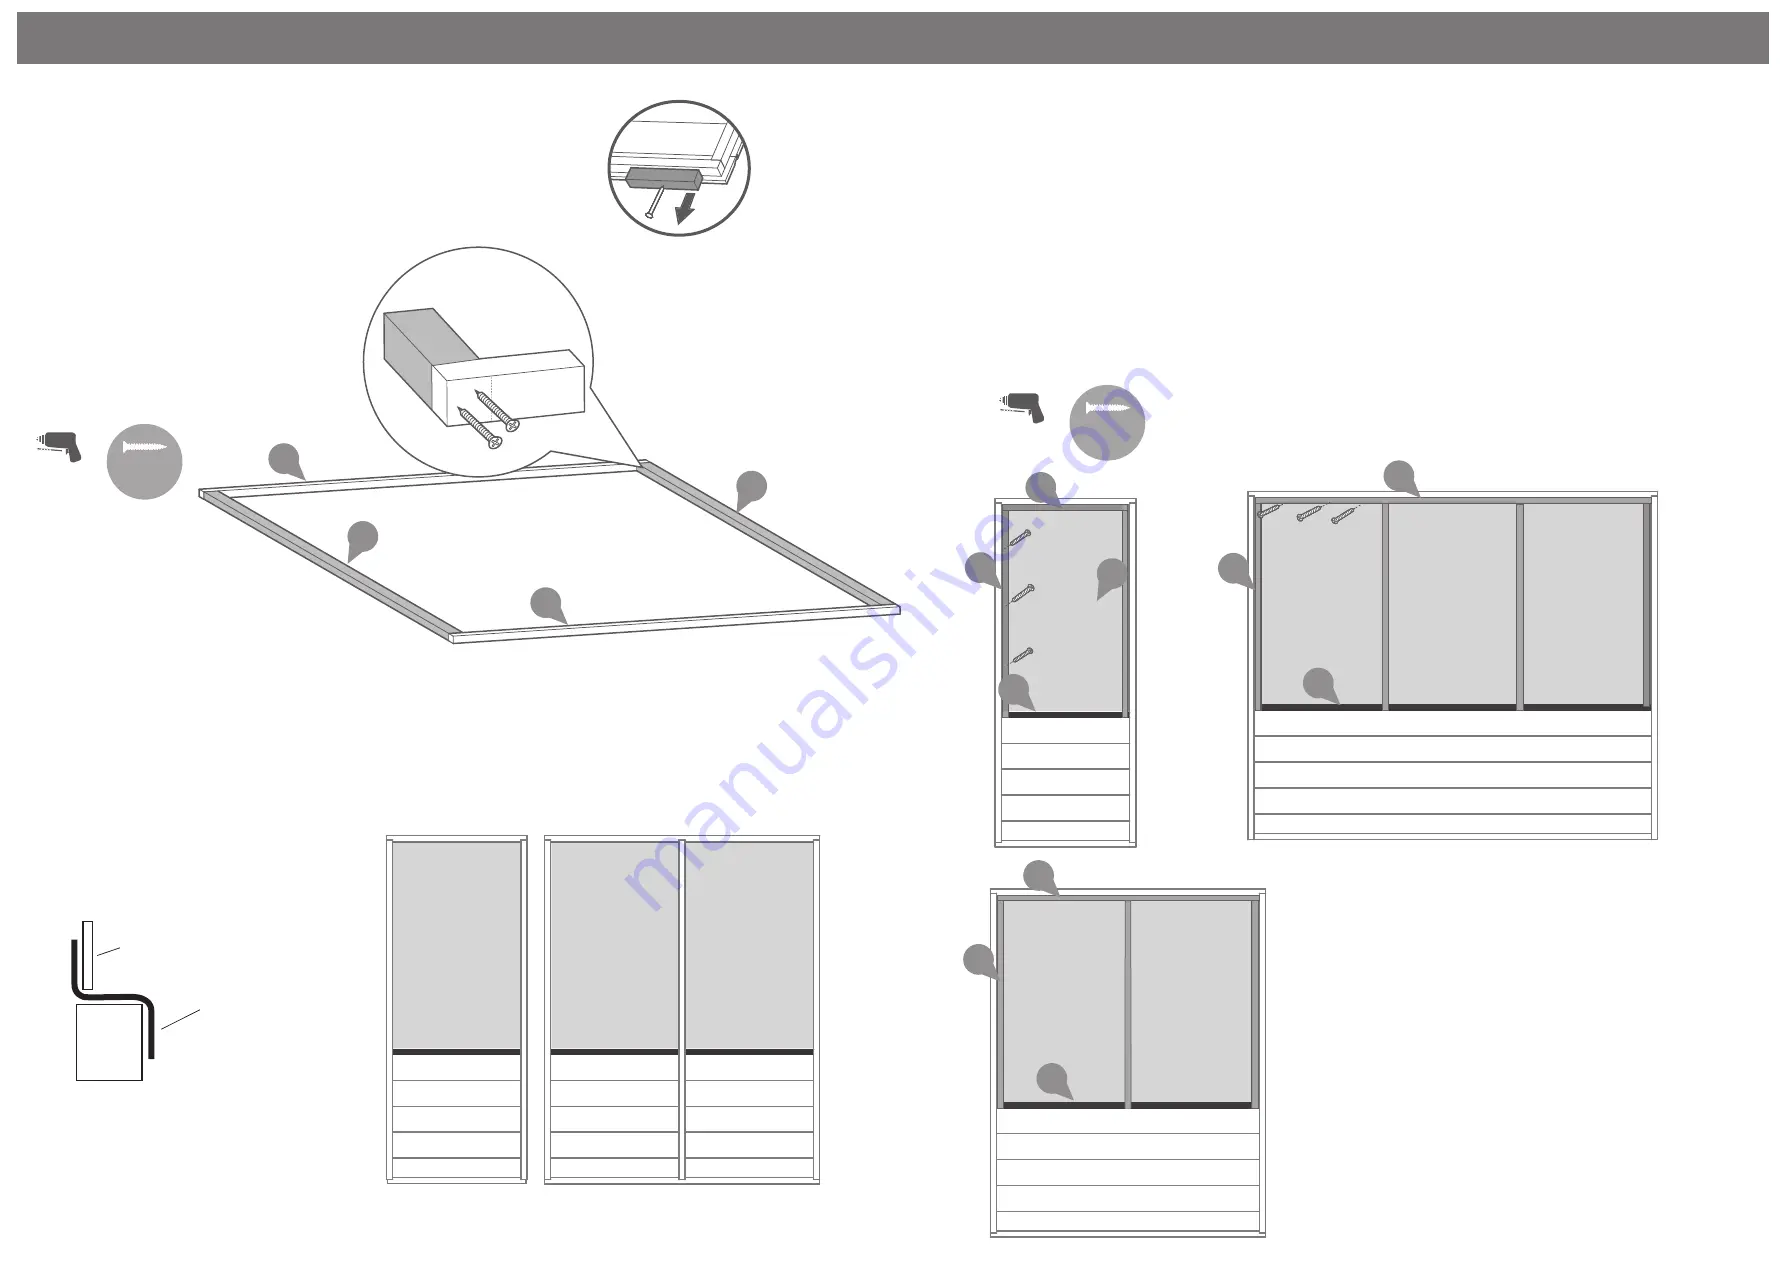
Step 1


Lay the base frame down as shown in the 

diagram. Ensure the base is square and 

layed on level ground. Fix the base    

framing 

(No. 11) 

&

 (No. 12) 

together with 

2 x 70mm screws per corner, pre drill to 

avoid splitting the timber.


8x70mm screws. 

Pre drill 

hole

70mm 

screw

Pre drill 

hole

Step 2


Assemble the window panels on the floor.

Place the plastic window cill onto the lip 

of the window panel externally.

1b. Lay the styrene on top of each open-

ing so that it overlaps the surrounding 

framing equally on both sides as per the 

diagram. 

Step 3


Attach the window strips using 3x30mm 

screws as per the diagram, starting with 

the top strip. Ensure the framing does not 

protrude the width of the window frame. 

Ensure you screw into the window strips 

to the side of where the styrene meets 

the window frame.

81x30mm

11

11

12

12

 Styrene

 Styrene

 Styrene

Window Cill

 Styrene

24

24

24

25

27

26

 Styrene

 Styrene

 Styrene

 Styrene

 Styrene

 Styrene

34

35

36

30

30mm 

screw

Pre Assembly

Before assembling remove the transportation

blocks from the bottom of each panel.

Summary of Contents for 04GREEN0406SD-V5

Page 1: ...P 1 04GREEN0406SD V5 x2 4 X 6 GREENHOUSE ASSEMBLY INSTRUCTIONS 04GREEN0406SD V5...

Page 2: ...X1037 V1 Plain Gable Top AI 04GREENPGT1864X426 V5 2 3 4 5 1 6 Roof AI 04GREENROOF1218X1037 V1 8 Door AI 04GREENDOOR550X1720 V5 9 Opening Window AI 04GREENOW560X460 V5 7 8 9 10 11 Fascia 1075mm QTY 4 B...

Page 3: ...indow Strip 610mm QTY 2 S1227 1193mm S1227 610mm Strip 543mm S1244 543mm Strip 560mm S1221 560mm Corner Trims 1576mm QTY 4 S1256 1576mm Strip 993mm QTY 6 Styrene 942x570x2mm QTY 9 Styrene 503x570mm St...

Page 4: ...indow panel externally 1b Lay the styrene on top of each open ing so that it overlaps the surrounding framing equally on both sides as per the diagram Step 3 Attach the window strips using 3x30mm scre...

Page 5: ...ill hole 50mm screw Side Front Rear Step 5 Fix the remaining Sml Window Side No 2 at the corner using 3 x 50mm screws 3x50mm screws Pre drill hole 50mm screw Side Front Rear Step 6 Fix the Door Sides...

Page 6: ...ws The building can now be attached to the floor framing with 6x50mm screws per side 24x50mm Screws Pre drill hole 50mm screw Step 10 Fix the Door strip No 17 to the top of the door opening with 3x30m...

Page 7: ...ame using 3x30mm screws per strip Ensure you screw to the side of the styrene not through it 15x30mm Screws Step 13 Attach the strip No 37 onto the window panel with 4x30mm screws Drop the window No 9...

Page 8: ...mm screws 6x20mm Screws Pre drill hole 20mm screw 6x20mm screws per casement stay 19 Step 15 Place the Roof panels No 6 No 7 on top of each gable making sure the roofs are flush to each gable and meet...

Page 9: ...the diagram 5x40mm Screws Pre drill hole 40mm screw Step 18 Fix the door No 8 to the building using 16x30mm black screws per hinge No 18 as shown in the diagram 16x30mm Black Screws Fit the turn butt...

Page 10: ...is the same Step 20 Fit the fascias No 10 and the finials No 21 to the building using 14x30mm screws as shown in the diagram 14x30mm Screws Pre drill hole 30mm screw Step 21 Fix the Roof trim No 16 to...

Page 11: ...P 11 1 2...

Page 12: ...P 12...

Reviews: