background image

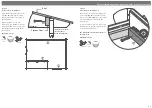
Pre drill 

hole

b

a

a

b

Example picture 

2 screws per bearer per end.

P4 

For assistance please contact customer care on: 01636 821215

Mercia Garden Products Limited, 

Sutton On Trent, 

Newark, 

Nottinghamshire, 

NG23 6QN

www.merciagardenproducts.co.uk

Please retain product label and instructions for future reference

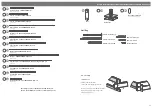
IMPORTANT: 

Pre-drill before fixing screws.

32

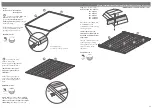
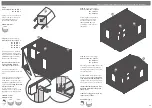
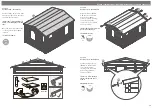
Step 1

Parts needed - No. 32 QTY 2


   No. 33 QTY 12


Lay the bearers 

A

 & 

B

 (

No. 32 

& No. 33

) onto a firm and level 

surface (

free from areas where 

standing water can collect

) as shown 

in the illustration.

Fix the framing together at each 

corner using 8x70mm screws, 

ensuring the frame is flush.

8x70mm Screws 

70mm 

screw

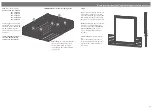
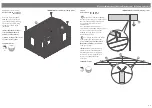
Step 2 

(See Pre-Assembly)

Parts needed - No. 6 QTY 1


No. 7 QTY 1


No. 8 QTY 1


No. 9 QTY 1


No. 11 QTY 1


No. 22 QTY 1

Place the boards (

No. 6, 7, 8, 

9, 11 & 22)

 on to the 

assembled base frame along 

the longest sides.

*Ensure the notches at 

either end of each board are 

flush and level with the ends 

of the frame.

Fix each of the starter boards 

to the frame by screwing 

through the notch into the 

frame as shown in the 

illustration.

6x70mm Screws 

7

6

11

Pre drill 

hole

70mm 

screw

33

33

32

Pre drill 

hole

70mm 

screw


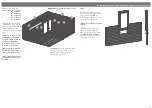
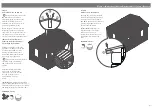
Following the same

method, arrange the 

remaining bearer’s (

B

) (

No. 33

inside the assembled frame 

*Ensure there is an equal

amount of space between 

each frame.


Fix the framing together at 

each corner using 10x70mm 

screws, ensuring the frame is 

flush.

40x70mm Screws

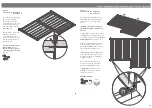
Please Note: 

The starters (

No’s. 38 & 39

)

can be arranged on either side (

allowing

the doors to be placed on the left or right 

the building

) depending on your needs.

7

8

9

22

33

33

Summary of Contents for 0628LOG131-V4

Page 1: ...ilding is sprayed with water during extended periods of warm sunshine and sheltered as much as possible during rain or snow BUILDING A BASE When thinking about where the building and base are going to...

Page 2: ...B28RT66 A 4000 Starter Board 28x66x2220mm LB28RT66 A 2220 Starter Board 28x66x2000mm LB28RT66 A 2000 Log Board 28x120x2111mm QTY 6 LB28 A 2111 Log Board 28x120x2000mm QTY 6 LB28 A 2000 Log Board 28x12...

Page 3: ...for future reference Veranda Post 70x70x2001mm F7070 2001 Notched Fascia 16x120x1601mm QTY 4 S16120 1601 Angled Fascia 16x120x4036mm QTY 2 S16120 4036 Eaves Frame 27x44x4000mm QTY 2 F2744 4000 Roof B...

Page 4: ...ds No 6 7 8 9 11 22 on to the assembled base frame along the longest sides Ensure the notches at either end of each board are flush and level with the ends of the frame Fix each of the starter boards...

Page 5: ...ards at the front of the building either side of the door and window opening s can be placed either side depending on your needs 9 22 11 19 13 10 19 Step 4 Once you have laid 6 log boards off of the s...

Page 6: ...boards are level and flush with each other as you lay each one Doors can be hung once the boarding has enclosed the door frame Please Note The short boards placed to create the opening s for the doors...

Page 7: ...Screws Step 7 See Pre Assembly Parts needed No 11 QTY 6 No 13 QTY 6 No 17 QTY 12 No 18 QTY 12 No 19 QTY 12 No 22 QTY 6 Following the same method outlined in Pre Assembly lay the remaining boards No s...

Page 8: ...12 22 onto the assembly as shown in the illustration Ensure that the boards are level and flush with each other as you lay each one Fix each board to the one below using 1x70mm screw per side Fix the...

Page 9: ...gger the screws to ensure not to collide 4x70mm Screws Pre drill hole 70mm screw 21 Step 15 See Pre Assembly Parts needed No 21 QTY 1 Keep adding the remaining boards onto the front and gables followi...

Page 10: ...the boards splitting using 4x70mm screws per purlin Please note The gable shown is for illustrative purposes and may differ in width from your choice in product Nevertheless despite any differences th...

Page 11: ...the apex The last board on each side will overhang Using a staight edge and a pencil mark out a line as a guide Cut along the pencil mark and remove the excess Place the cut down board s back onto th...

Page 12: ...d 1mm under the measurement This will allow the timber to expand and contract correctly Once all the floor boards are in position secure each board into position using 8x40mm screws Please Note Ensure...

Page 13: ...position fix each trim into place by pre drilling a pilot hole and using 6x30mm screws per trim equally spacing them along the face of the board 42x30mm Screws 30mm screw Pre drill hole Cut to fit Ste...

Page 14: ...mm 1 2 3 4 5 Step 26 Parts needed No 26 QTY 4 Align the fascia s No 26 with the roof and fix into place using 3x40mm screws per fascia making to screw through the fascia into the roof purlins and eave...

Page 15: ...internally Place 2x storm braces per side fixing into place using 2x 70mm bolts per brace making sure the washer nut are tightened from the outside of the building Ensure the storm braces are secured...

Reviews: