background image

Installation and User 

Guide 

NovAseptic

®

 GMP ATEX Mixer

NovAseptic and the Vibrant M are trademarks of Merck KGaA, Darmstadt, Germany or its affiliates. All other trademarks are the 

property of their respective owners. Detailed information on trademarks is available via publicly accessible resources. © 2008-

2018 Merck KGaA, Darmstadt, Germany and/or its affiliates. All Rights Reserved. 
00105442PU Rev 5 02/2018

Summary of Contents for EMD Millipore NovAseptic

Page 1: ...f Merck KGaA Darmstadt Germany or its affiliates All other trademarks are the property of their respective owners Detailed information on trademarks is available via publicly accessible resources 2008 2018 Merck KGaA Darmstadt Germany and or its affiliates All Rights Reserved 00105442PU Rev 5 02 2018 ...

Page 2: ...2 Installation and User Guide ...

Page 3: ...nd Sterilizing Procedures 17 Cleaning in Place CIP 17 Sterilizing in Place SIP 17 Installation ATEX Checklist 19 Install the Male Bearing 19 Install the Mixing Head 19 Before Installing the Drive Unit 19 Install the Drive Unit GMP 50 ATEX GMP 100 ATEX GMP 500 ATEX 19 Install the Drive Unit GMP 1000 ATEX and GMP 2000 ATEX 20 Install the Drive Unit GMP 5000 ATEX GMP 10000 ATEX GMP 20000 ATEX 20 Befo...

Page 4: ...4 Installation and User Guide ...

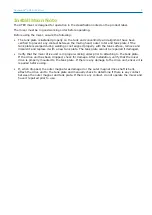
Page 5: ... with a new tank plate The tank plate cannot be repaired if damaged Verify that the mixer drive unit is in proper working order prior to attaching to the tank plate If the drive unit has been dropped check for damage After installation verify that the mixer drive is properly mounted to the tank plate If there is any damage to the drive unit ensure it is repaired before using If when dropped the ou...

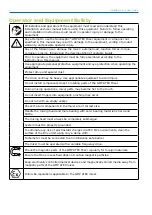
Page 6: ...iate equipment to avoid injury Do not install components close to rotating parts of the GMP ATEX Mixer During mixing operations mixer parts may become hot to the touch Do not insert fingers into equipment pinching may occur Do not run with an empty vessel Check that all components in the mixer are of correct size Handle the mixing head and male bearing with care bearing material is hard and brittl...

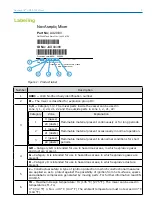
Page 7: ...operation 21 dusts 3 2 gases Flammable material present in abnormal conditions for short periods 22 dusts 4 GD Category GD is intended for use in hazardous areas in which explosive gases and dust are present G Category G is intended for use in hazardous areas in which explosive gases are present D Category D is intended for use in hazardous areas in which explosive dust are present 5 c Constructua...

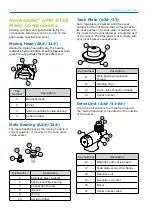
Page 8: ...e carbide bearing 7 Connection thread 8 Groove 9 O ring 10 Serial number Tank Plate AX 33 Each tank plate is marked with the serial number and a mill stamp that corresponds to its heat number The tank plate is welded onto the vessel and is considered an integrated part of the vessel The tank plate must comply with your local pressure vessel code 11 12 14 13 Welded tank plate Key Number Description...

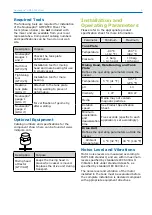
Page 9: ...transport Installation and Operating Parameters Please refer to the appropriate product specification sheet for more information Parameter Minimum Maximum Tank Plate Temperature 80 C 112 F 200 C 392 F Pressure 1 barg 14 5 psig 10 barg 145 psig Mixing Head Male Bearing and Tank Plate Defines the operating parameters inside the vessel Temperature 5 C 41 F 135 C 275 F pH 1 14 Viscosity 1 cP 800 cP Me...

Page 10: ...the male bearing with care Mounting the Male Bearing 1 Ensure proper position of the O ring on the male bearing 2 For minimal friction lubricate the visible part of the O ring with a small amount of purified water H2 O 360 3 Remove the protective cap Ensure that the thread connection in the tank plate and male bearing are clean dry and free from foreign material 1 2 4 Tighten the male bearing cloc...

Page 11: ...ng the multi tool Mixing head sizes GMP 5000 20000ATEX must be installed by hand 4 Carefully position the mixing head by turning it while lowering it onto the male bearing Align the mixing head with the tank plate Ensure that the mixing head rotates smoothly Drive Unit Installation The drive unit may be heavy Use appropriate equipment to avoid injury Never use the drive unit without a frequency co...

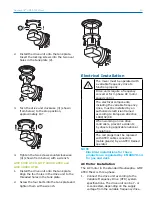
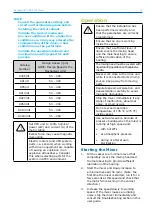
Page 12: ...l injury and damage to the equipment Do not make any adjustments to screws and bolts There is a powerful magnetic force between the mixing head and the outer drive head Mount the drive unit onto the vessel following the instructions for the appropriate mixer size GMP 50 ATEX GMP 100 ATEX and GMP 500 ATEX 1 Install the drive unit into the tank plate Put the two studs on the tank plate into the slot...

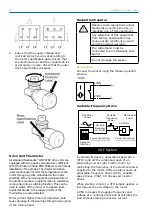
Page 13: ... units require a frequency converter for 3 phase AC motor speed control The electrical components including the variable frequency drive must be installed by an authorized electrician trained according to European directive 1999 92 CE When working on live drive controllers prevent accidents by observing applicable national regulations The red plugs must be replaced with ATEX cable connectors cable...

Page 14: ...n Counter Observe laws regulations and or standards governing the use or intended use of this equipment Any alteration of this equipment from factory specification may cause unsafe conditions and will void the product warranty The tachometer must be connected to an intrinsically safe barrier Do not damage the sensor Connection Connect the socket using the following electric scheme N N0 1 BN 2 BU L...

Page 15: ...evel of liquid covers the mixing head and the male bearing to ensure sufficient lubrication of the bearing The mixing head must be covered with liquid during operation with explosive media Never work close to the drive unit while it is connected to its driving source Keep away from moving parts Regulate speed acceleration and deacceleration carefully to avoid magnetic decoupling Stop the mixer imm...

Page 16: ...d to below 25 C 77 F Ensure that all connected media is shut off Before entering the vessel follow the local safety precautions The drive unit may be heavy Use appropriate equipment to avoid injury Dismount the mixer in the following order to prevent personal injuries and damage to the equipment 1 Drive Unit 2 Mixing Head 3 Male Bearing Storage Do not store in areas exposed to weather or humidity ...

Page 17: ...and Drive Unit Installation in this manual Magnetic particles are not removed from the mixing head during CIP they must be removed manually or by alternative cleaning Magnetic particles can cause corrosion and damage They can also cause a higher torque which may cause the mixing head to decouple and severely damage the vessel Sterilizing in Place SIP GMP mixers are designed for SIP Sterilization b...

Page 18: ...nd damage They can also cause a higher torque which may cause the mixing head to decouple and severely damage the vessel Other Sterilization Methods For information on using other sterilization methods please contact your EMD Millipore representative for NovAseptic GMP ATEX Mixer product information 18 Installation and User Guide ...

Page 19: ...q no Install the Mixing Head Complete 1 Inspect and remove any foreign magnetic particles from the mixing head q yes q no 2 Remove the drive unit Install the mixing head q yes q no 3 Position the mixing head and align it with the tank plate q yes q no 4 Ensure that the mixing head rotates smoothly q yes q no Before Installing the Drive Unit Complete 1 Verify that the drive unit classification note...

Page 20: ...d tighten q yes q no Before Installing the Electrical Components Complete 1 Ensure all incoming power is equipped with an emergency stop and an on off switch q yes q no 2 Shield motor cables q yes q no 3 Ensure the drive unit is grounded q yes q no 4 Ensure electrical cables are long enough to enable the drive unit to be disassembled and removed from the vessel q yes q no Install the AC Motor Comp...

Page 21: ...t voltage according to the AC motor q yes q no 3 Set frequency according to the AC motor q yes q no 4 Set minimum maximum rpm q yes q no 5 Set acceleration and deacceleration settings q yes q no 6 Power and current limit according to the motor rating q yes q no NovAseptic GMP ATEX Mixer 21 ...

Page 22: ...ing unit Transport collar on the Drive Unit removed before starting unit Remove the red plugs and replace them with ATEX plugs when plugs are required Before each startup The bearings are intact The mixing head is properly positioned The mixing head is not running dry The mixing head is covered by liquid during all ATEX operation Maximum working temperature for the mixer is 135 C 275 F T4 The part...

Page 23: ...on Density of liquid Viscosity of liquid Temperature of liquid Geometry of vessel Type of mixing required General Information Vessel Number Vessel Manufacturer Country Vessel Type Site Location GMP Type Manufacturer s Representative GMP ATEX Mixer Information Serial Number Catalog Number Notes Drive Unit Tank Plate Mixing Head Male Bearing Check Points Frequency Converter Settings Parameter Origin...

Page 24: ...ted by Print name ______________________________________________________________________ Signature________________________________________________________________________ Date inspection completed 24 Installation and User Guide ...

Page 25: ...___________________________________________________________ Design pressure __________________________________________________________________ Design temperature _______________________________________________________________ Product description________________________________________________________________ Viscosity_________________________________________________________________________ Compone...

Page 26: ...mic bearing for cracks and abnormal wear q yes q no Inspect the stainless steel foot q yes q no Make sure the O ring is not damaged q yes q no Check for loose ceramic parts q yes q no Check for thread deformation q yes q no Install and ensure male bearing is tightened to proper torque metal to metal q yes q no 4 Tank Plate Inspect tank plate for scratches marks and or damage q yes q no Inspected b...

Page 27: ...mixers in production and their application For further information please contact Technical Service The following equipment should be kept in stock Mixing head AX 12 Male bearings AX 24 Male bearing o ring See page 9 for required tools and accessories NovAseptic GMP ATEX Mixer 27 ...

Page 28: ...lem Possible Causes Solutions Motor mixing head does not rotate No power Inspect power supply Overload protection tripped Check the setting amp value and the ambient temperature Heavy load of particles stuck to the magnets Clean the unit High amp value Ambient temperature too high Chill the environment Motor mechanically overloaded Check all transmissions Mixing head scratches against tank plate M...

Page 29: ...aged reinstall the bearing and check rotation direction of the mixing head Short acceleration retardation time Increase the ramp time Particles stuck to the magnets Remove particles Mixing head running eccentrically Male bearing is not properly in place Remove male bearing Inspect male bearing and tank plate for damage If it is undamaged reinstall the bearing and check rotation direction of the mi...

Page 30: ... The applicable warranty for the products listed in this publication may be found at www millipore com terms within the Terms and Conditions of Sale applicable to your purchase transaction 30 Installation and User Guide ...

Page 31: ...NovAseptic GMP ATEX Mixer 31 ...

Page 32: ...onsibility for checking the suitability of our products for the envisaged purpose For technical assistance please visit www emdmillipore com techservice Worldwide contact information is available at www emdmillipore com offices For additional information and documentation please contact Merck KGaA Darmstadt Germany Corporation with General Partners Frankfurter Str 250 64293 Darmstadt Germany Phone...

Reviews: