background image

mcr FID S/... p/...

 single-plane fire dampers 

“MERCOR” SA 

– The company reserves the right to modify and change the document. Version FID S 22.02.02.18 

27/28 

position during transport. Before installing dampers, control each of them visually. Do not move the damper by holding 
by the connection cable or put a device on a release and control mechanism. Do not hit or drop the damper. When 
moving and installing, support the damper on the sides or edges of the body. 
Dampers should be stored in closed rooms that provide protection against external weather conditions. In the case 
dampers are stored on the ground, place them on protection pads in order to protect them against damage. Storage 
should take place in rooms where: 

•  there  is  no  access  to  dust,  gases,  caustic  vapors  and  other  aggressive  chemical  vapors  that  can  destroy 

insulating elements and structural elements; 

•  the dampers are not affected by direct sunlight and UV radiation; 
•  maximum relative humidity does not exceed 80% at the temperature of + 20 ºC; 
•  the ambient temperature is between - 20 ºC and + 40 ºC; 
•  there are no vibrations. 


8. MAINTENANCE AND SERVICING 

The equipment from Mercor SA requires periodic technical inspection and maintenance at least every  12  months 
throughout its operating life, i.e. during the warranty and post-warranty period. Inspection and maintenance may only 
be carried out by the manufacturer or contractors authorised by MERCOR SA to service its products. 
Regular service inspections of fire protection equipment is mandatory in Poland according to § 3 Section 3 of the 
Polish Regulation of the Ministry of the Interior and Administration of 7 June 2010 on the fire protection of buildings, 
other structures and areas (Polish Journal of Laws, Year 2010, No. 109 Item 719). 


Do these recommended actions in the inspection intervals: 


Check the electrical connections, especially for all mechanical damage. 


Inspections of the condition of the supply voltage for the devices, which allowed the following tolerances: 


24V±10% for electric actuators 


24V±2% for electromagnetic release mechanism 


230V ±10% for electric actuators 


230V±2% for electromagnetic release mechanism 


Check the equipment casing, especially for all mechanical damage. 


Check for any obstructions to proper performance of the equipment. 

To facilitate the activities under service inspection, servicing and warranty claim response, e.g. visual inspection or 
repairs, the equipment user/operator shall provide physical access to the equipment by removing thermal insulation, 
suspended ceiling, and other installations, as required and applicable to warrant unobstructed access. 
Inspection ports, e.g. type mcr KRW are recommended for equipment installed in ducts. 
In the case of roof mounted equipment, provide access to the area (via ladders or elevated platforms). 
 
Refer  all  matters  related  to  technical  inspection,  maintenance  and  servicing  of  this  equipment  to  the  Mercor  SA 
Service Department, 

serwis@mercor.com.pl

, tel. +48 58 341 42 45 ext. 170, fax: +48 58 341 39 85, from 8 AM to 4 

PM (Mo-Fri). 
 

9. WARRANTY TERMS & CONDITIONS 

1. 

“MERCOR” SA grants 12 months of warranty for the equipment quality from the date of purchase, 
unless the sales contract states otherwise. 

2.  Submit each warranty claim to 

“MERCOR” SA in 7 days from the date of discovery of a warranty 

eligible defect 

3.  Submit warranty claims by calling at: tel. +48 58 341 42 45, by fax: +48 58 341 39 85, by e-mail: 

reklamacje@mercor.com.pl or by traditional mail: 

“MERCOR” SA, ul. Grzegorza z Sanoka 2, 80-408 

Gdańsk, Poland. 

4.  If physical defects of equipment are found during the warranty period, 

“MERCOR” SA warrants and 

represents to remove them in shortest possible time from serving the written warranty claim with the 
proof of purchase or sales contract, subject to Item 10. 

5. 

“MERCOR”  SA  has  the  right  to  extend the  time of  repair  if  the  defect  removal  is  complicated  or 
requires purchase of custom components or spare parts. 

6.  The warranty liability only covers all defects arising from causes present in the equipment at the date 

of sale. 

7.  Defects caused by improper operation or otherwise as listed in Item 10 herein, the buyer / warranty 

beneficiary will be charged with the costs of their removal. 

8.  Condition for rectifying defects is  that the applicant makes the site/localisation where devices are 

installed available, in particular, ensuring: the lift in the case of devices mounted at a height above 

Summary of Contents for mcr FID S

Page 1: ...Ul Grzegorza z Sanoka 2 80 408 Gdańsk tel 0 58 341 42 45 tel fax 48 58 341 39 85 OPERATION AND MAINTENANCE MANUAL OMM Fire damper type mcr FID S Version FID S 22 02 02 18 FIRE VENTILATION SYSTEMS ...

Page 2: ...TION 8 6 INSTALLATION 8 6 1 PRE ASSEMBLY INSPECTION 9 6 2 INSTALLATION OPENING 9 6 3 EMBEDDING 9 6 4 ELECTRICAL CONNECTIONS 15 7 TRANSPORT STORAGE CONDITIONS 21 8 MAINTENANCE AND SERVICING 21 9 WARRANTY TERMS CONDITIONS 21 Technical Manual designations Option available Option unavailable CAUTION All previous issues of this Technical Manual expire on the date of issue hereof The Technical Manual do...

Page 3: ...the case of cut off and transfer fire dampers the device is equipped with a thermal release containing one time temperature fuses During normal operation the above mentioned element should be protected against the affect of the permissible temperature Tmax see the table below When it is exceeded the temperature fuses may operate which is a normal operation and is not covered by the guarantee or wa...

Page 4: ...ID S V p O shut off fire dampers for mixed fire ventilation systems mcr FID S V M p O transfer dampers mcr FID S T p O relief dampers mcr FID S T p O Caution Shut off fire dampers for fire ventilation systems the mcr FID S V p P and fire dampers for mixed fire ventilation systems the mcr FID S V M p P have one declaration of performance in accordance with the requirements of law The marker M and t...

Page 5: ...on partition made of two segments separated by a fire proof panel and a trigger control gear which is tripped remotely or automatically by tripping a thermal trigger The damper casing is made of steel sheet galvanized steel sheet or stainless steel sheet The isolation partition is made of a fire proof panel set in a reinforcement profile made of metal sheet The inner side of the fire damper casing...

Page 6: ...tric axial actuator without a return spring as a result of applying the supply voltage to the actuator in the right manner remotely by tripping the electromagnetic release and a spring as a result of applying the voltage shut off fire dampers for mixed fire ventilation systems mcr FID S M p O In normal operation the dampers are closed or open depending on the function carried out The dampers are o...

Page 7: ...M T G BFL 230 T S V V M T G BLE 24 ST S V V M T G BFL 24 T ST S V V M T G EXBF 230 S V V M T G BFN 230 T S V V M T G EXBF 24 S V V M T G BFN 24 T ST S V V M T G BF 230 TN S V V M T G BF 24 TN ST S V V M T G BF 24 TN TL S V V M T G BEE 230 S V V M T G BEE 24 ST S V V M T G BEN 230 S V V M T G BEN 24 ST S V V M T G MF 230 T S V V M T G MF 24 T S V V M T G MLF 230 T S V V M T G MLF 24 T S V V M T G S...

Page 8: ...57 30 75 42 BFL 138 30 75 38 BF 24TL ST 198 10 75 50 EXBF 225 55 75 160 embedding border mcr FID S p O fire damper with actuator Gear A C D E RST 50 30 75 75 embedding border mcr FID S p P fire damper with RST Gear A C D E RST 40 30 75 55 embedding border mcr FID S p O fire damper with RST Gear A C D E RST KW1 130 30 75 85 embedding border mcr FID S p P fire damper with RST KW1 ...

Page 9: ...be installed outside of walls in modules multiple damper sets in batteries multiple damper sets available for the mcr FID S S p P and mcr FID S V p P damper available for the mcr FID S S p P the mcr FID S V p P and mcr FID S V M p P damper available for the mcr FID S V p P and mcr FID S V M p P damper The mcr FID S p O dampers can be installed in the following building partitions i e walls or ceil...

Page 10: ...trigger control gear may be located on the right or on the left hand side of the damper at any direction of air flow Before embedding fixing place the damper axially aligned within the partition the wall or ceiling which separates the fire zones in the finished installation opening Level the device and secure in place Next actuate the damper isolation partition by hand to verify that the rotation ...

Page 11: ...nd specifically that the thermal trigger a fusible element must not be damaged or exposed to high temperature from fire and welding soldering equipment which might trigger it it is a single use element and not subject to warranty replacement Do not expose the intumescent gaskets installed in the fire damper casing to high temperature Swollen gaskets make it impossible to close the damper With the ...

Page 12: ...ent mortar or other as suitable 5 Wall of concrete blocks or solid bricks 6 Ventilation grade seal X wall thickness Installation of the mcr FID S p P fire damper in concrete block or solid brick walls 1 Ventilation duct 2 mcr FID S p O fire damper ØD 3 Cement mortar or other as suitable 4 Wall of concrete blocks or solid bricks X wall thickness Installation of the mcr FID S p O fire damper in conc...

Page 13: ... 18 13 28 1 Ventilation duct 2 Sheet metal screw ST4 2x16 3 mcr FID S p P fire damper BxH 4 Cement mortar or other as suitable 5 Floor slab 6 High temperature gasket 7 Installation profile 8 Steel expanded plug M8 metal screw X wall thickness Installation of the mcr FID S p P fire damper in a floor slab cont d Steel expanded plug hole ...

Page 14: ...ther as suitable 4 Floor slab X wall thickness Installation of the mcr FID S p O fire damper in a floor slab 1 Ventilation duct 2 Sheet metal screw ST4 2x16 3 mcr FID S p P fire damper BxH 4 Cement mortar or other as suitable 5 Mineral wool min density 80 kg m3 6 High temperature gasket 7 Panel wall 8 Screw ST5 5x35 9 Structural profile X wall thickness Installation of the mcr FID S p P fire dampe...

Page 15: ...tar 4 Panel wall 5 Mineral wool min density 80 kg m3 6 Structural profile 7 Screw ST5 5x35 X wall thickness Installation of the mcr FID S p O fire damper in a panel wall 1 mcr FID S p P fire damper BxH 2 Threaded rod 3 Fire protective board that provides fire resistance in class EIS 120 4 solid wall 5 masonry mortar or other as suitable 6 Fire protective band Installation of the mcr FID S p P outs...

Page 16: ...oke extraction duct 3 M10 fixing screw 6 Eg gypsum mortar 9 Suspension system Installation of the mcr FID S V p P damper in fire ventilation systems building partitions horizontal fire ventilation ducts 1 mcr FID S V p P BxH damper 4 M8 dowel 7 Building partition 2 Cover grille 5 Frame from fireproof board 20mm thick 8 Smoke extraction duct 3 M10 fixing screw 6 Eg gypsum mortar Installation of the...

Page 17: ...th appropriate mortar glue gaskets ensuring fire resistance The shut off damper in vertical position fire ventilation systems may be mounted across the horizontal smoke extract duct or on the sides of the horizontal smoke extract duct or on the surface of any side of the vertical smoke extract duct 1 e g a masonry wall 2 A building element with fire resistance equal or higher to the building envel...

Page 18: ...the connections with fireproof silicone Other configurations of mcr FID S V p P and mcr FID S V M p P fire dampers sets can be made consisting of two or three dampers while maintaining assembly rules acc Drawing above Installation of control and release mechanisms from the bottom or from the top of damper 1 e g a masonry wall 2 mcr FID S V p P or mcr FID S V M BxH 3 Fire protective band from from ...

Page 19: ...om the top of damper 1 e g a masonry wall 2 damper mcr FID S S p P BxH 3 fire protective band from from GKF boards width min 50mm Modular installation of the mcr FID S S p P damper consisting of two or more dampers Configurations consisting of two or more mcr FID S S p P fire dampers with maximum dimensions of a single fire damper BxH 1500x1105 mm are allowed while maintaining the installation rul...

Page 20: ...0 TN MF 230T Power supply AC 24V 50 60Hz DC 24V AC 220 240V 50 60 Hz Power demand for spring tensioning for spring holding 7 W 2 W 8 5 W 3 W Sizing apparent power 10 VA 11 VA Appliance class III II Ingress protection rating IP 54 IP 54 Auxiliary circuit breaker 2xSPDT 6 3 A 250V 2xSPDT 3 A 250V activation position degrees 5 80 5 80 Torque motor 18 Nm 18 Nm spring 12 Nm 12 Nm Cable connection motor...

Page 21: ...he spring under tension when in standby 2 5 W 0 7 W 3 5 W 1 1 W 4 W 1 4 W 5 W 2 1 W Apparent power 4 VA 6 5 VA 6 VA 10 VA Protection class III II III II IP rating IP 54 IP 54 IP 54 IP 54 auxiliary switch activation point degrees 2 x PDT 3 0 5 A AC 250V 2 x PDT 3 0 5 A AC 250V 2 x SPDT 3 0 5 A 250 V 2 x SPDT 3 0 5 A 250 V 5 80 5 80 5 80 5 80 Torque motor spring 4 Nm 3 Nm 4 Nm 3 Nm 9 Nm 7 Nm 9 Nm 7 ...

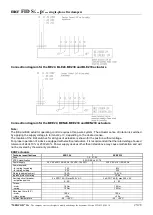
Page 22: ...he document Version FID S 22 02 02 18 22 28 motor max 45 dB A max 45 dB A spring 62 dB A 62 dB A Connection diagram for the BF24 Tand BF230 T actuators Connection diagram for the BFL24 T BFL230 T BFN24 T BFN230 T BF24 TN and BF230 TN actuators Connection diagram for the MLF 24T MLF 230T MF 24T MF 230T ...

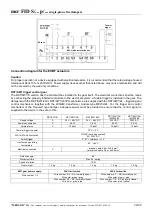
Page 23: ...device equipped with electrical actuators it is recommended that the rated voltage housed tolerance of 24V 10 or 230V 10 Power supply devices other than listed above may cause malfunction and will not be covered by the warranty conditions EXBF actuators Technical specifications EXBF 24 EXBF 230 Zone 1 2 21 22 ATEX classification II 2 GD EEx d IIC T6 Power supply 24 V AC 20 50 60 Hz 24 VDC 10 20 23...

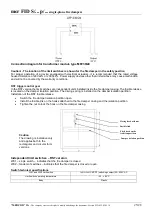
Page 24: ...rigger and control mechanism of the impulse type damper adequate power must be provided to ensure that the control signal is supplied to the device in the event of fire RST KW1 S RST KW1 24I RST KW1 24P RST KW1 24I MP230 24 RST KW1 24I MP230 24 Supply voltage X 24 V 48 V DC 24 V 48 V DC 230V AC 230V AC Power consumption X 3 5 W 1 6 W 4 5 W 2 5 W Holding force X 12 daN 12 daN 12 daN 12 daN Thermal ...

Page 25: ...e release is located on the damper isolation partition The driving spring is installed on the damper isolation partition Installation of the RST fusible release Switch the fire damper isolation partition open Install the fusible link on the hooks attached to the fire damper casing and the isolation partition Tighten the nut to lock the hook on the fire damper casing Independent limit switches RST ...

Page 26: ...the isolation partition Cover the entire edge bending length of the spacer with the Würth Adhesive Sealant K D The adhesive will keep the spacer in place Spacer between the isolation partition and the casing 1 Spacer 3 mcr FID S p fire damper Spacer between the isolation partition and the casing installation location Caution The manufacturer shall not be liable for any damage due to improper or in...

Page 27: ...s 230V 2 for electromagnetic release mechanism Check the equipment casing especially for all mechanical damage Check for any obstructions to proper performance of the equipment To facilitate the activities under service inspection servicing and warranty claim response e g visual inspection or repairs the equipment user operator shall provide physical access to the equipment by removing thermal ins...

Page 28: ... in the direct vicinity of the damaged property Damage due to failure to immediately report any defect found Deterioration in the quality of coatings due to natural weathering ageing Defects caused by abrasive or aggressive cleaning agents Damage caused by aggressive external influence specifically chemical or biological in nature or when the origin of which is related to the production processing...

Reviews: