SEAWATER COOLED MODELS
SERVICE MANUAL NUMBER 24
Page 6A-8
90-861327--1 OCTOBER 1999
Cleaning and Inspection
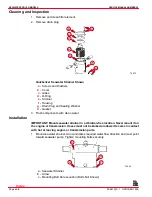
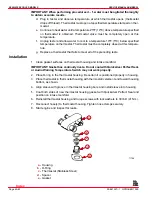
1. Remove and clean filter element.
2. Remove drain plug
72673
a
b
c
d
e
f
g
h
Quicksilver Seawater Strainer Shown
a -
Screws and Washers
b -
Cover
c -
Glass
d -
O-Ring
e -
Strainer
f -
Housing
g -
Drain Plug and Sealing Washer
h -
Gasket
3. Flush components with clean water.
Installation
IMPORTANT: Mount seawater strainer in a vibration-free location. Never mount it on
the engine or transmission. Hoses must not be kinked or allowed to come in contact
with hot or moving engine or transmission parts.
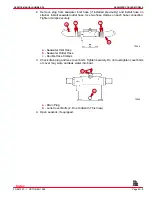
1. Mount seawater strainer. Arrow indicates required water flow direction and must point
toward seawater pump. Tighten mounting bolts securely.
72644
a
b
c
c
a -
Seawater Strainer
b -
Arrow
c -
Mounting Bolt Hole Location (Bolts Not Shown)
Index

