90-823224--2 796
454 CID (7.4L) / 502 CID (8.2L) - 3A-29
Cylinder Head
Removal
1. Drain engine cooling system.
2. Remove as outlined:
a. Exhaust manifolds.
b. Intake manifold.
c. Rocker arm covers.
d. Rocker arm assemblies and push rods (keep
in order for reassembly in their original loca-
tions).
e. Any components attached to front or rear of
cylinder head.
f.
Spark plugs.
g. Head bolts.
!
CAUTION
The head gasket may be holding cylinder head to
block. Use care when prying off cylinder heads.
DO NOT damage gasket surfaces. DO NOT drop
cylinder heads.
3. Place cylinder head on wooden blocks to prevent
damage to gasket surfaces.
Cleaning and Inspection
1. Clean gasket material and sealer from engine
block and cylinder heads.
2. Inspect sealing surfaces for deep nicks and
scratches.
3. Inspect for corrosion around cooling passages.
4. Clean head bolt threads and engine block bolt
hole threads, making sure no dirt, old oil or cool-
ant remain.
Installation
!
CAUTION
DO NOT use sealer on head gaskets.
1. Place head gasket in position over dowel pins.
2. Carefully set cylinder head in place over dowel
pins.
3. Coat threads of head bolts with Quicksilver Per-
fect Seal and install finger-tight.
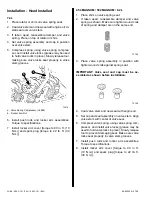
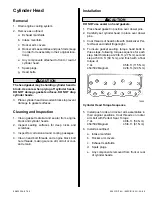
4. To insure gasket sealing, torque head bolts in
three steps, following torque sequence for each
step. Start first step at 20 lb. ft. (27 N·m), second
step at 50 lb. ft. (68 N·m), and finish with a final
torque of
7.4L
85 lb. ft. (115 N·m)
454/502 Magnum
92 lb. ft. (124 N·m)
72944
Cylinder Head Torque Sequence
5. Install push rods and rocker arm assemblies in
their original positions. Coat threads on rocker
arm bolt with Perfect Seal. Torque
7.4L
40 lb. ft. (54 N·m)
454/502 Magnum
45 lb. ft. (61 N·m)
6. Install as outlined:
a. Intake manifold.
b. Rocker arm covers.
c. Exhaust manifolds.
d. Spark plugs.
e. Any components removed from front or rear
of cylinder heads.


