Section 5 - Maintenance
90-899883182 NOVEMBER 2007
Page 57
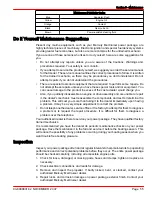
Task Interval
Maintenance to Be Performed
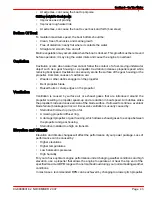
Each day start
•
Check the engine oil level. (You can extend this interval based on experience
with the product.)
•
Check the sterndrive gear lube level.
•
Check the trim pump oil level.
•
Check the power‑assisted steering pump or the compact hydraulic steering
fluid level, depending on the steering system of your model.
Each day end
•
If operating in saltwater, brackish water, or polluted water, flush the seawater
section of the cooling system after each use.
Weekly
•
Check the water inlets for debris or marine growth.
•
Check and clean the seawater strainer, if equipped.
•
Check the coolant level.
•
Inspect the sterndrive anodes and replace if 50% eroded.
Every two months or 50
hours
•
Lubricate the propeller shaft and retorque the nut. (If operating only in
freshwater, you can extend the interval to every four months.)
•
If operating in saltwater, brackish water, or polluted water, apply Corrosion
Guard to the power package.
•
Check the battery connections and the fluid level.
•
Ensure that the gauges and the wiring connections are secure. Clean the
gauges. (If operating in saltwater, reduce this interval to every 25 hours or
30 days, whichever occurs first.)
Scheduled Maintenance
NOTE: Only perform maintenance which applies to your particular power package.
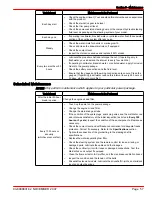
Task Interval
Maintenance to Be Performed
After the initial 20‑hour
break‑in period
Change the engine oil and filter.
Every 100 hours or
annually
(whichever occurs first)
•
Touch‑up the paint on the power package.
•
Change the engine oil and filter.
•
Change the sterndrive gear lube.
•
If the condition of the spark plugs, spark plug wires, and the distributor cap
and rotor was satisfactory at the initial inspection (as listed in
Every 300
hours or 3 years
), inspect the condition of these components. Replace as
necessary.
•
Check the coolant level and antifreeze concentration for adequate freeze
protection. Correct if necessary. Refer to the
Specifications
section.
•
Tighten the connection of the gimbal ring to the steering shaft to
specifications.
•
Replace the water‑separating fuel filter.
•
Check the steering system and the remote control for loose, missing, or
damaged parts. Lubricate the cables and the linkages.
•
Check the continuity circuit for loose or damaged connections. Test the
MerCathode unit output if equipped.
•
Clean the flame arrestor, IAC muffler, and the crankcase ventilation hoses.
•
Inspect the condition and the tension of the belts.
•
Driveshaft extension models: Lubricate the driveshaft U‑joints, and tailstock
input and output bearings.
Summary of Contents for Vazer 100
Page 8: ...Page iv 90 899883182 NOVEMBER 2007 ...
Page 26: ...Section 1 Warranty Notes Page 18 90 899883182 NOVEMBER 2007 ...
Page 40: ...Section 2 Getting to Know Your Power Package Notes Page 32 90 899883182 NOVEMBER 2007 ...
Page 54: ...Section 3 On The Water Notes Page 46 90 899883182 NOVEMBER 2007 ...
Page 60: ...Section 4 Specifications Notes Page 52 90 899883182 NOVEMBER 2007 ...
Page 114: ...Section 7 Troubleshooting Notes Page 106 90 899883182 NOVEMBER 2007 ...

