background image

User Manual : Customizing the User Interface

 User Manual

275

12.

Save the 

Preset.

User Macros

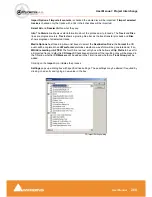
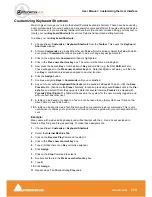
Macros are sequences of commands which can be invoked by a single keypress or combination. Mac-
ros can be a very powerful aid to productivity.

To define a new 

Macro

:

1.

Choose 

View 

Customize 

Macros

 from the 

Toolbar

. This opens the 

Macros

 window.

2.

Click the 

New Macro

 button, then name the Macro.

3.

Various menu 

Command

 functions are grouped together into 

Tabs

. Select the 

Tab

 with whichever 

group of 

Command

 Functions you wish to add to the Macro.

4.

Click on the appropriate 

Command

 so that it is highlighted.

5.

Press the 

<<

 button to add this command to the 

Macro

.

6.

Repeat steps 

to

 5

 to assign further 

Commands

 to the 

Macro

 until it is complete.

7.

Keyboard


Shortcut

 can now call the new 

Macro

. Follow the instructions in the previous section 

for assigning 

Keyboard


Shortcuts

. In this case, choose the 

Macro


Tab

 within the 

Keyboard 

Shortcut

 window. Your new 

Macro

 will appear as an option inside this window.

Summary of Contents for Pyramix 4.3

Page 1: ...www merging com www merging com USER MANUAL Pyramix 4 3...

Page 2: ...quality performance merchantability or fitness for a particular purpose The soft ware is supplied as is you the purchaser are assuming the entire risk of the results of using this Merging Technologies...

Page 3: ...User Manual Contents 3 User Manual Contents...

Page 4: ...Code and Video Sync Option 20 System Requirements For Pyramix Virtual Studio 20 Digital Audio Synchronization and TimeCode 22 Installing Pyramix Virtual Studio Hardware 23 Mykerinos Board Installatio...

Page 5: ...s 33 Library Maintenance 33 Track and Mixer Muting 33 TimeCode Entry 34 Starting Pyramix Virtual Studio 36 Beginning a New Project 37 New Project from scratch 38 Mixer Wizard 41 Getting Audio into Pyr...

Page 6: ...3 The Placement Tool 65 Markers or User Flags 66 Using the Mixer 67 Mixer Components 67 Creating and Configuring Mixers 69 I O Busses Explained 69 Internal Return Busses 69 Mixer Delay Compensation 69...

Page 7: ...rollers 111 Mixer Settings 112 General 112 I O and Sync 114 Mykerinos Daughter Card Settings 116 Level Meter 116 Pyramix Virtual Studio Window Orientation 119 Program Window 119 Project Window 120 Dua...

Page 8: ...3 Cue Sequencer 173 External Machines 174 9 pin Sony P2 protocol 174 Setting up an external machine 174 Virtual Multi track 175 Digitizing Sessions 177 Manual Digitizing 178 Autoconforming 178 Conform...

Page 9: ...mpensation 214 Delay Compensation Pre Anticipation 217 Plug Ins 218 Common Master Section 218 Parametric EQ 220 10 Bands EQ 221 Three Band Tone Control 221 Dynamics Processing 222 Delay 224 Flanger 22...

Page 10: ...Length Pitch 256 Reconforming a Project 256 Surround Post Processing Projects 256 Rendering Projects 257 Currently Available Plug ins 258 Cleaning Up Project media 258 Project Interchange 259 File In...

Page 11: ...hines 315 Menus Macro 320 Menus Settings 320 Menus Window 320 Menus Help 321 Remote Control 322 Control of External Device 322 Control by External Device 322 Hardware Control Surfaces 322 GPI GPO Supp...

Page 12: ...older 338 Appendix II I O Daughter card Options 339 Appendix III Optional Features 341 Pyramix DSD SACD 341 Time code Sync 342 Cue Sequencer 342 Appendix IV 9 Pin connection 344 PC RS 232 Serial Port...

Page 13: ...www merging com USER MANUAL User Manual...

Page 14: ...of sound recording editing mixing and mastering You have joined a worldwide com munity of users who have already discovered the Pyramix advantage Note IMPORTANT The first thing you need to do is regi...

Page 15: ...s on Windows 2000 or Windows XP desk top or lap top com puters It does have restrictions compared to the main Pyr amix Virtual Studio capabilities as you would expect but the Native software maintains...

Page 16: ...nal aux busses return Both configurations can load projects that come from a Pyramix Virtual Studio system Mykerinos based without any track limitations Once loaded it shows all original connections o...

Page 17: ...s used in this manual Names found on Pyramix screens and menus are shown in bold E g Information Settings Menu and sub menu selections are shown like this View Tracks Show all Tracks Which means Go to...

Page 18: ...apter Installing Pyramix Virtual Studio Hardware on page 23 Virtual Transport Guide This is the reference guide for Virtual Transport Pyramix Applications Guides These guides aim to be a useful resour...

Page 19: ...to the Mykerinos board Pyramix Card and Software Set and Pyramix Turnkey Your Pyramix Virtual Studio will have been supplied in one of two forms Pyramix Card and Software Set or Pyramix Turnkey Pyram...

Page 20: ...omputer PC with Intel Pentium PIII 800 MHz or higher minimum 256 MB RAM PCI 2 1 compliant card slot s in which to install the Mykerinos board s Windows XP Windows 2000 or Windows NT Workstation v4 0 S...

Page 21: ...on line research Graphics cards and optical drives in particular benefit from the most recent stable driver updates Keeping Windows and DirectX up to date with latest service packs is also in general...

Page 22: ...source digital audio will play at the same rate as the workstation and the time code will be correct Consider an alternative scenario A digital multi track is used as a location recorder synced to its...

Page 23: ...the PC have to be connected together using a special HDTDM ribbon cable This cable has to be plugged into the multi pin connectors located on the top edge of the I O daughter cards Please contact you...

Page 24: ...nvert ers for playing analog audio out of Pyramix In this case connect your analog audio sources to the A D Converter analog audio inputs and the A D digital audio output s to the Mykerinos digital au...

Page 25: ...s can be accepted To lock to incoming digital audio connect an appropriate digital audio signal to a Pyramix digital audio input To lock to incoming video connect an appropriate video signal to the Py...

Page 26: ...aller programs Choose the default location to install the software unless you have good reason to do otherwise You will also be asked to a create folders for your media files and for CD Images these c...

Page 27: ...ontrol Panel Windows Task Bar Start Control Panel MT Security Settings click the Import Key button and browse for your Key file called YourPersonalKeyXXXXX mtk 3 Open the MT Security Settings Control...

Page 28: ...eys on page 336 Context Menus Right clicking over objects on screen such as clips mixer strips and controls and track headers pops up menus with commands and options relevant to the object Keyboard Sh...

Page 29: ...Please see Optimizing Pyramix on page 326 These templates also offer a good starting point for creating your own customized templates To begin a new project using a template choose Project New from Te...

Page 30: ...ation of the same information shown in the Timeline and Fade Editor Changes made here are reflected in the Timeline and vice versa Media Files These are actual audio data files which can only be seen...

Page 31: ...dia Management Win dow Libraries Pyramix uses libraries to help make project organization tidier Libraries are used to organize project material into logical groupings However Libraries are not the sa...

Page 32: ...out media already present in other libraries by selecting Filter Media already present in other libraries Sound Effects Large Projects and Offline Libraries When used in the following manner Offline...

Page 33: ...mposition Library Each Project has a unique read only Composition Library This contains short cuts to every Master Clip placed on the Timeline present in the EDL in the current Project Note that the C...

Page 34: ...ines the register in green Entries must be made in Hours Minutes Seconds Frames order So to enter 10 Hours and 9 seconds and 15 frames key 1 0 0 0 0 9 1 5 BUT if you only want to change the seconds th...

Page 35: ...lete last typed digit same as BACKSPACE Undo typed TimeCode and restore previous 1 Enters Number 1 2 Enters Number 2 3 Enters Number 3 4 Enters Number 4 5 Enters Number 5 6 Enters Number 6 7 Enters Nu...

Page 36: ...ramix shortcut icon on your Windows desktop Alternately choose Start Programs Pyramix Pyramix Virtual Studio The first time Pyramix Virtual Studio is launched you will need to enter in your special Ke...

Page 37: ...for common tasks and you can save your own To use an existing Template to start a new Project choose Project New from Template from the pull down menus along the Tool bar at the top of the Pyramix Vir...

Page 38: ...roject select the required sampling rate and resolution number of bits or accept the defaults 44 1kHz 16 bits then click the Next button which will lead you to step 2 Note The Digitizing Session is de...

Page 39: ...oject and either type in a valid path or use the Browse button to browse to a suitable folder When you have entered the infor mation click the Next button to get to the next step Note If you uncheck t...

Page 40: ...prece dence over the sample rate set in the Editing Project selected in the Choose Project Type dialogue If no Default Mixer has been defined and Finish is clicked the Blank Mixer window opens Please...

Page 41: ...s dialog box Select the type s of busses required using the check boxes and the number needed from the drop down lists on the right Click the Next button to move on to the next page Select the type s...

Page 42: ...onnected Clicking Cancel opens the new Project with a Blank Mixer Window See below Step 4 Open the New Project Clicking Finish creates the Mixer and opens the new Project The Mixer you configured abov...

Page 43: ...uivalent of right clicking on a blank area of an existing mixer We recommend only experi enced users choose this option Please see Creating and Configuring Mixers on page 69 Creating a mixer in this w...

Page 44: ...nput sources are shown each with an associated red and a green light The green lights show the presence of a valid digital signal This does not necessarily mean that the sampling rate of this input ma...

Page 45: ...ault PMF format Track Record Modes Each Track has a tri state Record Ready toggle button located to the left of the Track itself in the Track Information and Setup Area Tip Right clicking on a track a...

Page 46: ...Mark Out point If the Mark In is located before the current location and the Mark Out far after then the system will immediately record once locked and stop recording when unlocking Recording from a...

Page 47: ...Windows directory or folder it is easy to mount that Windows folder as a Pyramix Media Drive Once mounted the supported files become available for use in a Project 1 Start a New Project or Open an exi...

Page 48: ...l as sample rate converted 3 Selecting Properties opens the Samplerate Converter Properties dialog box Choose the required target sample rate by clicking on one of the Output Sampling Rate Hz radio bu...

Page 49: ...Media Drive or Media Folder entry in the right hand pane and from the New entry in Media Folder drop down list menus in various Pyramix Windows The text box allows a complete path to be entered or a M...

Page 50: ...If the Use Quick Mount whenever possible check box in the General Settings Locations page is checked permanently mounted folders are automatically Quick Mounted when the application is started Mountin...

Page 51: ...Media Management Tab window in the Drive menu Drive Mounting Rules Folders where a conflict has been detected appear in Red Folders where a special Mounting Rule has been applied now appear in Dark G...

Page 52: ...ts This Waveform display can be enabled or disabled by the user Anatomy of a Clip Many Edit Commands refer to parts of a clip rather than the entire clip Once a clip is selected Trim Handles appear at...

Page 53: ...r end of the clip when the clip is selected The handles are used to create a fade in at the beginning of the clip or a fade out at the end of the clip To create or adjust a fade drag one of the trim h...

Page 54: ...value can be typed into the box at the top of the strip or set by clicking and dragging the fader Mute when checked mutes the selection but retains the gain value Sel box Selection When checked the ga...

Page 55: ...tiple clips are selected opens the Properties window for the first clip selected Selections and Region Selections Selection Operations Many editing operations in Pyramix can only be carried out if a c...

Page 56: ...ks Assuming the standard Pyramix keyboard shortcut assignments are in use Using the keyboard short cuts Regions can be easily made on the fly while playing or scrubbing the Timeline This is particular...

Page 57: ...want the clip to start right click and choose Paste to insert the clip where you placed the mouse cursor Selecting a Region To select a region click the mouse at one end of the region you wish to sele...

Page 58: ...a clip is selected pressing the ALT and SHIFT keys will allow the clip to be dropped into a Library as a new Composition Auto Crossfade By Default Auto Crossfade Layering can be set as the default ed...

Page 59: ...Region rather than a whole clip or clips then choosing the Edit Split command will split the selected Region from the surrounding material at the edges of the selection area not under the Playhead Cu...

Page 60: ...s Edit Command highlights Further Editing commands are to be found on the main Edit menu Please see Menus Edit menu on page 286 Undo Pyramix keeps track of all edit decisions and operations so they ca...

Page 61: ...ording to the current Insert mode setting Paste Tail to Cursor Inserts the contents of the Clipboard ending at I e before the current Play head Cursor position When the contents of the Clipboard is Pa...

Page 62: ...and saves to the clipboard the currently selected clip selection and ripples the end of the clip Delete and Ripple to Black Deletes the currently selected clip selection and ripples all following butt...

Page 63: ...aking it up into smaller clips not by deleting any actual audio from the hard drive Threshold dB This field determines the threshold level in dB below which material in the clip will be removed Minima...

Page 64: ...lips created by the Automatic Silence Removal operation The range for this setting is between 5 ms and 500ms 1 2 second Once the parameters have been set click OK This process takes into account the c...

Page 65: ...se Edit Paste Place from the Edit menu The Placement Tool window allows the user to customize the placement of a clip in extremely power ful and flexible ways The button layout corresponds to the nume...

Page 66: ...added You can also add a Marker at the current Play Head Cursor position by choosing Cursors Marks Add Marker to Playhead from the Toolbar Markers can be selected by clicking on them The Marker flag t...

Page 67: ...held peak level value Level Bargraph Rotary Controls and Faders Rotary Controls and Faders may be adjusted by grabbing them with the mouse and drag ging Rotary controls are adjusted by dragging left...

Page 68: ...mixers surface visible or hidden Show Hide can reduce clutter by concealing unused controls This is the same mixer with all areas hidden Simple 8 X 2 stereo mixer Window with all areas visible Show Hi...

Page 69: ...button to memorize the setting and exit The number of Internal Return Busses you assign here will be available as possible channel strip sources in the mixer Mixer Delay Compensation All digital proc...

Page 70: ...nd delay compensation of 256 samples applied Determining Delay Compensation One strategy for achieving this is to route a signal directly to an output bus and via an Aux to a physical output to the ex...

Page 71: ...e Stereo Mix Provides several stereo outputs and allows any input strip to be routed to any or all of them Surround Mix 5 1 format Multiple Surround Mix provides several surround outputs and allows to...

Page 72: ...be added as a single Multiple Surround Mix output strip The principle use of these is for stem mixing where for example dialog background effects spot effects foley and music are recorded as separate...

Page 73: ...oring between the busses Stereo and Surround Mix Busses work the same way If no Select Mix button is lit input strip signals are routed to all monitor outputs I e if no Select Mix button is lit on any...

Page 74: ...d select the appropriate type of bus to add Removing Strips To remove a given input strip bus or group right click directly on it and choose Strip Remove Strip Bus or Group as appropriate Mixer I O As...

Page 75: ...mouse is right clicked Mixer Show Show All Makes all input strips and busses visible Show Hide Selects Strips and Busses to be shown or hidden When checked the Busses or strips are visible on the cons...

Page 76: ...a can be varied from 8 bits to 24 bits Click on the rotary knob and drag left and right to adjust the value PDF Probability Density Function In basic terms the addition of a dither signal noise into t...

Page 77: ...e busses can be routed to physical outputs as required Storing and Recalling Mixer Presets Mixer Presets can be saved in a user folder or added to the main Mixer Preset list either for the current use...

Page 78: ...the position of the source within the surround sound space To position it simply left click on the control and move it to the desired location Double clicking on this control will automatically cen t...

Page 79: ...independent Sub sends One for each input channel Open Surround Control The Surround Control window offers far more information and a greater degree of control over all the surround panning parameters...

Page 80: ...To position it simply left click anywhere within the surround sound space To position it simply left click on the control and move it to the desired location Double clicking on the Green Dot automati...

Page 81: ...n Program and Project Settings Windows All three main settings windows can be found in the Settings menu General Settings is used to set parameters of the Pyramix Virtual Studio environment Informatio...

Page 82: ...page open This dialog box contains a number of Tabs which enable general Pyramix Virtual Studio configuration General Platform Audio processing The drop down list offers a choice of which audio device...

Page 83: ...n excess of 1 is entered in Auto Backup Versions see below Enable When checked the current Project will be automatically saved at the interval set by Auto Saving Frequency Sets the time between saves...

Page 84: ...nt by which a cursor or clip will be nudged when using the left and right Arrow keys Five Nudge Settings can be stored Any one of these can be selected as the current nudge setting using Clips Nudge C...

Page 85: ...When checked the rehearse will be performed from the selected option cursor mark in or mark out Separate To and From options are provided for Gate In and Gate Out Drag Drop Auto Crossfade by default...

Page 86: ...Manual General Settings User Manual 86 Playback Pre Post Roll Settings Allows values to be set for the Default and two alternative Pre and Post roll settings General Settings dialog box Playback Tab...

Page 87: ...a value or by clicking and dragging the slider Click Set to accept the new value or Reset to return to the default value Record Block Size Offers a choice of four possible values Should be left at th...

Page 88: ...Manual 88 Layout Timeline settings Waveform follows fades When checked enabled the waveform display is scaled in height during fades and crossfades The original waveform is shown grayed out General Se...

Page 89: ...Absolute Sources in EDL view Split Editor Vertically Check this box when using a dual monitor set up to enable the Timeline to be displayed on one screen and all Tab Windows on the other one Clip Colo...

Page 90: ...ton Default Templates Location This path is set when Pyramix is installed It can be change here in the ways described above Permanently Mounted Media Folders Shows a list of Media Folders available to...

Page 91: ...ix linear time code or video inputs you should see the current value in the LTC or VITC Reader registers General These are the general settings on which all other time code parameters are based Format...

Page 92: ...put on the optional Video TC interface bracket breakout cable LTC uses the Linear Time Code LTC input on the Video TC interface bracket to derive Auto Pyramix automatically uses any valid time code lo...

Page 93: ...hows which lines will be decoded Although VITC code fits into a single line it is normally duplicated to provide redundancy reducing read errors The drop down lists allow any two lines to be chosen Di...

Page 94: ...User Manual General Settings User Manual 94 Jog Chase General Settings dialog box Jog Chase Tab page...

Page 95: ...d state while crossing the midnight bar rier then even with this setting unchecked setting there will not be an immediate jump from midnight back to zero while playing or recording in sync The playbac...

Page 96: ...filter So when the slider is set to Low the Smoothing Filter parameters have no effect For sound to picture work where tight sync to picture is required use a setting biased to Low For a more pronounc...

Page 97: ...s the value set under Speed Ceiling Repeat Loop Mode continuously repeats a loop starting at the cursor position Scrub Settings Audio Quality Offers a choice of Standard Improved or Best The higher th...

Page 98: ...r mats General These controls are for setting the general format of the Video Sync signal Format Shows the current video format The drop down list offers a choice of PAL NTSC and a wide variety of Tri...

Page 99: ...head switch transients and horizontal sync during the last six to seven lines before the vertical front porch Otherwise the clamp circuit responds as always Burn in Location Simply drag the video bur...

Page 100: ...log box see below Remove If a machine is selected highlighted in the list clicking Remove uninstalls the machine and removes it from the list Properties Clicking on the Properties button opens the Mac...

Page 101: ...face protocol from the choice of MMC MIDI Machine Control or Sony 9 pin P2 protocol in the drop down list Properties Opens the Sony 9 Pin Protocol Configuration dialog box see below when SONY is selec...

Page 102: ...TimeCode source to over ride the automatic setting U Matic machines do not respond to all requests therefore you must specify the TimeCode source Serial Port Clicking the Configure button opens the CO...

Page 103: ...rs which have device drivers are currently installed Controllers in this list will be able to control many of the mixer and or transport functions of Pyramix If you do not see the controller you want...

Page 104: ...hen checked Pyramix communicates bi directionally with Virtual Transport Automatically Set as Clock Master When checked the Pyramix Client is set as Clock Master I e Pyramix is the master clock refere...

Page 105: ...toggle the Pyramix Chase Mode Force TimeCode Source to External Virtual Transport When checked TimeCode source is External Virtual Transport Clients State Saving Toggles between Don t Save Save Client...

Page 106: ...n Settings Information The Information Page has fields for displaying and entering information concerning the current project This information is specific to the Project and will always be available i...

Page 107: ...in the name of new recordings E g if you type Vocal the next recording you make into a track will be called Vocal This field works in conjunction with the Increment take number function see below If y...

Page 108: ...de from the choice available in the drop down list None Generate AFTER recording or Generate While Recording Source Name This field allows you to give a name to indicate the source of the material bei...

Page 109: ...cking the box suppresses the error message Post Processing These options determine what Pyramix will do after each recording is finished Prompt for name after recording When checked a Record Name dial...

Page 110: ...b Project clean up media etc All these functions destroy media on the hard drive but b c offer more control over what is perma nently deleted Group Recorded Clips When checked clips in a multi track r...

Page 111: ...e Controllers page shows a list of all external controllers currently installed Properties Pops up the configuration window for the selected controller Please see Remote Control on page 322 for furthe...

Page 112: ...when the project was created or the default Mixer preset loaded This can be changed from the Sampling Rate drop down list Varispeed Allows either choice of either a pull up pull down sampling rate or...

Page 113: ...tion then enter the required speed change in tenths of percents into the adjacent entry field Values entered outside of the allowed range will be limited to the extent of the allowed range E g if 1500...

Page 114: ...of daughtercards currently installed in the system Board In a multi board system use the drop down list to select the daughter card for which you want to view or change settings Master In a multi boa...

Page 115: ...ter in the VS3 control panel LTC In special situations this option enables word clock to be derived from Linear TimeCode Audio Input Select this option if you want Pyramix to derive it s clock from an...

Page 116: ...the current Mixer This allows each Mixer to have its own custom General and Level Meter settings To change any of the settings click the left or right buttons or drag the horizontal scroll bar to incr...

Page 117: ...isplay will not be updated until the next time playback is stopped and re started If it is not on unchecked the Peak Level Popup Display will show the highest level reached in that track from the last...

Page 118: ...help enable you to ensure that the DSD signal is compatible with the AES recommendations concerning the high frequency dither noise content 20k Applies a 20 kHz low pass filter to the signal thus onl...

Page 119: ...main Pyramix Virtual Studio by Merging Technologies program window appears when the pro gram is launched It has dockable Toolbars across the top with a Transport bar and status information at the bott...

Page 120: ...panels may be grabbed with the mouse and moved up or down thereby varying the space allocated to each panel Dual Monitors When using Dual Monitor setups the main project window can be split vertically...

Page 121: ...on one of the tool Tabs at the top of this Panel opens its window in the Panel Double clicking a Tab opens it as a floating window Double clicking the Tab of a floating window or its Caption Bar retu...

Page 122: ...Delete from the Project win dow pull down menu The Track and all clips placed on it will be deleted Note that only the clip or pointer will be deleted not the original Media File You can also right c...

Page 123: ...ing and or replay is not possible Clicking the Track Name area opens a text entry box where the track name can be typed Track names default to Mono or Stereo View Automation Off Automation data overla...

Page 124: ...nel input automatically between input and repro Behavior depends on the Auto monitoring setting on the Playback Tab page of the General Settings dialog box European Monitoring All tracks turn to INPUT...

Page 125: ...sical input or Internal Return Bus feeding the track input To change a Track input or Output assignment just click on the corresponding Track input or output icon then select the appropriate Mixer cha...

Page 126: ...nywhere along the Time Scale Bar and left click The Play Head will immediately move to the new position You can also left click the Play Head Cursor and drag it along this bar Fixed or Moving Playhead...

Page 127: ...re locked to the scale Linked to Any Track markers follow any track operation Linked to Tracks without Group markers follow any track that have no group Linked to Group X Y Z markers follow any track...

Page 128: ...ling frequency so the loop will be 116mS long at 44 1 88 2 and 176 4 kHz or 106ms at 48 96 and 192 kHz Scrub Settings Audio Quality Three Radio Buttons offer a choice between Standard Improved or Best...

Page 129: ...d at normal Play speed during the recording The Loop Play toggle button puts Pyramix into a loop play mode which continuously plays the Composition between the current In and Out points The Shuttle Co...

Page 130: ...ix The Jog Chase button will manually activate jog mode when Auto Jog on move is deactivated Please see also Auto Jog on move on page 96 The Offset button Click this button to capture the incoming tim...

Page 131: ...to reflect the capabilities and controls of the current machine Zooming and Panning The Project Editing Panel allows two kinds of zoom horizontal or Time Scale zooming and vertical or Track Height zoo...

Page 132: ...lows the user to Pan horizon tally left or right in the usual fashion Track Height Zoom The 1 2 4 8 16 and A buttons at the bottom left of the Project Editing Panel automatically scale the vertical Tr...

Page 133: ...ctangles in the same color as their background on the Timeline Click anywhere in the Overview to center the Project Editing Panel display on that point Click and drag on the shaded gray box to move th...

Page 134: ...List Panel are Absolute Sources in EDL View When View Sources in EDL View is checked on the Layout Page of General Settings the original Source In Source Out and Sync Point times are shown in Absolute...

Page 135: ...ith the Project It can still be opened in the Global Libraries window by looking for the PMX project file in the Project s Media Files sub folder The left hand pane shows Libraries associated with the...

Page 136: ...lose current library Mount Referenced Media Automatically mounts the most recent location where media in the current project were found Update Referenced Media Paths To update a library mount all the...

Page 137: ...ations between the Timeline and library and between libraries objects can also be Opened Auditioned Viewed depending on their type Place opens the Place dialog box The selected object s will be placed...

Page 138: ...Gives a choice of filter parameters Value A value can be typed in or chosen from the list The list displays all val ues present in the library for the selected Field Recursive When checked the search...

Page 139: ...whole of every media file referenced by the clips in a composition Consolidate backs up only those parts of the media files that are referenced by the clip segments in the Composition Extra media bey...

Page 140: ...ow library information is displayed Filter when ticked filters the items displayed in the right hand pane of the Document Libraries Tab Window according to the filter parameters set under the Filter O...

Page 141: ...The columns displayed and their order are all customizable Please see also Libraries on page 31 Media Management Opens a window with two panes The left hand pane shows mounted Media Drives and Folder...

Page 142: ...ultiple mono files appear as a single item with multiple tracks numbered in the form A 1 2 or A 1 8 or A 1 2 7 8 etc Otherwise you would see a separate entry for each mono file whether or not it is pa...

Page 143: ...REMOVES AUDIO and its associated Waveform file s from the drive Convert Quick Import Enables sound files in any supported format to be imported into a Pyramix Media Drive or Folder in either their ori...

Page 144: ...Quick Convert Enables one or more Media files to be converted in a variety of ways Output Dialog All these options produce new media files on disk Whichever conversion option is chosen this dialog bo...

Page 145: ...ling Rate Hz select the desired sampling rate by clicking the relevant radio button Conversion Quality Select the desired quality Very high offers better conversion but takes longer TimeZone Propertie...

Page 146: ...ed Blocklength Allows the user to determine the length of the blocks used for processing by entering a value between 32 and 2048 in the text box or by positioning the slider Crossfading Allows the use...

Page 147: ...aterial Normalize Properties Level dBFS Here you can select from four preset values or use the slider to specify the maximum level for the new file Group Normalize When checked the level of the highes...

Page 148: ...Destination Wordlength Select the desired wordlength using the radio buttons Noise Shaping Select the require quality of Noise Shaping A higher quality setting will produce better results but the proc...

Page 149: ...and function selection fields New tracks can be created or existing ones deleted and the order of tracks changed All track parameters are accessible and modifiable New tracks can be added by clicking...

Page 150: ...his column field toggles between YES and blank Record Ready Shows the current record ready state Clicking in this column field drops down a list box with the three possible states Safe Record Ready an...

Page 151: ...t to Standard Clicking in this column field pops up a color picker Waveform Color Shows clip Waveform color If blank color is set to Standard Clicking in this column field pops up a color picker Recor...

Page 152: ...ar left of the Name field and dragging to the desired row When tracks are assigned to a Track Group a small group track is shown in the Timeline immediately above the first assigned track Track Groups...

Page 153: ...group is automatically Soloed Auto Mute The whole group is automatically muted unless one of its tracks is selected Auto Record Ready When a track of this group is selected the whole group goes into R...

Page 154: ...ecord Page The Playlist icon displayed on each track header enables The creation of an empty Playlist for each track in Record Ready Mode all Tracks in Group or Strip or the selected Track Creating an...

Page 155: ...ting levels If you click on the in the selection part gain is applied to the whole selection and if you click in the clip part the gain is applied only to the clip which was under the mouse when you c...

Page 156: ...as PMF Wave etc Sample Rate Word Length Length Shows the total length of the media file referenced by the clip Original TimeCode Tracks Shows the tracks the media was originally recorded to Peak This...

Page 157: ...ue identifier and extension Note The values shown in the Clip Media and Media Track sections reflect the track clicked on in the Timeline Where a selection contains several possibly multi channel clip...

Page 158: ...ing options is provided together with libraries for user defined fade shapes and fades The Fade Editor always displays the fades for the current selection in the main Editor The nearest fade to the c...

Page 159: ...re Roll and Post Roll set before and after the X Fade bound aries Audition whole X Fade with Pre Roll and Post Roll set around the Reference Point Audition Fade Out up to its End with Curve Audition F...

Page 160: ...on can be displayed see Parameters Options below At the left of each track display The Track name of each clip is shown with a toggling Edit On Off selector This allows one or more Clip s Fades to be...

Page 161: ...n can be linked by clicking the Link button Length of Fade Out and In can be changed symmetrically centered by clicking the Mirror button Position Faders Nudge buttons and Manual Entry Value Box in mi...

Page 162: ...ed tracks are auditioned when Off all tracks of the composition are auditioned as well Loop any audition operation is repeated until Stop is pressed Speed allows choice between 100 50 and 25 of normal...

Page 163: ...en recalled Curve Only When this box is checked only the curve shape will be recalled and applied to the overlapping tracks for the duration of the existing cross fade If left unchecked the original d...

Page 164: ...in ascending order by their position in time If a Marker is moved before or after another Marker the affected markers are automatically re numbered Clicking on the first entry in the Name Field Click...

Page 165: ...ack in the CD Track grid Title CD Title Performer CD General Performer Song Writer CD General Song Writer Composer CD General Composer Arranger CD General Arranger Edition default params These paramet...

Page 166: ...you that this marker was auto generated Number Read only Number of the PQ Marker The stop marker has the same number as the start The index markers begin at 2 then Inc This is a Read only property it...

Page 167: ...orms a similar function to Length Length Length of the CD Track Modify this value to increase or decrease the length of the track and ripple all the tracks after Start Offset Negative Offset for the s...

Page 168: ...enu display with a right click on the grid Add CD Mark Groups Generate PQ markers automatically from clips or clip groups Start Marker Add a Start Marker to the cursor position Stop Marker Add a Stop...

Page 169: ...Check if the ISRC code is correct and correct it if it s bad Inc Selection Increment the designation code part of the ISRC for the selected track s Show Offset Move the PQ marker to reflect the final...

Page 170: ...pop up menu to take care of the offset The player has standard playback functions play stop next previous scan etc and some special functions Play transition Play the current track pause from the prev...

Page 171: ...ext composer from the CD Text Info in the CD Properties page to the selected track s Copy Arranger Copy the CD Text arranger from the CD Text Info in the CD Properties page to the selected track s Cop...

Page 172: ...displayed in the CD Tab Window follow the currently selected Track Group Red Book Validation Validate PQ right click on the CDTrackList and choose Validate PQ This will ensure the PQ con forms to the...

Page 173: ...ransport control window shows the active machine and can be used to switch between installed and enabled machines Alternatively you can toggle through the currently enabled machines Machines Active Ma...

Page 174: ...nnection for the Sony 9 Pin protocol Please see Appendix IV 9 Pin connection on page 344 for a description of the physical connection between the PC s COM port and the RS 422 connector of the external...

Page 175: ...In this case set each Track to Record Ready mode simple Red Dot 3 Check your input levels using the Mixer and adjust as appropriate 4 Position the Play Head Cursor in the Composition where you wish th...

Page 176: ...hift click on the Time Scale bar a movable red triangle and vertical line indicates the Mark In The simplest way to set a Mark Out is to Ctrl click on the Time Scale bar a movable green triangle and v...

Page 177: ...yramix Project which is intended for efficiently loading audio material into Pyramix One advantage to using a Digitizing Session for capture is that Master Clips referencing the audio Media Files can...

Page 178: ...amix A machine can be selected from the Machine drop down list It s control panel appears below the list 7 Locate the required material on the source tape 8 Click on the red Record button to begin rec...

Page 179: ...re Reset Status Restores the Status Field check boxes to their previous state Export Report Exports an rtf file detailing the edits which were captured and those which were not Handles Sets an extra a...

Page 180: ...EDL Importing a CMX EDL Select Project Import choose CMX EDL in the InterChange Import dialog then click on the Import button Select the desired edl file in the Open file browser window The CMX EDL Im...

Page 181: ...ttings are reflected in the rest of the dialog Click the OK button to begin the Import If the edl is not one of the common variants or the intention is to perform a partial or re conform make the appr...

Page 182: ...ther Matching Tape Name or FIXREEL pragma the media original Matching Media Name the media original Matching File Name the media original By TimeCode in matching Folder name the media Timestamp in a f...

Page 183: ...ia file with a Media Source name matching field 2 in the EDL in the preceding example TEST DAT12 or TAPE1 and where the original TimeCode and length match the Source In and Source Out field Source Nam...

Page 184: ...EDL is not accompanied by audio files on disk an Autoconform can be performed A Digitizing Session is used to grab the audio referenced by the CMX EDL from an external machine This may be operated un...

Page 185: ...eplacement of 16 bit versions of audio files with 24 bit versions based on the clip name media name Scene Take infor mation or original TimeCode Relink Clips Media Gives options to extract a string fr...

Page 186: ...File Extension ignores any characters after the last dot Match only first characters ignores all characters after a given number of them Search In allows the choice of which Media Folder to search in...

Page 187: ...he automation during the Reconforming process cannot be undone For this reason it is better to save a copy and reconform that Clicking the OK button opens a file browser window to enable the changes E...

Page 188: ...e quickest and easiest way to get started with Source Destination editing is to use one of the sup plied Templates Choose the one which most closely matches your requirements modify to taste and save...

Page 189: ...Out to Left Right Each nudge operation can be auditioned automatically by setting Audition after Nudge in the View General Settings editing Page Audition the selected Track Group Gate In Out Pre Throu...

Page 190: ...etween Overwrite or Insert by choosing the menu item Edit Source Destination Settings 3 Gates Auto Edit does Overwrite Insert The menu item Edit Source Destination Settings Auto Set Destination Gate I...

Page 191: ...In and Source Gate Out to Destina tion Gate In or Destination Gate Out by rip pling Destination material Destination Gate In Gate Out Auto Edit Performs 3 points editing by doing the following Overwr...

Page 192: ...ng existing automation data Play Green triangle indicator The control s follow the last automation data recorded for them or maintain their default position where no previously recorded automation dat...

Page 193: ...gs General Page This reduces the number of automation versions kept in the history but enhances per formance Release mode determines what happens when a control is released or the transport stopped If...

Page 194: ...red to calculate the automation movements in case of complex mixes Selecting Automation Modes Entire Mixer The entire mixer can be set to the same mode by right clicking in a blank area of mixer panel...

Page 195: ...y back existing automation data otherwise they maintain their default values Controls set to Isolate or Record main tain their current values and no new data is recorded When the Record button is pres...

Page 196: ...selected for display via sub menus In this illustration the gain of band 2 Eq of the strip tools plug in will be displayed Mixer Functions in the same manner as Connected Strip but enables display of...

Page 197: ...This defines the length of fade which is automatically applied at the beginning and end of the selected range from and to the orig inal values Note dB applies to level changes If the automation curve...

Page 198: ...Delete All Versions Deletes all the automation passes for the selected control Clean Up All Tracks Deletes all versions except the current one for all tracks Delete All Tracks Deletes all automation...

Page 199: ...rag a clip s to a library all automation over that clip s is copied pasted as well Mixer and Plug in Snapshots Note Mixer Snapshots as described here use the dynamic automation mechanism Mixer Snapsho...

Page 200: ...library where you want to store the settings then release A new item of the type Mixer Snapshot is stored in the library The snapshot is given the name of the plug in by default The new item is autom...

Page 201: ...ardless of the location of the client applications The server application is launched automatically when Pyramix is started if Enable Virtual Transport Communication is enabled in the Settings General...

Page 202: ...k ahead and Delay Compensation where Strip Tools has a Compressor Both may be freely used in Strips or Busses if the need should arise for a limiter in an Input Strip or a Compressor in a Bus Modules...

Page 203: ...mber of the selected group When you move or switch this control or any other control which is a member of this group all the members of the group will move or switch along with it Exclusive This mode...

Page 204: ...input gain of strip tools 2 are both assigned to group one The invert button of the gain of strip tools 2 is on Now when you increase the gain of strip tools 1 by 1 dB the gain of strip tools 2 will d...

Page 205: ...band fully parametric equalizer Each band can be switched to high or low pass shelving or peaking characteristics Output This section controls the output level of the strip tool and also offers auto m...

Page 206: ...ug in This button switches the entire Strip plug in on or off Note that when the plug in is switched off it doesn t consume any DSP power Show Hide input section Input section on off Input level contr...

Page 207: ...act If the input signal level exceeds the Threshold Level the gain is reduced or increased in De Compressor mode in proportion to the setting of the ratio control Ratio Control Determines the proport...

Page 208: ...vel Control If the input signal level falls below the threshold level the gain of the expander is reduced or increased in inverse mode according to the setting of the ratio control Ratio control Deter...

Page 209: ...igher depending on the sampling rate of the project and can be switched between peaking high or low shelving and low pass or high pass characteristics Each of the five bands can be switched off De act...

Page 210: ...determine the characteristics of the selected EQ band The choices from left to right are High Pass Filter Low Shelving Peak High Shelving and Low Pass Filter Selected Band On Off Switches the selecte...

Page 211: ...andle selects the band The frequency response display uses two separate gain scales The left hand blue scale shows the scale used for individual bands The right hand gray scale shows the scale for the...

Page 212: ...most frequently used mastering processing blocks you find on the output busses of a mixing console in a single plug in including an advanced limiter Like Strip Tools multiple instances of the Bus Tool...

Page 213: ...ns the input level control and shows the name of the mixer strip this instance of the plug in is assigned to Limiter This section contains the limiter which either acts as a standard limiter but it ca...

Page 214: ...surround channels by adding two Bus Tools plug ins to the Bus and selecting L C R in the first and LS and RS in the second Using Bus Tools on multiple surround busses Although a single instance of Bu...

Page 215: ...nerated by the Limiter Section The range of the display can be switched between 6 or 12 dB by clicking on the bar graph Scale markings in 1dB increments on the right hand side of the bar graph make it...

Page 216: ...lays the dynamics of the input signal which is the basis for the DRC algorithm Velocity control Determines the speed of the DRC algorithm The lower the value the faster the algorithm reacts to changes...

Page 217: ...up is Off the Output Level Control will act as a ceiling control setting the absolute level of the resulting output signal Delay Compensation Pre Anticipation Example In this table Bus Tools Instance...

Page 218: ...ut level Output Gain Manually adjusts the gain applied at the output of the plug in The value is shown in dB Channel List Shows which channel has the plug in that the window is currently controlling C...

Page 219: ...rom libraries Choosing Presets Click on the desired preset from the list The plug in s parameters will be set to the values stored in the preset Storing Presets Creating a new preset stores a snapshot...

Page 220: ...te the current preset right click in the effects window Then choose Presets Remove then choose the preset you wish to remove Parametric EQ The Parametric Equalizer is a four band fully parametric EQ w...

Page 221: ...or cut in any or all of ten bands one band per octave ranging from 32Hz to 16kHz As with all rotary controls double clicking on a slider knob restores it to zero Three Band Tone Control A simple three...

Page 222: ...f the input signal All the threshold settings are on the right of the window From the bottom up Gate Expander Compressor 1 Compressor 2 Limiter and Input Reference Level Reference Level Sets the input...

Page 223: ...dynamics processor but does not alter the tonal balance of the main signal This enables the response of the pro cessor to be made more sensitive to certain frequencies than others This is typically us...

Page 224: ...he output level in real time when signal is present at the inputs Delay The delay Plug in provides four delay based effects Plain vanilla Delay Echo Comb Filter and All Pass Filter The interface is sl...

Page 225: ...quency response chart which looks like a comb with some frequencies depending on the delay time missing like the gaps between the teeth of a comb All Pass Filter Combines the processes used in the Ech...

Page 226: ...reversed the input levels are adjustable and the both channels can be indi vidually panned anywhere between hard left and hard right AnguDion Interesting Three buttons labeled Stooge Angel and Tricky...

Page 227: ...and Output gain rotaries Velocity and Amount rotaries flank a rotary switch with Stooge Angel and Tricky options The concentric Wide pot becomes active when AnguDion II is inserted in a stereo channe...

Page 228: ...strip where it is acti vated in a common window It can serve as a master level display replacing expensive external hard ware metering units Clicking on a VU meter plug in opens the meter window The p...

Page 229: ...ime of 12 dB second Activating the VU Meter The VU Meter can be added like any other plug in on any strip by choosing Add Effect VU Meter from the context menu within the mixer strip The only differ e...

Page 230: ...ettings and several predefined presets while the right side has four Tab panels Switch Display Clicking on this area cycles through VU PEAK and BOTH Double VU When this button is lit the peak meter sw...

Page 231: ...ng levels measured in milliseconds Peak Release This is the speed at which the peak meter falls when the level is decreasing expressed in dB s per sec ond VU Release This is the speed at which the VU...

Page 232: ...Anything above this level means that the signal is clipped If for example the VU Reference level is set to 16 dBFS the VU meter would display 0 dB when the signal is at 16 dBFS Peak Color A B alignmen...

Page 233: ...tal clipping so care should be taken with signals at these lev els Rulers Min This sets the minimum level of the range displayed by the peak meter and thus influences the accuracy and the resolution o...

Page 234: ...is assigned to the plug in Phase Oscillo This plug in combines a phase meter and a X Y oscilloscope Note Phase Oscillo cannot be used in a mono strip If you do so it will return an error message The p...

Page 235: ...tches the oscilloscope display on and off If set to off only the phase meter is displayed Sample interpolation When this switch is on the samples of the signals displayed on the oscilloscope are inter...

Page 236: ...h more than two channels e g a surround bus or a multiple stereo bus these two selectors allow you to select the appropriate channels for the left and right input of the plug in On a surround bus you...

Page 237: ...to is set levels so the meter reads average 8 when recording speech This is partly due to the modulometer s characteristics as a quasi peak meter quasi because it has the ballistics of a mechanical m...

Page 238: ...ol the behavior of the Modulometer Reset Restores the default settings Presets Offers the standard Preset options Display Frame Sec Sets the display refresh rate Release dB Sec Sets the Release time A...

Page 239: ...User Manual Plug Ins User Manual 239 Function Generator This oscillator can produce a Sine wave a Pulse wave a Triangular Sawtooth wave DC and White or Pink Noise Function Generator floating Windows...

Page 240: ...s Hold Alt Shift then click and drag from a Plug in window to the library where you want to store the settings then release A new item of the type Mixer Snapshot is stored in the library The snapshot...

Page 241: ...The Nova window is fully resizable for optimum compatibility with all screen resolutions Prosoniq MPEX2 Timestretch and pitch change Overview The MPEX2 algorithm for Pyramix has been developed with th...

Page 242: ...in the Timeline like fades sync points gain curve are also stretched squeezed properly Optionally the media can be consolidated to convert only the required part The two processes described above are...

Page 243: ...ly click OK or press the Enter key to confirm the operation Select the region or clip you want to process and copy it Edit Copy or Ctrl C etc Select the region you want the copied region to fit into t...

Page 244: ...he left window select those you want to use in Pyramix and press the Copy to MT VST Plugin Dir button If nothing appears in the left window you just need to have a folder con taining all your VST plug...

Page 245: ...uted via a physical out put to an external effect The output of the external effect is simply brought back into Pyramix via one of the physical inputs However a delay will be introduced by the externa...

Page 246: ...milarly to set a CD Stop Marker which indi cates the ending of a CD track place the Play Head at the appropriate CD track End location and choose Cursors Marks Add CD Stop Marker to Play Head A named...

Page 247: ...e signal Since there is no such thing as a free lunch the trade off is a slightly increased level of noise However the noise can be shaped to reduce its perceived audibility See also Dithering on page...

Page 248: ...propriate changes to the settings then click the Generate Image button Important if using SRC dithering must only be turned on in the Generate CD Image dialog box Please turn dithering OFF in the Mixe...

Page 249: ...x Virtual Studio that is used to write the CD image out to a CD R disc or a DDP image file to a folder or DDP tape drive Source The drop down list enables the user to choose between all installed opti...

Page 250: ...down a list of other optical disk drive commands Retract Closes the loading tray on the source drive Disk Info Reads the disc information and displays it in the Results box Drive Info Interrogates th...

Page 251: ...Fix Disc Finalizes a CD R Erase Disc Erases the contents of a CD RW Drive Info Interrogates the optical drive firmware and displays information about the drive in the Results box Settings Clicking on...

Page 252: ...iinstructions should be available from the drive manufacturer s website This is true for CD Text writing write speed buffer issues as well as for CD Import CD Text CD Text has been successfully tested...

Page 253: ...tape and from there on it may be transfered copied duplicated checked archived or whatever else you want to do with it such as sending it over a secure FTP connection Red Book Compatible Masters If t...

Page 254: ...ts of the Composition together to move it to another machine or storage medium The Consolidate function makes a selective backup of the media used in the Composition Instead of backing up the whole of...

Page 255: ...down list enables the Consolidated Composition to be saved in the same format as the origi nal or to be converted to any supported format Generate Waveform When checked waveform files will be generat...

Page 256: ...the part of audio required by the clips This function is available through the menu Project Stretch and requires the Prosoniq MPEX2 authorization key to be entered Reconforming a Project Processes ent...

Page 257: ...ial to processes that need analyzing before or after the given portion of data Handles will NEVER be processed by any Render plug ins Taget Settings Affect the Output File Render Name A text entry box...

Page 258: ...renders for each selected Clip Group in the timeline In this case the Render Name text edit box is ignored and all renders take the name of the first clip in time of each group Currently Available Plu...

Page 259: ...rrent project tracks Export Options Export whole composition including tracks track groups and markers Export selection only The Export selection only will be grayed out if there is no selection in th...

Page 260: ...ration please see www mediafour com AAF Pyramix can import and export projects in AAF Advanced Authoring Format Import Select AAF in the Interchange Import dialog Choose the appropriate import option...

Page 261: ...dialog opens Navigate to the required drive folder type a suitable filename in the File name text box choose the appropriate file type from the Save as type drop down list Make appropriate choices in...

Page 262: ...f the dialog box Choose the disk you want to work with by selecting it with the mouse The Refresh Disks button restarts the search for available Akai disks The lower part of the dialog box shows the d...

Page 263: ...dia folder instead of copies of the actual audio data The audio will play correctly but no waveforms will be dis played CD Import Pyramix has comprehensive CD import functions Project Import opens the...

Page 264: ...has three drop down list boxes to select the Destination Drive the Format the CD audio will be captured in and Waveform determines whether a waveform will be generated and if so WHILE recording or AF...

Page 265: ...ports 10 5 3 11 sub compositions When exporting OMF from another application there is a choice of either embedding the audio files into the OMF file or keeping them external as a link Pyramix supports...

Page 266: ...existing one Project Import opens the Interchange Import dialogue box Select the appropriate import option from the three choices at the bottom using the radio buttons These are 1 Replace the current...

Page 267: ...the session file and all audio files in an archive or a set of archives and then burn an ISO CD or DVD or a set of ISO CD or DVD containing the archive s Copy this ese archive s into your Mac extract...

Page 268: ...nder Use the following port choose File 4 Select the printer that you will eventually use to print the file 5 The rest of the installation is the same as a standard printer installation If you print a...

Page 269: ...User Manual Project Interchange User Manual 269 The CueSheet Printing window opens Shown with the Preview option selected CueSheet Printing Window...

Page 270: ...which should give access to the Printer s set up dialog with options dependant on the selected printer Preview Adds a graphic preview of the Cue Sheet s to the right hand side of the window Design Op...

Page 271: ...User Manual Project Interchange User Manual 271 Preview Clip Borders When checked clip borders are shown in the preview display Background Black White Toggle the preview background color...

Page 272: ...Settings Interface Editor Clicking on any of the building blocks of the Track Header selects the block indicated by a square red outline Blocks may be positioned anywhere in the Track Header by click...

Page 273: ...the background color of the tracks to be chosen Track Separator Color Opens a Color Picker enabling the color of the guard band between tracks to be selected Apply Applies the current settings to the...

Page 274: ...he Assign button 7 Continue assigning Keys to Commands until you are satisfied 8 Any set of user defined Keyboard Shortcuts can be saved as a Preset To do so click the Save Preset button then name the...

Page 275: ...u Command functions are grouped together into Tabs Select the Tab with whichever group of Command Functions you wish to add to the Macro 4 Click on the appropriate Command so that it is highlighted 5...

Page 276: ...al to a Biphase to LTC converter E g the Rosendahl BIF Converter s LTC output is directly fed to Pyramix LTC input Pyramix is set to LTC sync mode and will adapt it s own internal clock to sync to LTC...

Page 277: ...c you may well wish to retain a previous take for say Effects until a certain point This can be achieved by arming the Dialogue and Music Track Groups playing the transport and punching into record at...

Page 278: ...eady exists Do not attempt to move or copy the tape once created as this would suppress the block interleaving on the disk made by Virtual Tape Format Even if you feel that copying a template tape fro...

Page 279: ...the menu item View Zoom Fit in Window Your tape should be at its proper location in the Timeline Now go into the Project Information Settings Record Settings Page Select the Media Folder where your ta...

Page 280: ...mode Place Mark In at 00 00 00 00 and Mark Out at 23 59 59 24 default values for a new project Plug LTC Out from the tape machine into Pyramix Set Chase mode to HARD CHASE Rewind the tape Press Play o...

Page 281: ...e Add Tempo button to add your new Tempo to the list You may wish to delete any others Tip Select View Scales Toolbars Tempo Map to see the new Tempo in the Timeline Tempo bpm Allows you to pick a tem...

Page 282: ...amix software By default this will be C Program Files Merging Technologies Pyramix Virtual Studio Metronome Bars wav etc The Attack Offset parameters enable the timing to be adjusted and the values in...

Page 283: ...cribed here or elsewhere in this manual New Create a new Editing Project or Digitizing session New from Template Create a new Project based on a Template Open Open an existing Editing Project or Digit...

Page 284: ...ersions of audio files with 24 bit ver sions based on the clip name media name Scene Take information or original TimeCode Load Change EDL Allows a so called Change EDL generated from a State 1 EDL an...

Page 285: ...the selected folder 1 Late night test etc The most recently opened Projects are listed at this position Clicking on an entry opens the Project Exit To quit the application choose Exit from the File me...

Page 286: ...User Manual Menus Edit menu User Manual 286 Menus Edit menu Paste Sub menu Edit menu...

Page 287: ...of the current selection Fill Selection This command will substitute the Clipboard contents for the selected clip or region Replace Selection This command will substitute the Clipboard contents for t...

Page 288: ...a selected clip between the marks on the same track Automatic Silence Removal This command opens the Automatic Silence Removal dialog box Delete with Media Removes the current selected clip from the...

Page 289: ...es are set in a Source and 1 is set in the Destination then AutoEdit performs an Insert operation Jog Wheel Editing A number of editing actions may be undertaken on a selected clip or group of clips u...

Page 290: ...ip placed on a track to snap the head of the clip to the nearest edit point or mark on the track This includes the head or tail of existing clips on the track as well as the Play Head Cursor Mark In M...

Page 291: ...ap mode is set to Bars Beats Grid Snap Cursor When this option is checked enabled the Cursor is also snapped following the current mode Snap Region Selection When this option is checked enabled the Se...

Page 292: ...osition when playback stops Show Ghosts When checked enabled shows a ghost image of clips on related virtual tracks Show Media When checked enabled shows the full extent of the underlying digital medi...

Page 293: ...ay a waveform that is fully colored even at sample level like peak display Show Waveform Origin Sets the current waveform display to display a waveform that show also at sample level the 0dB origin Sh...

Page 294: ...ze Scroll Timeline Scroll Timeline Left Scroll the whole Timeline to the left Scroll Timeline Right Scroll the whole Timeline to the right Scroll Timeline Up Scroll the whole Timeline up Scroll Timeli...

Page 295: ...ndow CD Open CD Tab window Notes Open Notes Tab window Machines Open Machines Tab window Media Management Open Media Management Tab window Global Libraries Open Global Libraries Tab window Customize M...

Page 296: ...lect all clips on current audio track Deselect All Deselect all currently selected clips Select Previous Clip Select clip to left of currently selected clip Select Next Clip Select clip to right of cu...

Page 297: ...the keyboard Move Up Moves the selected clip or region up to the adjacent track above it Move Down Moves the selected clip or region up to the adjacent track below it Move Up with Fade Moves the selec...

Page 298: ...Keep Current Name When checked the current name is retained but with the choice of keeping or removing the current track number in parenthesis Remove Track Number Removes Track Number from the Clip Na...

Page 299: ...Fade In Default Apply Fade In Default Fade In Default Curve Apply Fade In Default Curve Fade In Standard Fade In Power Linear Apply Fade In Power Linear Fade In Tension LinearApply Fade In Tension Li...

Page 300: ...clip will always show the waveform display regardless of the waveform display set tings for the track Waveform force Name clip will always show the clip name regardless of the waveform display settin...

Page 301: ...ion Editor Auto connect Automatically connect all tracks sequentially to any available mixer input Select Previous Track Group Selects the track group above the currently selected track group Select N...

Page 302: ...cts and highlights all clips on the selected track Select All Clips to Mark In Selects all clips on the track from the beginning of the composition up to the mark in Select All Clips between Marks Sel...

Page 303: ...User Manual Menus Cursors and marks User Manual 303 Menus Cursors and marks Cursors Marks menu...

Page 304: ...ight by an amount entered with the Keyboard Nudge Cursor to Left Custom in Bars BeatsNudge Cursor to Left by an amount entered in Bars Beats with the Keyboard Nudge Cursor to Right Custom in Bars Beat...

Page 305: ...lay Cursor to be positioned to a specific Footage Goto Beat Allows the Play Cursor to be positioned to a specific Beat Cursor to Mark In Moves the Play Cursor to the Mark In Cursor to Mark Out Moves t...

Page 306: ...ow Cursor Automatically centers the display of the Project Editor to the Play Cursor Show Mark In Automatically centers the display of the Project Editor to Mark In current position Show Mark Out Auto...

Page 307: ...e current selection to the track below its current position Narrow Selection Up Removes the current selection from the track above its current position Narrow Selection Down Removes the current select...

Page 308: ...sor position Select between Gates Sets the Selection between the selected track group Gates Gates to Selection Moves the Gates to the extremities of the current selection Select Clip s under Cursor Se...

Page 309: ...Undo Fade Change Undoes the last parameter change Previous Fade Select Edit previous fade Next Fade Select Edit net fade Xify Reset the current fade to a standard Power X fade Show Faders Control Sho...

Page 310: ...ine Zoom factor Zoom Preset 1 Recall Preset Zoom 1 Zoom Preset 2 Recall Preset Zoom 2 Zoom Preset 3 Recall Preset Zoom 3 Zoom Preset 4 Recall Preset Zoom 4 Zoom Preset 5 Recall Preset Zoom 5 Faders Co...

Page 311: ...Curve with Ref Audition Out without Curve with Ref Audition Out after Fade with Ref Audition Out Original Material Audition In with Curve Audition In without Curve Audition In before Fade Audition In...

Page 312: ...Memory 2 Recall Memory 3 Recall Memory 4 Recall Memory 5 Presets Load Default X Curve Load Default X Preset Save Default X Preset Load Default Out Curve Load Default Out Preset Save Default Out Preset...

Page 313: ...cted region Cut Selected Points Cuts all automation points contained in the selected region Copy Selected Points Copies all automation points contained in the selected region Paste Points to Cursor Pa...

Page 314: ...Save Workspace 10 Update Current Workspace Updates the current Workspace with current settings Recall Recall Workspace 1 Recall Workspace 1 Note Recall Workspace 2 9 omitted Recall Previous Workspace...

Page 315: ...ewind Scan Forward Scan Forward Scan Rewind Scan Rewind Start Goto Start End Goto End Play Reverse Play Reverse Play 1 2 Play 1 2 Play 1 2 Reverse Play 1 2 Reverse Play 1 4 Play 1 4 Play 1 4 Reverse P...

Page 316: ...6 Play 1 16 Reverse Play 2X Play 2X Reverse Play 4X Play 4X Reverse Toggle Play Stop Toggle Play Pause Toggle Play Record Toggle Stop Record Safe Note This command toggles between Play and Stop or oth...

Page 317: ...on Pre Preroll 2 Audition Pre Preroll 2 Audition Pre Preroll 3 Audition Pre Preroll 3 Audition Audition Audition Pre Postroll 2 Audition Pre Postroll 2 Audition Pre Postroll 3 Audition Pre Postroll 3...

Page 318: ...ut Pre Postroll 3 Audition Gate Out Post Audition selected track groups Gate Out Post Audition Gate Out Post Postroll 2 Audition selected track groups Gate Out Post Postroll 2 Audition Gate Out Post P...

Page 319: ...t Eject Chase Cursor On Off Chase Cursor On Off Enable Record On Off Enable Record On Off Record Ready V1 Record Ready V1 Record Ready A1 Record Ready A1 Note Record Ready A2 A7 omitted Record Ready A...

Page 320: ...ee User Macros on page 275 Menus Settings The Settings menu brings together all the Settings windows and the customization windows Menus Window The Window menu maintains a list of open projects and en...

Page 321: ...s Macro User Manual 321 Menus Help The Help Menu gives quick on line access to this manual and others About pops up a Window with the Pyramix logo and details about the registered user and software ve...

Page 322: ...d the External Machine is the selected Active Machine then Play Rewind Fast Forward Stop and Goto commands sent by any Remote Controllers Sony 9 Pin or MIDI are redirected to the External Machine Reco...

Page 323: ...om an external 9 pin controller synchronizer then the exter nal controller must be set up as a Controller in Pyramix If you wish Pyramix to work as a 9 pin control ler e g to control an audio or video...

Page 324: ...al Settings window Note Do not do this more than once Only one GPI GPO controller is allowed How ever this can control more than one physical GPI GPO USB Module Enable Disable The GPI GPO controller m...

Page 325: ...input and or output pins Status can be only associated with output pins The other Remotes cannot be mapped to GPI O pins GPI O Input and Output Pin Configuration Input pins mapped to Toggle or Range...

Page 326: ...4 kB of channel 1 then 64 kB of channel 2 etc finally 64 kB of channel n This setting default 64 kB can be changed by the user to one of four alternative values in the Record Block Size section of the...

Page 327: ...ity of a 64 x 64 sized mixer from 4096 nodal computations down to just 64 computations which is a dramatic DSP processing saving feature and allows Pyramix to accommodate very large player recorder tr...

Page 328: ...eans equal Real time intensive activities such as those found in audio and video workstations show up inadequacies unlikely to be noticed in more mundane applications Even though one might expect the...

Page 329: ...ng either the VS3 resulting in audio drops while preserving the synchronization of the tracks or the Mykerinos driver In the latter case the stall may also endanger the integrity of the synchronizatio...

Page 330: ...at the bottom the Pyramix window should be in a range of 20 to 90 A higher level could produce clicks or occasionally mute the audio inputs In the I O Status window right click on the bottom of the P...

Page 331: ...w right click on the bottom of Pyramix window Debug menu The input frequency should match the frequency set in the Mixer Settings The yellow bar must be slightly visible in the Deviation field The amo...

Page 332: ...right click for individual clips and tracks in Pyramix Relaunch After Improper Exit In the case of an improper application exit politically correct term for crash the system does not attempt to autom...

Page 333: ...lock Source If Pyramix is set up to lock to an external clock source but cannot get a valid signal from this source it will switch to Internal clock In this case the red light associated with Internal...

Page 334: ...nefit of a larger immunity against short term hard disk access stalls and other operating system slow downs at the cost of longer latency at initial playback start Threshold During playback the audio...

Page 335: ...oop to com plete video frames The start point will always be rounded down and the end point will always be rounded up so that the loop will always contain at least the initial range intended for the l...

Page 336: ...tempo for the current Beat Ctrl Shift Click In the Tempo Map Create a new tempo portion Ctrl Click In the Track headers zone Repeat action for the same button on all tracks Shift Click In the Clips z...

Page 337: ...elope in value H Don t merge Automation points Ctrl Constrain Automation in time V Constrain Automation in value H Select only what is under the mouse no groups Shift Select all tracks Ctrl Shift Sele...

Page 338: ...On dropping a fade or crossfade from a library Apply to whole group Shift Overview Left Mouse Button Draw a region to zoom in Alt Drag the current composition to a library Shift Alt Notes Left Mouse...

Page 339: ...O and the second on a separate bracket carries four AES EBU Input and Output stereo pairs There are four analogue Line outputs and four analogue Line Inputs two of which may be switched to accept Mic...

Page 340: ...of I O over 3 Tascam TDIF connections Connec tion is via three DB 25 connectors One on the main card attached to the Mykerinos and two more on a separate bracket connected via internal ribbon cable to...

Page 341: ...prevent proper locking to the exter nal source and therefore prevent correct decoding of the DSD bitstreams resulting in very loud noise on its outputs Check the setting via View Mixer Settings I O Sy...

Page 342: ...nvert this DSD Project into a DXD Mixing Project If the answer is YES the project will be opened in DXD Mixing mode Though all your media files will remain in DSD IFF format If the answer is NO the pr...

Page 343: ...tatus Disabled White The sequence has to be reset to enable all Cues Ready Pink The Cue is enabled and ready to play Playing Green The Cue is playing it can be paused or stopped Paused Yellow The Cue...

Page 344: ...for short distances a direct cable may be used However Merging Technolo gies does not guarantee the correct function of an external controller if this cable is used Different cables are required depe...

Page 345: ...is not implemented consistently on all devices so the cable pinouts may differ Please consult your controller s user guide for appropriate connector cabling Function GND Pin 1 2 3 4 5 6 7 8 9 Rcv Xmi...

Page 346: ...inos Latencies FX IN FX IN FX IN FX IN FX IN FX IN FX IN FX IN FX IN FX IN MIX FX OUT MIX FX OUT MIX MIX FX OUT MIX FX OUT FX OUT 2 7 ms 5 3 ms 5 3 ms 8 ms 5 3 ms 8 ms 128 samples 128 sampling rate 12...

Page 347: ...192 Auto Write 192 Isolate 192 Play 192 Record 192 Automation Settings 193 Automation Trim 197 Auto Monitoring 87 Auto Mount Media 284 AutoPunch Ready enable disable 124 Auto Saving 83 Aux Bus 73 B B...

Page 348: ...n out 113 Discontinuous TimeCode 46 280 DiscWrite 249 Display and Editing of Automation Data 196 Display Blocks 124 Display Envelope 125 Display Waveform 124 Dither 247 Dithering 148 Dithering Window...

Page 349: ...109 Input Assignment 67 Input Format 115 Input Strip Mode 69 Input Strip Mode for External Processors 70 Input Strips 70 Insert Silence 62 Installing Pyramix 26 Interface Editor 272 Internal Return B...

Page 350: ...Files 329 Multiple CDs or versions in one Project 172 Multiple Mix Busses 71 Multiple Stereo Mix 71 Multiple Surround Mix 72 Multi track Editing 276 Mykerinos 19 326 Mykerinos Board Installation 23 My...

Page 351: ...n Auto 45 Record Ready Manual 45 Record Tab 107 Recording Audio into a Pyramix Virtual Studio Project 45 Recording from a Tape with Discontinuous TimeCode 46 Recursive 49 Redirect Remote Controllers c...

Page 352: ...orithm 80 Surround Post Processing 256 Sync 115 Sync Video and Time Code Connections 25 System Requirements 20 T Target Settings 107 TASCAM TDIF I O Option 340 Time Code and Video Sync Option 20 Time...

Page 353: ...ex 353 User Manual W Warnings 328 329 Window Menu 320 Word Length 76 Wordlength Converter Properties 148 Work Spaces 154 Workspaces 273 Workspaces Menu 314 Write to End 193 X X Fade 58 Xify 159 Y Your...

Page 354: ...User Manual Index User Manual 354...

Reviews: