background image

Chapter 1: Welcome Aboard!

490 Pilothouse    Owner’s Manual

8

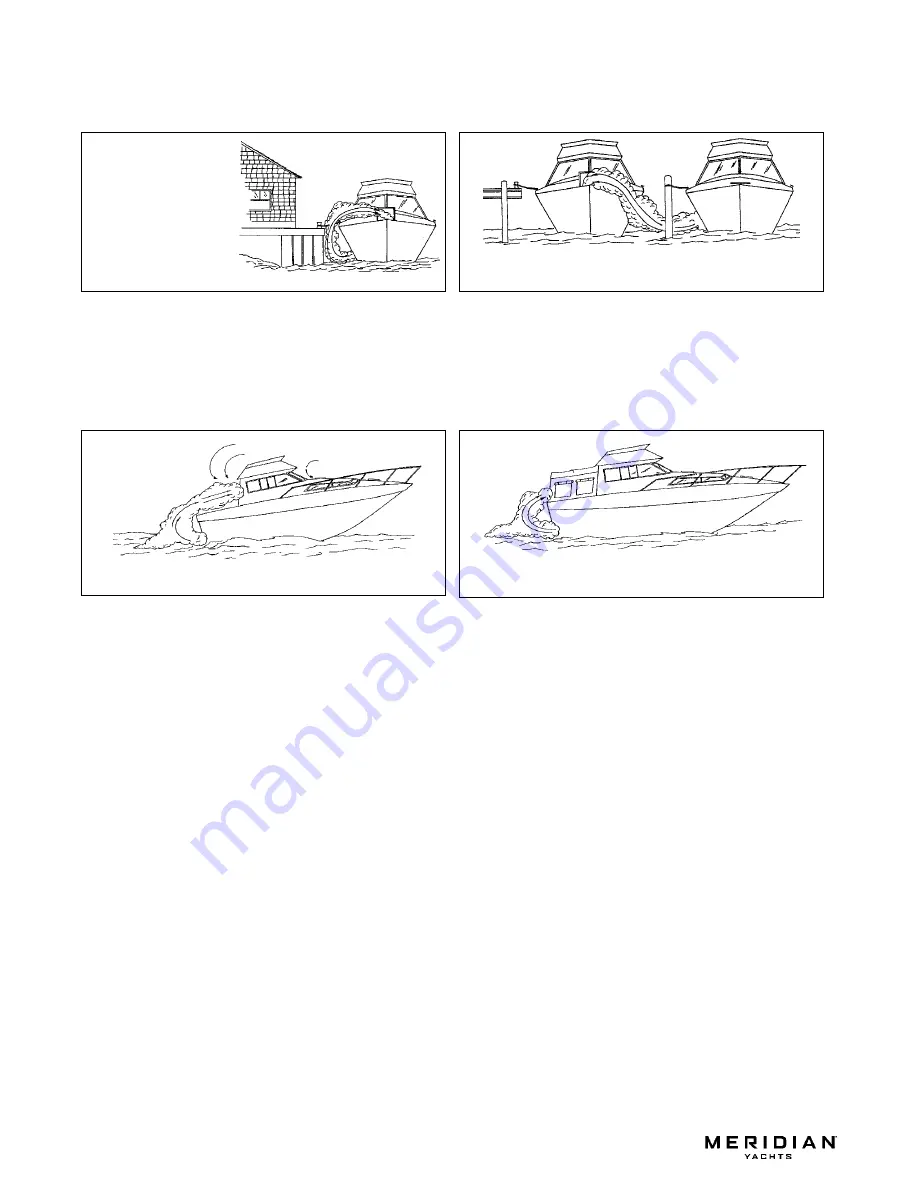
Where & How CO Can Accumulate

Stationary conditions that increase CO accumulations include:

To correct stationary situations A and/or B:

Close all windows, portlights and hatches.

If possible, move your yacht away from source of CO.

Running conditions that increase CO accumulations include:

To correct running situations C and/or D:

Trim bow down.

Open windows and canvas.

When possible, run yacht so that prevailing winds help dissipate exhaust.

How To Protect Yourself & Others From CO

Know where and how CO may accumulate in and around your yacht (see above).

Always maintain fresh air circulation throughout your yacht.

Know where your engine and generator exhaust outlets are located and keep everyone away from these areas.

Never sit on, or hang onto, the back deck or swim platform while the engines or generator are running.

Never enter the areas under swim platforms where exhaust outlets are located.

Although CO can be present without the smell of exhaust fumes, if exhaust fumes are detected on your yacht, take 
immediate action to dissipate these fumes.

Treat symptoms of seasickness as possible CO poisoning. Get the person into fresh air immediately. Seek medical 
attention—unless you’re sure it’s not CO.

Maintain the CO monitors inside your yacht. NEVER ignore any alarm. Replace monitors as recommended by the 
monitor manufacturer.

Follow the checklists provided on the next page.

Get a Vessel Safety Check.

For information about free VESSEL SAFETY CHECKS, visit www.vesselsafetycheck.org or contact your local U.S. 
Coast Guard Auxiliary or United States Power Squadrons®.

U.S. Coast Guard Auxiliary: 1-800-368-5647 or on the Internet at: http://www.cgaux.org

U.S. Power Squadrons: 1-888-FOR-USPS (1-888-367-8777) or on the Internet at: http://www.usps.org

A.

Using engine, 
generator, or 
other fuel 
burning device 
when yacht is 
moored in a 
confined 
space.

B.

Mooring too close to another boat that is using its 
engine, generator, or other fuel burning device.

C.

Running yacht with trim angle of bow too high.

D.

Running yacht without through ventilation 
(station wagon effect).

Summary of Contents for 490 Pilothouse

Page 1: ......

Page 2: ......

Page 3: ...iability resulting from errors or omissions in this document or from the use of information contained herein Due to our commitment to product improvement Meridian reserves the right to make changes in...

Page 4: ...Chapter 2 Locations Exterior Views 11 Hull Views 11 Forward Deck View 12 Aft Deck View 13 Helm Views 14 Pilothouse Helm Station 14 Command Bridge Helm Station 15 Component Locations 16 Chapter 3 Propu...

Page 5: ...nt Davit Operation Guidelines 56 Dinghy Launching Retrieving 56 Davit Dinghy Storage 58 Davit Maintenance Guidelines 59 Canvas Vinyl Tops Enclosures 60 Canvas Care 61 Clear Vinyl Care 62 Chapter 8 App...

Page 6: ...alerts you to hazards or unsafe practices which COULD result in severe personal injury or death if the warning is ignored WARNING This box alerts you to hazards or unsafe practices which COULD result...

Page 7: ...secure yet readily available place Dimensions Tank Capacities Dealer Service Your dealer is your key to service Ask your dealer to explain all systems before taking delivery of your yacht Contact your...

Page 8: ...ea schools or competent instructors Qualified Maintenance Failure to maintain your yacht s systems listed in the warning above as designed could violate the laws in your jurisdiction and could expose...

Page 9: ...air and at the correct pitch for your particular situation A slightly bent or nicked propeller will adversely affect the performance of your yacht BEFORE starting or working on your engine s read the...

Page 10: ...hang from the back deck or swim platform while the engines are running Teak surfing dragging or water skiing within 20 feet of a moving watercraft can be fatal DANGER DANGER PERSONAL SAFETY HAZARD AL...

Page 11: ...ice Sacrificial Anodes Zincs Your yacht features sacrificial anodes zincs to protect underwater metal parts from excessive deterioration Check the zincs regularly and replace them if they have deterio...

Page 12: ...ing slings together BEFORE lifting WARNING PERSONAL INJURY and or PRODUCT or PROPERTY DAMAGE HAZARD NEVER lift your yacht using the cleats WARNING PERSONAL INJURY and or PRODUCT or PROPERTY DAMAGE HAZ...

Page 13: ...e fatal Breathing CO blocks the ability of your blood to carry oxygen The effects are cumulative Even low levels of exposure can result in injury or death Factors that Increase the Effects of CO Poiso...

Page 14: ...Although CO can be present without the smell of exhaust fumes if exhaust fumes are detected on your yacht take immediate action to dissipate these fumes Treat symptoms of seasickness as possible CO po...

Page 15: ...tem components Signs include rust and or black streaking water leaks or corroded or cracked fittings Inspect rubber exhaust hoses for burned cracked or deteriorated sections All rubber hoses should be...

Page 16: ...tp www cgaux org U S Power Squadrons 1 888 FOR USPS 1 888 367 8777 or on the Internet at http www usps org CARBON MONOXIDE POISONING HAZARD The house battery switch MUST be in the On position for the...

Page 17: ...R DRAIN ANCHOR LOCKER DRAIN DECK DRAIN AIR CONDITIONER DRAIN IF EQUIPPED GALLEY SINK DRAIN WATER HEATER DRAIN DECK DRAIN AFT BILGE PUMPS DRAINS PORT ENGINE EXHAUST GENERATOR EXHAUST PORT COCKPIT DRAIN...

Page 18: ...wner s Manual 12 Forward Deck View BOW HATCHES WINDLASS FOOT CONTROLS CLEAT CLEAT BOW NAVIGATION LIGHTS ANCHOR WINDLASS SPOTLIGHT WINDSHIELD WIPERS ALL ROUND LIGHT BOW PLATFORM DECK RAIL DECK RAIL BOW...

Page 19: ...e Owner s Manual Chapter 2 Locations 13 Aft Deck View CLEAT BOARDING LADDER CITY WATER INLET CLEAT GRAB RAILS NAVIGATION LIGHT STERN SWIM PLATFORM STORAGE HATCH COCKPIT GRAB RAIL TRANSOM DOOR HAWSE PI...

Page 20: ...OARD ENGINE STARBOARD ENGINE PORT ENGINE STARBOARD ENGINE COMPASS SHIFT THROTTLE CONTROL SPOTLIGHT CONTROL AIR CONDITIONER CONTROL IF EQUIPPED RUDDER PANEL TRIM TABS HORN IGNITION ENGINE PREHEAT BILGE...

Page 21: ...NGINE PORT ENGINE COMPASS STARBOARD STARBOARD ENGINE STARBOARD ENGINE STARBOARD SPOTLIGHT CONTROL TRIM TAB PANEL IGNITION PANEL SHIFT CONTROL THROTTLE STARBOARD FUEL TANK BATTERY PARALLEL SWITCH PANEL...

Page 22: ...d side of the pilothouse The 12 volt DC main circuit breakers and standby load push to reset circuit breakers are located on the battery management panel 110 Volt AC 12 Volt DC Master Panels Located i...

Page 23: ...s through the salon center floor hatch Air Conditioners 3 total If Equipped One is located inside the port bunk hatch in the forward stateroom One is located under the pilothouse lounge s aft seat cus...

Page 24: ...to remove the screws Batteries 6 Total All batteries except the house batteries are located on the starboard side of the lazarette The house batter ies are located on the port side of the lazarette NO...

Page 25: ...t corner of the salon Bilge Pumps 6 total Two are located in the bilge under the engine room floor hatch Two are located in the utility room bilge Access the utility room bilge by lifting the top step...

Page 26: ...y pump is not controlled by a float switch It is controlled by the forward bilge pump switch at the helm City Water Inlet Located on the transom above the swim step platform CO Monitors 4 total One is...

Page 27: ...hang ing locker in the mid guest stateroom One is located in the forward stateroom on the aft ceiling above the starboard cabinet One is located on the port wall above the salon stairs MID GUEST STATE...

Page 28: ...ngine room bilge Engine Room Access through the center floor hatch in the salon Freshwater Fill Deck Fittings 2 Total Located on the port side of the forward deck SEAWATER INTAKE GENERATOR SEACOCKS NO...

Page 29: ...he 12 volt DC main distribution panel Freshwater Tanks 2 Total Both are located under the forward state room bunk Access the forward tank through the forward bunk hatch Access the aft tank through the...

Page 30: ...er of the utility room Port Engine Located in the port aft corner of the utility room Generator Located in the starboard aft corner of the utility room FUEL FILL DECK FITTING TYPICAL PORT STARBOARD ST...

Page 31: ...of the utility room Generator Located in the lazarette Access through the center cockpit floor hatch Generator Seawater Intake Seacock Located on the star board side of the lazarette forward of the b...

Page 32: ...the icemaker One is located above the bottom salon step on the port side of the hallway One is located below the hang ing locker on the port side of the forward stateroom The control is located on the...

Page 33: ...cated next to the command bridge stairs on the port wall Holding Tank Located on the starboard side of the engine room Holding Tank Monitor Located inside the electrical cabinet on the starboard side...

Page 34: ...cated aft of the fuel fill deck fitting on the starboard deck trail Hydraulic Steering Fluid Reservoir Located on the steering wheel column at each helm Lazarette Access through the cockpit floor hatc...

Page 35: ...or Underwater Discharge Seacock Located forward of the starboard engine in the engine room Marine Head Vacuum Flush Vacuum Pumps 2 Total One is accessed through the sliding doors on the star board sid...

Page 36: ...e of the hallway Seawater Washdown Faucet Located inside the anchor locker on the starboard side of the forward deck Seawater Washdown Intake Seacock Located in the port forward area of the lazarette...

Page 37: ...Located on the 12 volt DC main distribution panel Spotlight Located on the bow platform Spotlight Control Panels 2 Total One is located at the command bridge helm 12 VOLT DC MAIN DISTRIBUTION PANEL S...

Page 38: ...t the pilothouse helm Trim Tab Hydraulic Fluid Reservoir Located on the starboard aft wall in the lazarette Utility Room Access the utility room by lifting the top step of the salon stairs PILOTHOUSE...

Page 39: ...ual Chapter 2 Locations 33 Water Heater Located in the port forward corner of the utility room Windshield Wiper Fluid Reservoir Located under the port forward lounge cushion in the pilothouse WATER HE...

Page 40: ...on in Chapter 6 of this Owner s Manual for instructions about cleaning the seawater strainers Read the engine manual BEFORE starting or working on your engines NOTICE Engine Break in Procedure Engine...

Page 41: ...nerator exhaust is a source of dangerous carbon mon oxide gas CO Check ALL exhaust systems BEFORE each trip Look for leaks in the exhaust systems of the engines and the generator Look for discoloratio...

Page 42: ...HAZARD Fuel vapors can explode BEFORE starting the engines 1 Check the bilge areas for fuel vapors or leaking fuel If you see leaking fuel or smell fuel vapors a Do NOT start the engines or generator...

Page 43: ...t Owner s Manual Supplement WARNING Avoid the storage or handling of gear near the fuel lines fittings and tank CAUTION Air in the diesel supply system can stop an engine or severely restrict performa...

Page 44: ...have the alignment rechecked after every 60 hours of opera tion At any time if unusual noise or vibration is noticed have the alignment inspected immediately Shaft transmission alignment should be don...

Page 45: ...ately 30 degrees to the long axis of the shaft 6 Stagger the ends of each ring around the shaft and insure that the rings are at the bottom in the sleeve 7 Tighten the stuffing gland nuts until resist...

Page 46: ...lights will help dry the lenses Fogging will not harm the gauges Radio Transmission Interference VHF or other radio transmissions may cause brief erratic readings on the tachometers This will not dama...

Page 47: ...pumps if bilge water rises above a preset level You can also turn On the bilge pumps using the switches at the helm The bilge pumps are wired directly to the battery Unless the battery is dead the bi...

Page 48: ...and clear any debris Reinstalling the bilge pump 1 Align the tabs on the strainer with the slots on the pump 2 Press down firmly until the tabs click into place 3 Make sure the bilge pump is locked i...

Page 49: ...ruction sheet for cleaning and maintenance information FLOODING and SWAMPING HAZARD Close the seacock s when leaving your yacht unattended for any length of time If a seacock is left open a hose failu...

Page 50: ...ons section in Chapter 2 of this Owner s Manual FLOODING and SWAMPING HAZARD NEVER leave your yacht unattended while the seawater washdown system is running Any leak or break in this system may allow...

Page 51: ...he city water supply on the dock before leaving your yacht unattended Turn Off the freshwater pump switch when your yacht is not in use or when the freshwater tank is empty Inspect and clean the fresh...

Page 52: ...stem is being pres surized by a city water supply FLOODING and SWAMPING HAZARD NEVER leave your yacht unattended while the freshwater system is pressurized by city water Any leak or break in this syst...

Page 53: ...from the fresh water pump 3 Place the air nozzle against the end of the just removed water line and blow air through the system 4 When the water stops coming out of the faucet stop the air and Close...

Page 54: ...The tank is full if water flows from the tap when the hot water is turned On in the galley Even brief water heater operation with a dry tank WILL damage the heating elements Warranty replacements wil...

Page 55: ...eave the pressure relief and drain valves Open until you fit out your yacht after storage WATER HEATER DAMAGE HAZARD NEVER turn On the water heater breaker on the 110 volt AC master panel while the wa...

Page 56: ...l after the water heater tank is completely filled with freshwater 6 Turn On the water heater breaker WATER HEATER DAMAGE HAZARD Fill the water heater tank BEFORE turning On the water heater breaker o...

Page 57: ...rd and aft head sinks drain into the sump pump box The sump pump box has an autofloat switch When the drain water rises to a preset level the autofloat switch turns On the sump pump and the drain wate...

Page 58: ...witch The autofloat switch turns the sump pump On when water rises above a preset level Test the autofloat switch often Autofloat switch testing 1 Lift the float switch test button to turn On the sump...

Page 59: ...ction in Chapter 2 of this Owner s Manual Empty the holding tank at every opportunity Winterizing the System Read the marine head s operation and maintenance manual for winterizing instructions Macera...

Page 60: ...rcuit breaker is turned Off Radar Wing PERSONAL INJURY and or PRODUCT or PROPERTY DAMAGE HAZARD NEVER lift your yacht using the cleats WARNING DANGER PERSONAL SAFETY PRODUCT DAMAGE HAZARD An unsecured...

Page 61: ...njury or death NEVER lift people or lift objects over people Clear the area around and beneath the lifting area BEFORE using the davit WARNING PERSONAL INJURY FALLING HAZARD ALWAYS rotate the davit ar...

Page 62: ...rt the drain plug if equipped 3 If equipped tilt the outboard motor to the Up position NOTE Keep the outboard tilted Up until the dinghy is safely in the water and the lifting bridle has been removed...

Page 63: ...dle to the lifting points inside the dinghy 5 Turn the davit breaker On 6 Plug the davit remote control into the deck outlet 7 Raise the davit arm into the Loading position by removing the locking pin...

Page 64: ...on Do Not leave the remote control plugged into the deck outlet unless you are actively launching or recovering the dinghy Make sure the davit breaker is Off when the davit is not in use Dinghy Storag...

Page 65: ...davit breaker is Off and the remote control is unplugged before washdown Allow the davit to dry before turning on electri cal power again As needed lubricate the gas shocks and the mouse on the cable...

Page 66: ...track D on the radar wing The jaw slides should not need to be adjusted However if you think the jaw slides need to be adjusted obtain the mea surements from your sell ing dealer PRODUCT or PROPERTY...

Page 67: ...ethods may remove the waterproof finish of the fabric and may also decrease the life of the polyester thread used in the can vas Reapply a water repellent treatment as necessary Method 1 1 Add 1 8 cup...

Page 68: ...sh the clear vinyl with soap and water 3 Rinse thoroughly to remove the soap 4 Before stowing the clear vinyl must be completely dry Air drying is best but you can also carefully dry the vinyl with a...

Page 69: ...on 12 volt DC power unless 110 volt AC power is being supplied by shore power or generator power and the refrigerator s circuit breaker on the 110 volt AC master panel is On Range Oven Always keep an...

Page 70: ...nual 64 Audio Visual Equipment Dockside Television Telephone Inlet Plug a dockside source into the TV telephone inlet if you want to watch cable TV or use a telephone NOTICE AM radio reception may be...

Page 71: ...e corroded clean the base and coat it with non conductive electrical lubricant Interior Exterior Lights The lights are powered by your yacht s 12 volt DC system The battery switch must be in the On po...

Page 72: ...use Check the seawater strainer for debris before each use of the air conditioning system If the strainer needs to be cleaned out follow the direc tions in the Seawater Systems section of Chapter 6 in...

Page 73: ...cabin heaters Operating instructions for this system can be found in the manufacturer s instruction manual Before using the electric heaters make sure the breakers on the 110 volt AC master panel are...

Page 74: ...devices or working on the electrical system 1 Check the bilge areas for fuel vapors or leaking fuel If you see leaking fuel or smell fuel vapors a Do NOT start the engines or generator do NOT turn On...

Page 75: ...tery management panel see the Component Locations section in Chapter 2 of this Owner s Manual Standby loads such as the automatic bilge pumps and the stereo memory are not affected by the battery swit...

Page 76: ...Charging Module Information Sheet Fuses Circuit Breakers The fuses and circuit breakers for the engines and main accessory power are on the follow ing panels 12 volt DC main distribution panel Battery...

Page 77: ...arger will automatically charge your yacht s batteries when 110 volt AC power is being provided by shore power or generator power and the battery charger circuit breaker on the 110 volt AC master pane...

Page 78: ...the same time WILL cause major electrical system damage and could start a fire The power source lockouts on the 110 volt AC master panel prevent the use of shore power and generator power at the same...

Page 79: ...rns on when you are connecting to shore power do NOT turn on the main breaker switches Instead IMMEDIATELY unplug the shore power cord ALWAYS from the dockside outlet first and alert marina management...

Page 80: ...ch the shore power cord to the yacht inlet first then to the dockside outlet 4 Switch the SHORE POWER 1 and or SHORE POWER 2 master breakers On 5 As needed turn On the individual compo nent breakers o...

Page 81: ...aks BEFORE each use Read the Carbon Monoxide CO section of Chapter 1 in this Owner s Manual DANGER FIRE and EXPLOSION HAZARD Fuel vapors can explode BEFORE starting the generator 1 Check the bilge are...

Page 82: ...Number Generator Manufacturer Model Name Number Serial Number Oil Type SAE Quarts Filter Type Fuel System Fuel Capacity Filter Type Plumbing Freshwater Tank Capacity Waste Holding Tank Capacity Key Nu...

Page 83: ...ll Color Trim Color Fuel Capacity Engine Type Number of Engines Distinguishing Features Distinguishing Features Operator of Yacht Full Name Male or Female Age Health Address Address Phone FAX E mail O...

Page 84: ...e Stopover 1 Arrive No Later Than Date Arrive No Later Than Time Stopover 2 Arrive No Later Than Date Arrive No Later Than Time Stopover 3 Arrive No Later Than Date Arrive No Later Than Time Stopover...

Page 85: ...Owner s Notes...

Page 86: ...Owner s Notes...

Page 87: ......

Page 88: ......

Reviews: