49
Meritor
Wheel end assembly
3
Part 2 - Traditional wheel end with 3-4 planets
Spindle fitted with interference
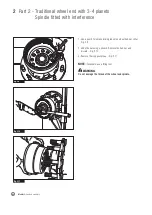
NOTE
: If available, use a lifting tool.
WARNING:
Do not damage the thread of the wheel end spindle.
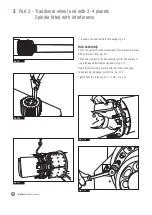
5. Install and tighten wheel-bearing nut, while rotating wheel back
& forth. Further rotate wheel (3) revolutions each direction
alternating fwd/rev. Mark nut position and retighten it.
If nut turns, repeat previous step until nut no longer turns when
retightened. Use a torque wrench on wheel end.
The torque of the new nut wheel should be 64 ± 20Nm.
Fig. 3.6
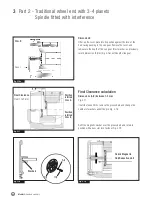
Alternative method:
applied as shown in the picture here below.
In this test modality, the linear force range should be
10 ÷ 28N. - Fig. 3.7
NOTE
: If the torque is outside the spec, return at the previous
point and readjust it.
6. When the wheel end torque is in the specification use a
staking tool to stake nut lip into keyway in spindle.
Fig. 3.8
Fig. 3.5
Fig. 3.6
Fig. 3.7
Fig. 3.8
Summary of Contents for MM-0164
Page 20: ...20 Meritor Wheel end assembly ...
Page 30: ...30 Meritor Wheel end assembly ...
Page 38: ...38 Meritor Wheel end assembly ...
Page 54: ...54 Meritor Wheel end assembly ...
Page 62: ...62 Meritor Wheel end assembly ...
Page 63: ...63 Meritor Wheel end assembly pg 2 Part 3 Wheel end disassembly 64 Wheel end disassembly ...
Page 82: ...82 Meritor Wheel end assembly ...
Page 85: ...85 Meritor Wheel end assembly 4 Troubleshooting and Service Tools Mounting tool ...


