TP-9579C
Revised 12-09
16579/22882
Page 4
© Copyright Meritor Automotive, Inc., 2009
Printed in the USA
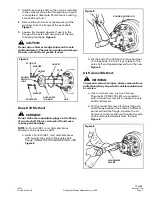
10. Remove the tapered dowels, the axle shafts
and gaskets (if used).
Figure 4
.
11. Remove the remaining axle shaft(s) as
necessary from the axle(s) that will remain on
the road when the vehicle is transported
according to Table A.
12. Install a cover over the open end of each hub
where an axle shaft was removed. This will
prevent dirt from entering the bearing cavity
and minimize loss of lubricant.
NOTE:
If an air supply will be used for the brake
system of the transported vehicle, continue with
Steps 13 and 14, otherwise continue with Step 15.
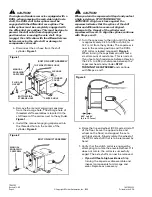
13. Connect an auxiliary air supply to the brake
system of the vehicle that is being transported.
Before moving the vehicle, charge the brake
system with the correct amount of air pressure
to operate the brakes. Refer to the instructions
supplied by the manufacturer of the vehicle for
procedures and specifications. If an auxiliary
air supply is not used, continue with Step 15.
14. When the correct amount of air pressure is in
the brake system, release the parking brakes of
the vehicle that is being transported. Step 15 is
not required.
WARNING
When you work on a spring chamber, carefully
follow the service instructions of the chamber
manufacturer. Sudden release of a compressed
spring can cause serious personal injury.
15. If there are spring (parking) brakes on the
axle(s) that will remain on the road when the
vehicle is transported, and they cannot be
released by air pressure, manually compress
and lock each spring so that the brakes are
released. Refer to the manufacturer’s
instructions.
After Towing or
Drive-Away (Piggybacking)
WARNING
To prevent serious eye injury, always wear safe eye
protection when you perform vehicle maintenance
or service.
WARNING
Engage the parking brake to prevent the vehicle
from moving before you begin maintenance or
service procedures that require you to be under
the vehicle. Serious personal injury can result.
1.
If an auxiliary air supply was used, apply the
vehicle parking brakes using the switch inside
the cab of the vehicle. If an auxiliary air supply
was not used, begin with Step 2.
WARNING
When you work on a spring chamber, carefully
follow the service instructions of the chamber
manufacturer. Sudden release of a compressed
spring can cause serious personal injury.
2.
Apply the vehicle spring (parking) brakes by
manually releasing each spring that was
compressed before transporting started. Refer
to manufacturer’s instructions.
3.
Disconnect the auxiliary air supply, if used,
from the brake system of the vehicle that was
transported. Connect the vehicle’s air supply to
the brake system.
4.
Remove the covers from the hubs.
NOTE:
Install the axle shafts indicated in
Table B
.
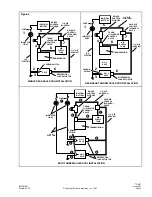
Axle shafts with a DCDL have a double row of
splines that engage with splines of the side gear
and of the shift collar in the differential case.
Figure 7
. Continue with Step 5.
NOTE:
Make sure to engage the axle shaft splines
for the differential side gear and the shift collar.
They must be fully engaged.
5.
Install the gasket, if used, and axle shaft into
the axle housing and carrier in the same
location it was removed from. The gasket and
flange of the axle shaft must be flat against the
hub. Rotate the axle shaft and/or the driveline
as necessary to align the splines and the holes
in the flange with the studs in the hub.
Figure 4
.
6.
Install the dowels, if used, over each stud and
into the tapered holes of the flange.
Table B
Single Axles
Remove both axle shafts.
Tandem Axles
Forward Axle (Towing from Front):
No need to remove axle shafts.
Forward Axle (Towing from Rear):
Remove both axle shafts.
Rear Axle (Towing from Front):
Remove both axle shafts.
Rear Axle (Towing from Rear):
No need to remove axle shafts.

