background image

Product Life Expectancy 
Your scooter has been designed to provide the user with a long, reliable life 
provided it is correctly maintained and regularly serviced by an authorised dealer. 
However, due to inevitable wear and tear and technological improvements it is 
recommended that the average useable life of this scooter is five years. 

General Cleaning 
The shrouds and seat of the scooter should be cleaned using a damp cloth and 
gentle detergent. Do not use abrasive cleaners or solvents, as this will damage 
the plastic components. Do not spray water (hose or pressure washer) onto the  
scooter as this may cause damage to the electronics. 

Routine Maintenance 
We suggest that your scooter should undergo a full service at least once a year 
by an authorised dealer. 
Please check the following on a weekly basis: 
         Tyres are in good condition (Pressure 25-30psi) 
         Front wheels spin freely 
         Moving parts, pivots and frame fixings are not damaged or worn 
         All hand knobs and levers are secure 

Contact Cleaning 
Your scooter has contact plate and pin connectors which will need to periodically 
cleaned to maintain their performance.  
NEVER use abrasive material such as sandpaper to clean the plates or pins as 
this will enable dirt to build up and cause connection problems. Use a soft cloth 
and an alcohol based cleaner to remover any dust / dirt from the connections 
and if necessary use an electrical contact treatment grease to lightly cover the 
plate connections.
The areas to be cleaned are shown in the following images. 

23

Operating your Scooter

Maintenance

Summary of Contents for S742

Page 1: ...ic x 2pcs 300 lb 135 kg 4mph 6 kph 20 miles 32 km 56 142 cm 6 Head Rear 12V U1 36AH x 2 pcs Intelligent regenerative and electromagnetic brakes 2 rear anti tip wheels Front Rear 1 Fish on 187 lb 85 kg...

Page 2: ...ns Driving Outdoors Getting to Know Your Scooter Parts to the Scooter Batteries Controls Analog dashboard Operating Your Scooter ICE Symbols Seat Adjustment Tiller Angle Adjustment Freewheel Mode Trou...

Page 3: ...3 Introduction B Reverse A Forward A B A B Practice Before Operating...

Page 4: ...S742 Introduction 4...

Page 5: ...5 Safety Instructions Safety Considerations...

Page 6: ...S742 Safety Instructions 6...

Page 7: ...7 Safety Instructions...

Page 8: ...S742 Safety Instructions 8 Driving Outdoors...

Page 9: ...9 Safety Instructions...

Page 10: ...S742 Safety Instructions 10 Use cautionwhen driving on hills...

Page 11: ...11 Safety Instructions...

Page 12: ...S742 S742 Getting to Know Your Scooter 12...

Page 13: ...if there is a break in the connection The red light indicates that the batteries are receiving charge The green LED will light when the charging cycle is complete Always turn off mains power to the ch...

Page 14: ...S742 14 Charge Socket Tiller Charge Socket Circuit Breaker Getting to Know Your Scooter...

Page 15: ...e scooter is in motion Always fully charge the batteries before driving your scooter and never let the batteries become completely drained as this may cause permanent damage to the batteries On Off Ke...

Page 16: ...ocked in the forward facing position before driving Adjust the tiller and seat if necessary see Adjustments DO NOT use the tiller to fully support you during transfers The Scooter has a dual operation...

Page 17: ...rds Adjust the speed setting tolow before you reverse Steer wide of all corners and obstacles Caution Do not reverse onto a main thoroughfare Ramps Slopes The stability of your scooter depends on seve...

Page 18: ...S742 Operating your Scooter 18 Seat adjustment...

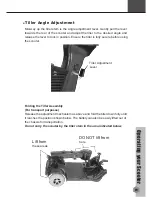
Page 19: ...fully secure before using the scooter Folding the Tiller Assembly For transport purposes Release the adjustment mechanism as above and fold the tiller down fully until it reaches the position shown be...

Page 20: ...ter must be turned off and on by the key switch to reset the circuits before it will resume normal operation The status led will flash continually if the brake is disengaged when it is switched on Bra...

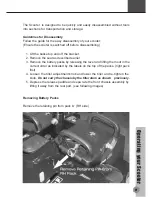
Page 21: ...ve the seat as described earlier 3 Remove the battery packs by releasing the lever and lifting them out in the correct order as indicated by the labels on the top of the packs right pack first 4 Loose...

Page 22: ...st Assembly is the reverse of the above procedure The Scooter is now separated into four components for easy transportation or storage If the scooter is not to be used for periods of more than a few w...

Page 23: ...your scooter should undergo a full service at least once a year by an authorised dealer Please check the following on a weekly basis Tyres are in good condition Pressure 25 30psi Front wheels spin fre...

Page 24: ...eaker continue to trip turn off the scooter immediately and consult your dealer Fuses There are two 40 amp blade type fuses inside the battery pack to give protection against possible overload on the...

Page 25: ...less than 16 5v Charge immediately 3 Battery voltage too high Possible excessive re gen charging by travelling downhill for long periods Turn power off on to reset controller 4 Current time limit out...

Page 26: ...S742 26...

Page 27: ...27 Ice Symbols...

Page 28: ...S742 28...

Page 29: ......

Page 30: ...Rev 0 11 11 2010...

Reviews: