


5
Installation Instructions for built-in
The following instructions are intended for the installer so
that the installation and maintenance procedures may be
followed in the most professional and expert manner
possible.
Important: Disconnect the appliance from the
electrical supply before performing any maintenance
or regulation upkeep work.
Positioning for gas hob
Important:
this unit may be installed and used only in
permanently ventilated rooms according to the British
Stancards Codes Of Practice: B.S. 6172 / B.S. 5440, Par.
2 and B.S. 6891 Current Editions. The following
requirements must be observed:
a)
The hob should not be installed in a bed sitting room
with a volume of less than 20m
3
. If it is installed in a
room of volume less than 5m
3
an air vent of effective
area of 110cm
2
is required, if it is installed in a room of
volume between 5m
3
and 10m
3
an air vent of effective
airvent of 50cm
2
is required, while if the volume exceeds
11m
3
no airvent is required. However, if the room has
a door or a window which opens directly to the outside
no air vent is required even with the volume is between
5m
3
and 11m
3
.
b)
Intensive or prolonged use of the appliance could mean
that extra aeration is needed, such as the opening of a
window or a more powerful fan.
c)
If there are other fuel burning appliances in the same
room, B.S. 5440 Part 2 Current Edition, should be
consulted to deter mine the requisite air vent
requirements.
Installation of built-in gas hobs
The gas hobs are prepared with protection degree against
excessive heating of type X, the appliance can therefore
be installed next to cabinets, provided the height does not
exceed that of the hob. For a correct installation of the
cooking hob the following precautions must be followed:
a)
The hob may be located in a kitchen, a kitonen/diner
or bed sitting room, but not in a bathroom or shower
room.
b)
The furniture standing next to the unit, that is higher
than the working boards, must be placed at least
110mm from the edge of the board.
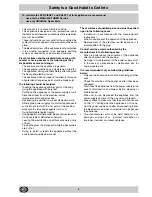
c)
The minimum distance combustible material can be
fitted above the hob in line with the edges of the hob is
420mm. If is fitted below 420mm a space of 50mm
must be allowed from the edges of the hob. The
minimum distance combustible material kitchen units
can be fitted directly above the hob is 700mm.
Min. 600
mm.
HOOD
min. 650 mm. with hood
min. 700 mm. without hood
Min. 420
mm.
Min. 420
mm.
HOOD
min. 650 with hood
min. 700 without hood
LESS THAN 420
LESS THAN 420
min. 50
min. 50
d)
The dimensions of the room for the furniture must be
those indicated in the figures. Fixing hooks are provided
which allow to place the hob plate on work tops that
measure from 20 to 40 mm in thickness. To obtain a
good fixing of the hob plate it is advisable to use all the
hooks supplied.
555 mm.
55 mm.
475 mm.
Fastening Clamps - Assembly Diagram
20
30
Clamp Position for
Clamp Position for
H=20mm
top
H=30mm
top
Front
40
Clamp Position for
H=40mm
top
Back
N.B:
Use the clamps contained in the "accessory kit."
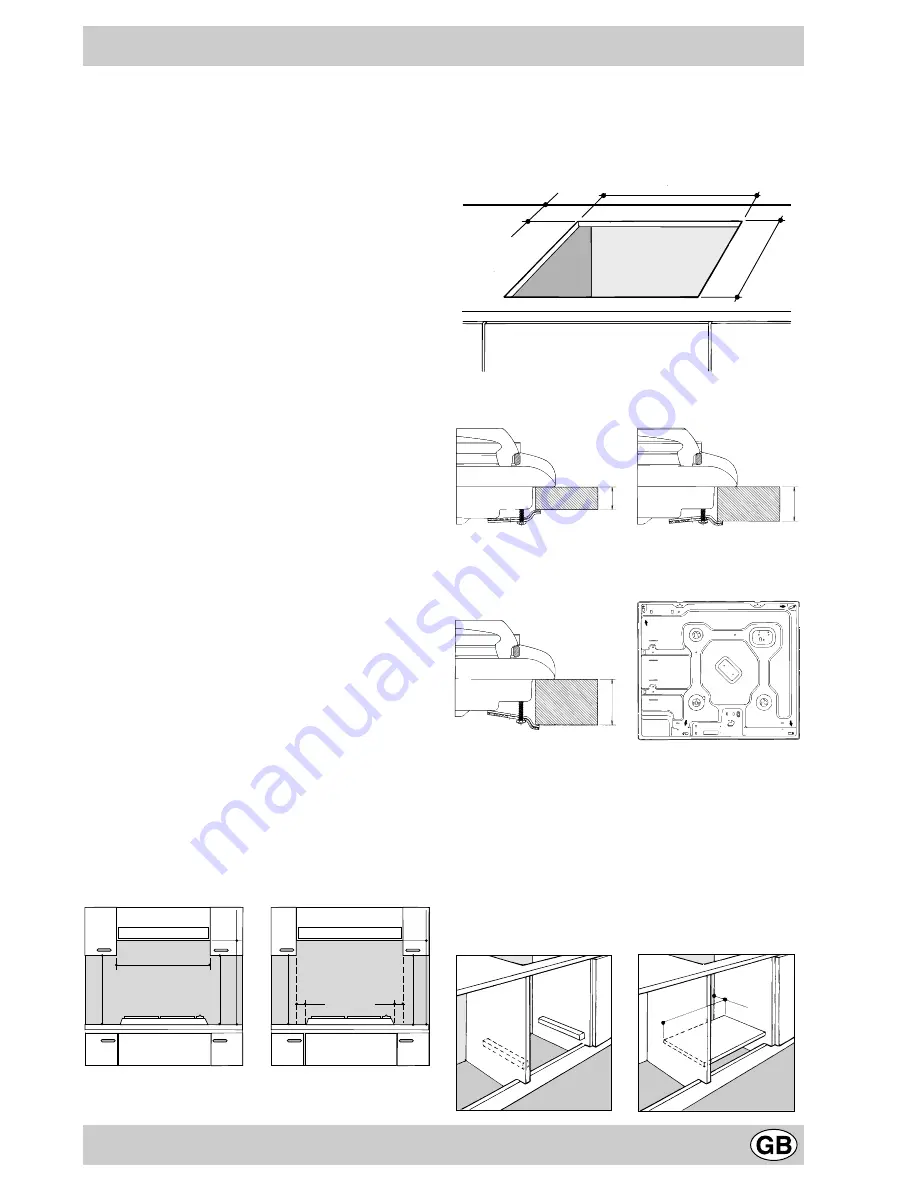
e)
In the event the cooktop is not installed above a built-
in oven, a wood panel must be inserted as insulation.
This panel must be placed at least 20 mm from the
bottom of the cooktop itself.
Important:
When installing the cooktop above a built-in
oven, the oven should be placed on two wooden strips; in
the case of a joining cabinet surface, remember to leave
a space of at least 45 x 560 mm at the back.
560 mm.
45 mm.


