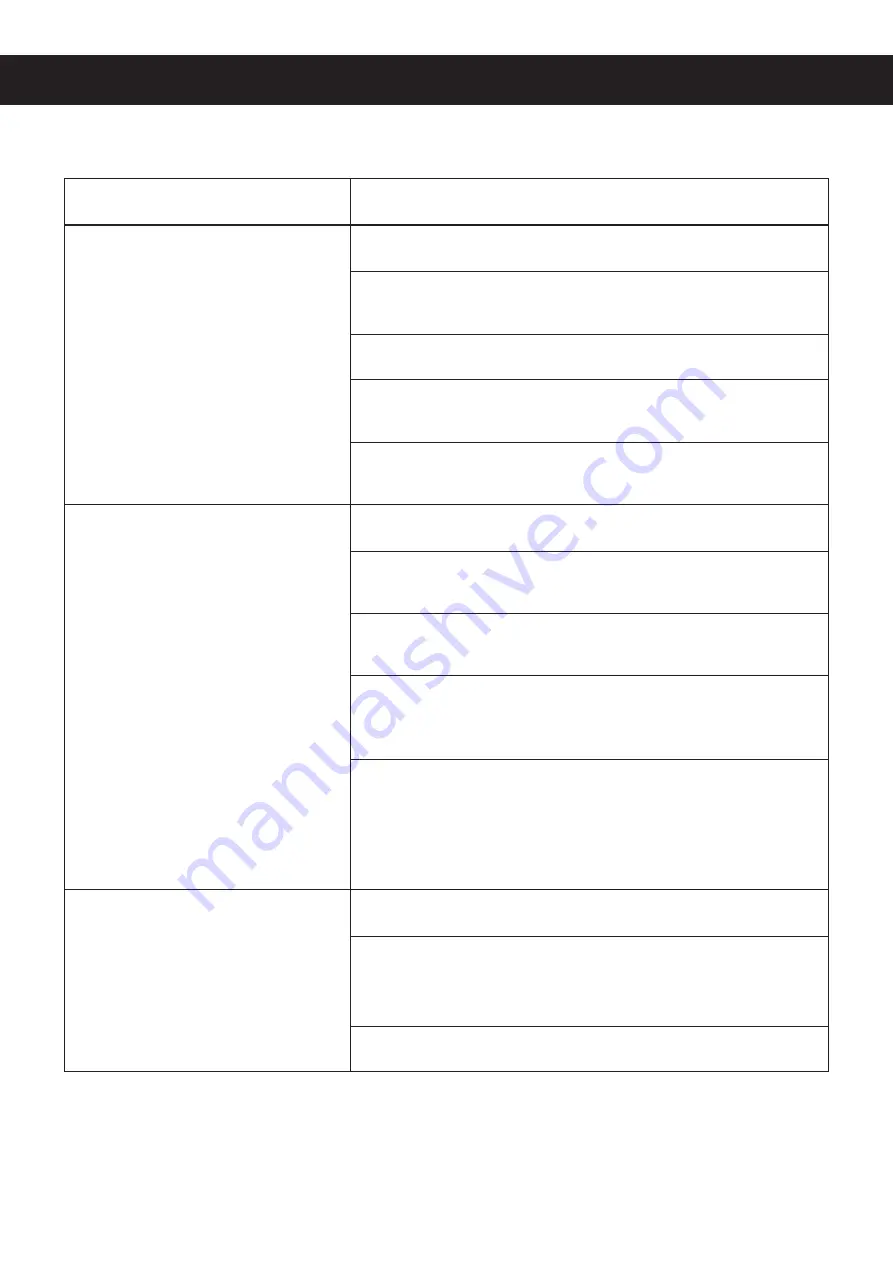
background image

11

Troubleshooting

Potential Problems

Common Solutions

Fan blades don't rotate

Check fuses and/or circuit breakers and reset if needed.

Cut off power to the fan and check its internal electrical 

connections.

Replace the remote control’s batteries.

Check that the fan cover is correctly placed and no 

screws interfere with the movement of the blades.

Contact customer service to replace a faulty remote 

control.

Fan is too noisy

Check that all fasteners are well tightened.

Ensure the canopy housing has a short distance between 

itself and the ceiling.

Upon initial installation, allow 24 hours of use for the 

machine to break itself in.

Cut off power to the fan and check that the wire nut 

connections are not rubbing against one another or the 

inner housing.

If you have installed a solid-state variable-speed control, 

cut off power to the fan and disconnect this control from 

the device. See if using the remote resolves the problem, 

which    can  be  caused  by  erratic  signals  from  such 

controls.

Fan wobbles during use

Check that all fasteners are well tightened.

Use the provided balance kit to adjust the blades if their 

tips are found to be an unequal distance from the ceiling 

while well fastened.

Exchange the position of the various blades.

Again, do not bend the blades during any of these procedures.

Summary of Contents for CFN-1507

Page 1: ...CFN 1507 Instruction Manual Read Carefully Before Use Keep for Future Reference V20220437 ...

Page 2: ...ditional tools required for assembly Electrical tape flathead Phillips screwdriver pliers safety glasses ladder and wire strippers Additional helpful tools AC tester light tape measure wiring handbook and wire cutters CONTENTS Introduction 1 Package List 2 Safety Information 3 Preparation 4 Initial Installation 5 Fan Housing Installation 5 Downrod Mounting 6 Circuit Connections 7 Canopy and Cover ...

Page 3: ...anopy Cover 1 E Downrod 1 F Coupling Cover 1 G Fan Housing 1 H Fan Motor Assembly 1 I Light Plate 1 J LED Light Kit 1 K Shade 1 L Remote Control 1 M Receiver 1 N Mounting Screws 2 Mounting Bolts 4 Metal Washers 8 Blade Bolts 16 Wire Nuts 6 Balance Kit 1 A B C D E L M N K J F H I G ...

Page 4: ...ard and pushed carefully up into the junction box The wires should be spread apart with the grounded conductor and the equipment grounding conductor on one side of the junction box 7 The fan must be mounted with a minimum of 7 feet clearance from the trailing edge of the blades to the floor 8 Do not use the reverse switch while the fan blades are in motion To prevent damage and ensure long use the...

Page 5: ... need to install a new UL listed junction box secure it directly to your building s structure usingappropriate fasteners and materials Do not use plastic boxes The junction box and its supports must be able to support the MOVING weight of the fan at least 50 lb and be rated for fan support 3 Choose a Suitable Location Ensure the blades will be at least 30 inches from any obstruction and at least 7...

Page 6: ... and mounting bolts or screws Mounting Bracket Mounting Bolt Screw Supply Wires Junction Box Metal Washer Fan Housing Installation Step 1 Remove the 8 pre installed bolts from the reinforcing plate on the top of the motor assembly Step 2 Fit the fan housing in place on the reinforcing plate and secure it by replacing and retightening the bolts Reinforcing Plate Reinforcing Plate Fan Housing ...

Page 7: ...d Step 5 Install the downrod onto the top of the motor assembly aligning their holes and replacing the pin and the clip Step 6 Retighten the previously loosened bolts Step 7 Place the downrod s top mount onto the mounting bracket Rotate the entire assembly until the tab has dropped into its slot and sits firmly The entire motor assembly should no longer rotate if seated properly Failure to reattac...

Page 8: ... colored wires of the fan motor Secure each set with the provided wire nuts Step 3 Connect the 2 colored wires of the receiver to the 2 identically colored wires of the junction box Secure each set with the provided wire nuts Step 4 Connect the green or bare copper ground wire of the junction box to the ground wire of the ceiling fan motor Separate the white and green connections from the black wi...

Page 9: ...ts and washers Bolt Washer Blade Canopy and Cover Installation Step 1 Tuck all the connections neatly into the outlet box Step 2 Slide the canopy up to the ceiling mounting bracket and place the key hole slots over the mounting screws or bolts on the bracket Rotate the canopy until the screw or bolt heads lock in place at the narrow section of the key hole Step 3 Attach the canopy cover to the bot...

Page 10: ...eps to toggle among 3 color temperatures Color Temperature Adjustment Step 1 Remove the bolt from the bottom of the fan motor Step 2 Feed the wire plug of the fan motor through the middle of the light plate Install the light plate onto the motor and secure it by replacing and tightening the bolt Step 3 Connect the LED light kit to the light plate using its magnetic suction cup bolt Step 4 Connect ...

Page 11: ...r 2 hours and then turns it off 4H Runs the fan for 4 hours and then turns it off Install the remote control holder onto any wall or suitable flat surface using two mounting screws bolts DO NOT press F or R to reverse the fan s direction while the fan is turning Wait for it to stop completely before changing the direction of its rotation This remote operates with a range of 30 feet 10 m It uses 2 ...

Page 12: ...g Upon initial installation allow 24 hours of use for the machine to break itself in Cut off power to the fan and check that the wire nut connections are not rubbing against one another or the inner housing If you have installed a solid state variable speed control cut off power to the fan and disconnect this control from the device See if using the remote resolves the problem which can be caused ...

Page 13: ...cts If you have any questions or comments contact us at help cs supportpro com and we ll resolve your issue ASAP For a pdf copy of the latest version of these instructions use the appropriate app on your smartphone to scan the QR code to the right ...

Page 14: ...C F N 1 5 0 7 N I Rev 17 Jun 2022 ...

Reviews: