background image

8

9

Garantievoorwaarden

Op de pomp wordt 

36 maanden

 garantie verleend welke ingaat op het moment van aankoop. U dient  

hiervoor de aankoopbon als bewijs te bewaren. Schade aan de pomp binnen de garantietermijn, ontstaan 

door een produktie en/of materiaalfout, wordt kosteloos hersteld. Schade die is ontstaan door; inbouwen  

bedieningsfouten. Kalkaanslag, te weinig onderhoud, bevriezing, normale slijtage of ondeskundige  

reparaties, vallen niet onder deze garantieaanspraak.

Bij veranderingen aan de pomp, zoals het inkorten van de stroomkabel of het afknippen van de stekker, 

vervalt de aanspraak op garantie.

Meßner is niet aansprakelijk voor de gevolgschade die is ontstaan door het uitvallen of het verkeerd  

gebruiken van de pomp. Stuur bij reparatie altijd uw garantieformulier en aankoopbon mee.

Het verwijderen en de afvalopslag van

Elektrische apparaten die in het huishouden zijn gebruikt, dienen volgens EU-richtlijnen verwijderd 

te worden.

Het produkt mag niet samen met het andere normale afval verwijderd worden, maar dient apart verzameld 

te worden. Het is gescheiden afval.Het is uw eigen verantwoordelijkheid dat het apparaat naar een speciaal 

daarvoor bestemde afvalplaats wordt gebracht om op een milieuvriendelijkere manier te worden verwijderd 

of te worden hergebruikt. 

Meer informatie over lokale afvalverzamelpunten vindt u bij de gemeente in uw gebied.

Please read these instructions thoroughly, before using the pump!

This appliance is not suitable for use by persons (including children) with limited physical, sensory or mental 

capabilities or lacking experience and/or knowledge, except if they are supervised by a person responsible 

for their safety or have been instructed in the use of the appliance.

Children should be supervised in order to make sure that they do not play with the appliance.

Use

Centrifugal pump for submersible usage with resin encapsulated motor.

The pumps are designed for use in water, for instance: swimming pond, swimming pool, garden pond, fish 

pond, fountain, terrace fountain, indoor fountain, for operating filters systems, watercourses etc. as well as 

for aerating and recirculating water.

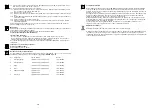
Please refer to the type plate for technical specifications or the table on page 1.

Safety measures

Caution!

 It may only be used in garden ponds and in their protection area if the electrical installations 

  have been set up to comply with the code‘s requirements. Please contact an electrician.

-  Before use: Check whether mains connection and plug are intact.

-  Mains voltage and type of current have to correspond to the data on the type plate.

The pump has to be connected to a regular safety plug socket through a residual current device

  (RCD, 30 mA).

-  The connection box should be located in a water-protected area. It should be at least 2 m away from the 

  edge of the pond 

(see fig.1)

.

-  Keep the plug dry!

Pull out mains plug before starting to work on the pump, fountain or pond. It is not allowed to run

  the pump when people are inside the water (disconnect the pump)!

Important!

 If the mains connection or the motor housing is damaged, the pump cannot be used anymore.

  It cannot be repaired since the connection is cast into the motor housing.

-  Never hang up or transport the pump by the cable!

Operate the pump only when it is immersed in water!


Start-up (see fig.1)

Important! Do not let the pump run dry. This could cause damage to the appliance.

-  Immerse the pump completely in your pond. This causes the pump body to be filled with water.

-  A minimum water depth of 20 cm is required for underwater operation to avoid the pump taking in air.

-      The maximum depth for submerged operation of the 


2 m

  pump is 2 m!

-  The water temperature should not exceed 35°C.

Do not let the pump freeze in the wintertime.

-  The pump is switched on by putting the plug in the socket.

-  To prevent the pump becoming unnecessarily dirty, place it above the mud in your pond, in a firm and 

  horizontal position (on a brick)!

-  A range of accessories may be fitted onto the threaded connection of the pump.

-  Running in conjunction with fountain jets, the pump should be positioned firmly and horizontally (on a 

 brick).

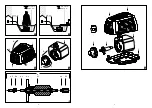
Dismantling / Assembly (see fig. 2 - 5)

  1.  Follow the safety measures. 

Disconnect the pump!

  2.  Push in the two brackets on the front of the pump, push the top shell (1) up and remove it.

  3.  Lift the entire pump (8) out of the bottom shell (2).

  4.  Twist the intake lid (6) clockwise and pull it out of the pump (8).

  5.  The front bearing support (4.5) and an axial bearing washer (4.4) are situated in the inlet lid (6) or on 

    the axle (4.3) respectively.

  6.  Pull the rotor (4) out of the pump (8). 

  7.  The complete rotor (4) can be rotated on the shaft (4.3).

  8.  The flywheel (4.2) and the magnet (4.1) can also be rotated against one another at a certain angle.

  9.  Thoroughly pull the axle (4.3) out of the pump (8).

10.  Push the rear bearing support (4.5) including the axial bearing washer (4.4) out of the pump; you may 

    find a pen to be helpful to accomplish this. 

11.  Insert this pen in the small bore at the pump‘s rear side (8) and use it in order to push the rear bearing 

    support (4.5) including the axial bearing washer (4.4) out of the pump. 

12.  Clean all components - please use clear water only - so that they allow to be easily moved. Do not use

    sharp-edged objects.

13.  Proceed as follows in order to reassemble the pump: 

13.1.  Put the rear bearing support (4.5) including the axial bearing washer (4.4) onto the axle (4.3) and 

      insert it in the pump (8). 

13.2.  Put the rotor (4) onto the axle (4.3). 

13.3.  Put the front bearing support (4.5) including the axial bearing washer (4.4) onto the axle (4.3).

13.4.  Twist the intake lid (6), insert it into the pump (8) and turn it counter-clockwise up to its stop.

13.5.  Place the pump (8) into the bottom shell (2).

GB

Summary of Contents for system-X 3000

Page 1: ...p Pond Pump Pompe pour étang Bomba para estanque Pompa per vasca Bomba para lagos system X 3000 system X 4000 Tószivattyú Pompa do stawu Насос для пруда Lammikkopumppu Jazierkové čerpadlo Jezírkové čerpadlo Črpalka za ribnike in bazene 池塘泵 H Használati útmutató PL Instrukcja obsługi RUS Руководство по эксплуатации FIN Käyttöohje SK Návod na obsluhu CZ Návod k použití SL Navodilo za uporabo CN 操作说明...

Page 2: ...00 system X 4000 55 3 300 l min l h 67 4 000 l min l h 2 70 m 2 90 m 45 W 60 W 230 V 50 Hz 230 V 50 Hz IP 68 IP 68 IP 68 Tmax 35 C 35 C 205 x 165 x 130 205 x 165 x 130 G A G A 10 m 10 m Art No 156 001379 156 001380 ...

Page 3: ...2 3 1 3 1 2 min 20 cm max 2 m min 20 cm max 2 m min 2 m min 2 m 1 8 2 6 2 2 1 1 1 4 4 4 5 4 4 4 3 4 2 4 1 4 4 4 5 5 8 3 1 6 4 2 ...

Page 4: ...hysischen sensorischen oder geistigen Fähigkeiten oder mangels Erfahrung und oder mangels Wissen benutzt zu werden es sei denn sie werden durch eine für ihre Sicherheit zuständige Person beaufsichtigt oder erhielten von ihr Anweisungen wie das Gerät zu benutzen ist Kinder sollten beaufsichtigt werden um sicherzustellen dass sie nicht mit dem Gerät spielen Verwendungszweck Tauchmotor Kreiselpumpe M...

Page 5: ...iel en horizontaal staan stenen plaat Demonteren Monteren zie afb 2 5 1 Let op de veiligheidsmaatregelen Stekker uit het stopcontact halen 2 Druk de twee strippen aan de voorkant van de pomp naar binnen schuif de bovenste schaal 1 omhoog en verwijder deze 3 De complete pomp 8 uit de onderste schaal 2 halen 4 Draai het inlaatdeksel 6 met de wijzers van de klok mee en trek het uit de pomp 8 5 In het...

Page 6: ...tected area It should be at least 2 m away from the edge of the pond see fig 1 Keep the plug dry Pull out mains plug before starting to work on the pump fountain or pond It is not allowed to run the pump when people are inside the water disconnect the pump Important If the mains connection or the motor housing is damaged the pump cannot be used anymore It cannot be repaired since the connection is...

Page 7: ...n moteur complètement coulé en résine synthétique Les pompes sont prévues pour être utilisées dans l eau comme p ex étang piscine bassin de jardin vivier fontaine à jet d eau fontaine de terrasse fontaine intérieure ainsi que pour une utilisation avec installations de filtrage ruisseaux etc sans oublier l oxygénation et la circulation de l eau Les caractéristiques techniques figurent sur la plaque...

Page 8: ...ompe dans un local Ó l abri du gel Commande de pièces de rechange Pour commander vos pièces de rechange veuillez indiquer le type de pompe la désignation et le n de ref figurant sur le tableau ci dessous voir aussi fig 4 6 Pos Désignation Type de pompe N de ref 1 Coque supérieure system X 3000 system X 4000 104 003668 2 Coque supérieure system X 3000 system X 4000 104 003669 3 Poignée system X 300...

Page 9: ...bomba 8 10 Para empujar hacia afuera el soporte de cojinete trasero 4 5 con la arandela axial 4 4 utilizar una punta 11 Introducir dicha punta en el pequeño orificio situado en la parte trasera de la bomba 8 y con él desplazar hacia afuera el soporte de cojinete trasero 4 5 con la arandela axial 4 4 E 12 Limpiar todas las piezas sólo con agua limpia de manera que se puedan mover fácilmente No util...

Page 10: ...era salda ed orizzontale lastra in pietra Smontaggio montaggio vedere Fig 2 5 1 Rispettare la misure di sicurezza Staccare la pompa dalla rete elettrica 2 Premere verso l interno le due linguette sul lato frontale della pompa e quindi spingere verso l alto e togliere il guscio superiore 1 3 Estrarre la pompa completa 8 dal guscio inferiore 2 4 Girare il coperchio di entrata 6 in senso orario ed es...

Page 11: ...m técnico electricista Antes de usar Controle o cabo e a ficha de alimentação por danificação A tensão de alimentação e o tipo de corrente devem estar de acordo com as indicações na placa de identificação A bomba só deve ser ligada através de um disjuntor de protecção contra correntes de falha interruptor diferencial 30 mA a uma tomada de ligação à terra isolada correctamente instalada Instalar a ...

Page 12: ...or indique na sua encomenda de peças sobressalentes a designação o tipo e o nr de referência da sua bomba orientando se para isso pelo quadro seguinte ver também fig 4 6 Pos Designação Tipo de bomba Ref Nr 1 Carcaça superior system X 3000 system X 4000 104 003668 2 Carcaça inferior system X 3000 system X 4000 104 003669 3 Pega system X 3000 system X 4000 104 003670 4 Rotor system X 3000 system X 4...

Page 13: ...átsó csapágytartót 4 5 és a tengelyirányú csapágylemezt 4 4 12 Kérjük a berendezés minden részét csak tiszta vízzel tisztítsa úgy hogy ezek könnyen mozogjanak A tisztítás során kérjük kerülje az éles szélü tárgyak használatát 13 A pumpát következöképpen szerelheti össze 13 1 Helyezze a hátsó csapágytartót 4 5 és a tengelyirányú csapágylemezt 4 4 a tengelyre 4 3 és nyomja azt a pumpába 8 13 2 Helye...

Page 14: ...ę łożyska z tyłu 4 5 z osiową podkładką łożyska 4 4 należy wykorzystać sztyft 11 Ten sztyft należy wetknąć do małego otworu od tyłu pompy 8 i wypchnąć nim podporę łożyska z tyłu 4 5 z osiową podkładką łożyska 4 4 12 Części należy czyścić tylko czystą wodą aby pozwalały się lekko poruszać Nie używać żadnych przed miotów o ostrych krawędziach 13 Pompę należy montować zgodnie z poniższym opisem 13 1 ...

Page 15: ...те присоединить дополгительное оборудование Разборка и сборка system X 1501 см рис 2 5 1 Соблюдайте правила безопасности Отделите насос от электросети 2 Вдавите две накладки на передней стороне насоса внутрь поднимите верхнюю чашу 1 и снимите ее 3 Выньте весь насос 8 из нижней чаши 2 4 Поверните крышку ввода 6 по часовой стрелке и извлеките ее из насоса 8 5 Во входной крышке 6 или на оси 4 3 наход...

Page 16: ...avirtasuojakytkimeen FI kytkin 30 mA joka on liitettävä suojamaadoitettuun pistorasiaan Pistorasia on asennettava vedeltä suojattuun paikkaan vähintään kahden metrin päähän lammen reunasta katso kuva 1 Suojaa pistoke kosteudelta Irrota pistoke pistorasiasta ennen pumpun käsittelemistä tai työskentelyä lammessa Älä käytä pumppua kun vedessä on ihmisiä erota pumppu sähköverkosta Tärkeää Pumppu on kä...

Page 17: ...ckých bazénoch záhradných jazierkach rybníkoch pre chov rýb fontánach balkónových fontánach izbových fontánach pre prevádzkovanie filtračných zariadení prietokových zariadení atď ako tiež pre prevzdušňovanie a cirkuláciu vody Technické údaje môžete nájsť na výrobnom štítku príp v tabuľke na strane 1 Bezpečnostné opatrenia Pozor Používanie v záhradných rybníkoch a ich ochrannej oblasti je dovolené ...

Page 18: ... potřeba dohlížet na děti aby bylo zajištěno že si s přístrojem nehrají Účel použití Odstředivé čerpadlo s ponorným motorem motor kompletně zalitý do epoxidové pryskyřice Čerpadla jsou určena pro použití ve vodě např pro jezírka na koupání bazény zahradní jezírka jezírka s rybkami vodotrysky terasové fontány pokojové vodotrysky pro provoz filtračních zařízení potůčků atd i pro provzdušňování vody ...

Page 19: ...otopnim motorjem motor je v celoti zalit v epoksidno smolo Črpalke so predvidene za uporabo v vodi npr plavalno jezero plavalni bazen vrtno jezero ribnik fontana terasasti vodnjak sobna fontana za poganjanje filtrirnih sistemov in umetnih potokov ipd kot tudi za prezračevanje in kroženje vode Tehnični podatki so razvidni na napisni tablici ali v tabeli na strani 1 Varnostni ukrepi Pozor Uporaba v ...

Page 20: ... nege pozebe normalne izrabe ali nestrokovnih poskusov popravil niso zajete s to garancijo Pri spremembah na črpalki npr rezanju priključnega omrežnega kabla ali omrežnega vtiča prenehajo veljati pravice iz garancije Ne prevzemamo odgovornosti za posledične škode ki so nastale zaradi izpada črpalke ali nestrokovne uporabe V primeru uveljavljanja pravice iz garancije vas prosimo da nam črpalko z do...

Page 21: ...座 system X 3000 system X 4000 104 003669 3 提手 system X 3000 system X 4000 104 003670 4 转子 system X 3000 system X 4000 168 009172 6 入水口外盖 system X 3000 168 009110 system X 4000 168 009174 7 附件 system X 3000 system X 4000 104 003959 质保 从交货日期算起 设备有3年的质保期 起始日期将以发票为准 如果因为产品制造或者原材料的原因导致设 备坏了 那么在质保期内我们会免费为您维修或者替换新的零部件 这样的选择权将取决于我们 因为安装 或者操作的失误 钙化物过多 过少的维护 霜冻 正常磨损 不正确的修理尝试而导致设备的损坏 这些 将不在质保的范围内 一旦有对设备进行修改的...

Page 22: ...40 41 1 3 1 2 min 20 cm max 2 m min 20 cm max 2 m min 2 m min 2 m 1 8 2 6 2 2 1 1 1 4 4 4 5 4 4 4 3 4 2 4 1 4 4 4 5 5 8 3 1 6 4 2 ...

Page 23: ... bélyegzöje és alaírása Vásárlás idöpontja Pieczątka i podpis sprzedawcy Data zakupu Штамп и подпись продавца дата покупки Myyjän leima ja allekirjoitus Ostopäivämäärä Pečiatka a podpis predajcu Dátum kúpy Razítko a podpis prodejce Datum koupě Žig in podpis prodajalca Datum nakupa 经销商的盖章和署名 购买日期 _________________________________________________________________________ _____________________________...

Reviews: