background image

11

ENGLISH

1.

Machine Overview .................... 10

2.

Please Read First!..................... 11

3.

Safety ......................................... 11

3.1 Specified conditions 

of use .......................................... 11

3.2 General Safety Instructions ........ 11

3.3 Safety devices ............................ 12

3.4 Symbols on the machine ............ 12

3.5 Symbols used throughout 

these instructions ........................ 12

4.

Special Product Features......... 12

5.

Transportation and 
Installation................................. 12

5.1 Machine installation .................... 12

5.2 Machine transport ....................... 12

5.3 Mains connection........................ 12

6.

Operation................................... 13

6.1 Cutting ........................................ 13

7.

Care and Maintenance.............. 14

7.1 Saw blade change ...................... 14

7.2 Saw storage................................ 15

7.3 Maintenance ............................... 15

8.

Available Accessories.............. 15

9.

Repairs....................................... 15

10. Environmetal Protection .......... 15

11. Troubleshooting Guide ............ 15

12. Technical Specifications.......... 16

13. Available saw blades........... 16/53

x

Read these instructions before initial
operation. Pay special attention to
the safety instructions. 

x

Disregard of the instructions voids
the warranty; the manufacturer is
not liable for any damages caused
by disregard of the instructions. 

x

If you notice transport damage while
unpacking, notify your supplier
immediately. Do 

not

 operate the

machine!

x

Dispose of the packing in an envi-
ronmentally friendly manner. Take
to a proper collecting point. 

x

Keep these instructions for refer-
ence on any issues you may be
uncertain about. 

x

When you hire or sell the machine,
have all documents supplied go 
with it. 

3.1

Specified conditions 
of use

This machine is only intended for cutting
firewood as described in these instruc-
tions. Any other use is not as specified.
Unspecified use, modifications to the
machine, or use of parts not tested and
approved by the manufacturer may
cause unforeseeable damage! 

This machine is intended for operation
by

one

 person. Other persons shall keep

a sufficient distance to the machine. 

Do not use logs larger than the dimen-
sions the saw can handle safely (see
"Technical Specifications"). 

Never cut several workpieces at the
same time – and also no bundles con-
taining several individual pieces. Risk of
personal injury if individual pieces are
caught by the saw blade uncontrolled.
Never cut logs containing the following: 

ropes 

strings

cords 

cables 

wires.

Do not overload machine – use it only
within the performance range it was
designed for (see "Technical Specifica-
tions").

Use this machine out of doors only. 

3.2

General Safety Instruc-
tions 

When using this machine observe the
following safety instructions, to exclude
the risk of personal injury or material
damage.

Please also observe the special safety
instructions in the respective chapters;

where applicable, follow the legal direc-
tives or regulations for the prevention of
accidents pertaining to the use of circu-
lar saws. 

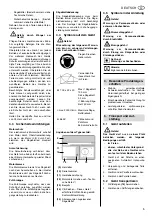
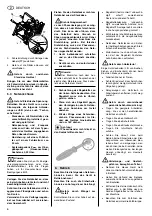
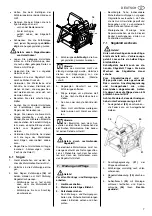
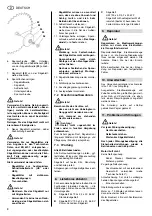
A

General hazards! 

Be alert. Know what you are doing. Set
out to work with reason. Do not operate
machine while under the influence of
drugs, alcohol or medication.

Keep your work area tidy – a messy
work area invites accidents.

Regularly clear the work area of the cut
logs.

Store logs to be cut and the cut logs
near the workplace.

Prevent adverse body positions. Ensure
firm footing and keep your balance at all
times.

Consider environmental effects: 

provide proper lighting.

Do not operate machine near inflamma-
ble liquids or gases.

This machine shall only be started and
operated by a person familiar with circu-
lar saws and who is at all times aware of
the dangers associated with the use of
such machine.

Keep bystanders, particularly children,
out of the danger zone. Persons under
18 years of age shall use this machine
only in the course of their vocational
training, under the supervision of an
instructor.

Do not permit other persons to touch the
machine or power cable while it is run-
ning. 

B

Danger! Risk of electric shock!

To ensure the machine remains weath-
erproof, before any use check to see
that the switch, power cable or plug are
not damaged (no cracks, etc.) 

Do not use the power cable for any pur-
pose it is not intended for. 

A

Risk of personal injury and
crushing by moving parts! 

Do not operate the machine without
installed guards.

Keep sufficient distance to driven com-
ponents when operating the machine.

Ensure the machine is disconnected
from power supply before servicing.

Ensure that when switching on (e.g. after
servicing), no tools or loose parts are left
on or in the machine.

Turn power OFF if the machine is not
used. 

A

Hazard generated by modifica-

tion of the machine or use of parts
not tested and approved by the manu-
facturer! 

Use only parts approved by the manu-
facturer. This applies particularly to: 

saw blades (see "Technical Specifi-
cations" for stock numbers); 

safety devices (see "Spare Parts
List" for stock numbers). 

Do not change any parts. 

A

Hazard generated by machine
defects!

Keep machine and accessories in good
repair. Observe the maintenance
instructions.

Prior to any use check the machine for
possible damage: before operating the
machine all safety devices, protective
guards or slightly damaged parts need to
be checked for proper function as speci-
fied. Check to see that all moving parts
work properly and do not jam. All parts

Table of Contents

2.

Please Read First! 

3.

Safety

Summary of Contents for BW 750

Page 1: ...115 168 1812 2307 2 2 BW 750 Betriebsanleitung 3 Operating Instructions 10 Instructions d utilisation 17 Handleiding 24 Manuale d istruzioni 31 Manual de uso 38 Betjeningsvejledning 46 A0236IVZ fm ...

Page 2: ...om nastĊpujących norm wedáug ustaleĔ wytycznych sprawozdanie z kontroli technicznej przeprowadzone przez EL HU ǻǾȁȍȈǾ ǹȃȉǿȈȉȅǿȋǼǿǹȈ MEGEGYEZėSÉGI NYILATKOZAT ǻȘȜȫȞȠȣμİ μİ ȚįȓĮ İȣșȪȞȘ ȩIJȚ IJȠ ʌȡȠȧȩȞ ĮȣIJȩ ĮȞIJȚıIJȠȚȤİȓ ıIJȚȢ ĮțȩȜȠȣșİȢ ʌȡȠįȚĮȖȡĮijȑȢ ıȪμijȦȞĮ μİ IJȚȢ įȚĮIJȐȟİȚȢ IJȦȞ ȠįȘȖȚȫȞ ǼțșİıȘ İȜİȖȤȠȣ ʌȡĮȖμĮIJȠʌȠȚȠȪμİȞȠȢ Įʌȩ IJȠ Kizárólagos felelĘsségünk tudatában ezennel igazoljuk hogy ez a termék kielégíti...

Page 3: ...H 1 Die Säge im Überblick 1 Sägeblattabdeckung mit Ausleger 2 Zuführwippe 3 Fahrwerk 4 Netzanschluss 5 Ein Aus Schalter 6 Motor 7 Griffstangen 8 Montageschlüssel 2x 1 2 3 4 5 6 7 8 XA0032D3 fm Betriebsanleitung ...

Page 4: ...egeben ist Verwenden Sie dieses Gerät nur im Freien 3 2 Allgemeine Sicherheits hinweise Beachten Sie beim Gebrauch dieses Gerätes die folgenden Sicherheitshin weise um Gefahren für Personen oder Sachschäden auszuschließen Beachten Sie die speziellen Sicherheits hinweise in den jeweiligen Kapiteln Beachten Sie gegebenenfalls gesetzli che Richtlinien oder Unfallverhütungs Vorschriften für den Umgang...

Page 5: ...sstellung zurückkehren Sägeblattabdeckung Die Sägeblattabdeckung muss beim Betrieb immer montiert sein Die Säge blattabdeckung darf nicht beschädigt sein Der Ausleger der Sägeblattabde ckung muss von allein in die Ausgangs stellung zurückkehren 3 4 Symbole auf dem Gerät AGefahr Missachtung der folgenden Warnun gen kann zu schweren Verletzungen oder Sachschäden führen Tragen Sie einen Gehörschutz V...

Page 6: ...den Uhrzeigersinn dreht Netzka bel vom Anschluss am Gerät abziehen 5 Mit der Klinge eines Schrauben drehers Phasenwender im Ste cker des Gerätes hineindrücken und um 180 drehen AAchtung Phasenwender nicht direkt an den Kontaktstiften drehen Beachten Sie die folgenden Gefahren hinweise bevor Sie das Gerät in Betrieb nehmen Beachten Sie auch die Sicherheits hinweise an Anfang dieser Anleitung AGefah...

Page 7: ...Abschnitt aus der Zuführwippe entfernen 6 Wippe reinigen um optimalen Halt für das nächste Werkstück herzu stellen 7 Nun kann der nächste Schnitt erfol gen 8 Wenn nicht unmittelbar weitergear beitet werden soll Gerät ausschal ten 3Hinweis Der Brummton nach dem Aus schalten entsteht beim Ansprechen der elektrischen Motorbremse Dies bedeu tet keinen Defekt am Gerät AGefahr durch nachlaufendes Sägebl...

Page 8: ...Gerät nicht ungeschützt im Freien oder in feuchter Umgebung aufbewahren Zum Schutz gegen Rost Sägeblatt vor längerem Stillstand mit Reinigungs und Pflegespray Zubehör einsprühen 7 3 Wartung Alle 50 Betriebsstunden Alle Schraubverbindungen prüfen ggf festziehen Wippe und Wippenanschlag müssen beweglich bleiben Sägeblatt auf festen Sitz Abnutzung und Schärfe prüfen Ablagerungen im Sägeblattgehäuse e...

Page 9: ...endeschnitt Minimaler Durchmesser Maximale Länge Minimale Länge mm mm mm mm 300 25 1000 300 Abmessungen des Gerätes Länge Breite Höhe mm mm mm 950 790 1110 Gewicht des Gerätes kg 98 Geräuschemission nach EN ISO 374XXXX Schallpegel Leerlauf Schallpegel Betrieb dB A dB A 87 102 Die angegebenen Werte sind Emissionswerte und müssen damit nicht zugleich auch sichere Arbeitsplatzwerte darstellen Obwohl ...

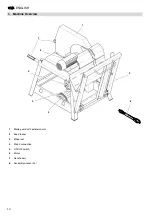
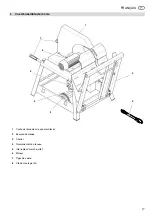
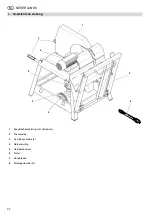
Page 10: ...GLISH 1 Machine Overview 1 Blade guard with extension arm 2 Feed rocker 3 Wheel set 4 Mains connection 5 ON OFF switch 6 Motor 7 Handle bars 8 Assembly wrench 2x 1 2 3 4 5 6 7 8 XA0032E3 fm Betriebsanleitung ...

Page 11: ...special safety instructions in the respective chapters where applicable follow the legal direc tives or regulations for the prevention of accidents pertaining to the use of circu lar saws AGeneral hazards Be alert Know what you are doing Set out to work with reason Do not operate machine while under the influence of drugs alcohol or medication Keep your work area tidy a messy work area invites acc...

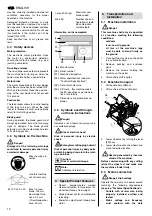
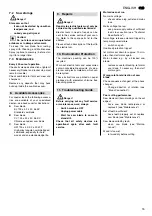
Page 12: ...ury or seri ous material damage BRisk of electric shock Risk of personal injury by electric shock cEntanglement trapping hazard Risk of personal injury by body parts or clothing being drawn into the rotat ing saw blade ACaution Risk of material damage 3Note Additional information x Robust powder coated welded steel construction for maximum tor sional resistance at low weight x Hinged wheel set for...

Page 13: ...trician x Motor brake after switching OFF no more than 10 seconds post run ning of saw blade ARisk of injury by inhaling wood dust Dust of certain timber species e g oak beech ash can cause cancer when inhaled x Work only out of doors x When working take care that as lit tle wood dust as possible will get into the surroundings x Remove wood dust deposits in the work area do not blow away AHazard g...

Page 14: ...ension 1 Dismount the extension arm lever 20 the spring can remain on the lever 2 Dismount stop limiter 21 from the rocker 3 Lower the feed rocker carefully 4 Remove the blade guard 19 5 Hold outer blade flange 24 with assembly wrench and loosen the arbor bolt 26 R H thread 6 Remove arbor bolt 26 spring lock washer 25 and outer blade flange 24 from the saw spindle 23 7 Take the saw blade 22 off th...

Page 15: ...cled Worn out electric tools and accessories contain considerable amounts of valua ble raw and plastic materials which can be recycled These instructions are printed on paper produced with elemental chlorine free bleaching process ADanger Before carrying out any fault service or maintenance work always Switch machine OFF Unplug power cable Wait for saw blade to come to standstill Check that all sa...

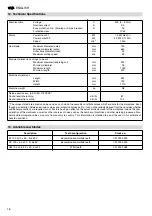
Page 16: ...02 The values stated are emission values and as such do not necessarily constitute values which are safe for the workplace Even though a correlation between emission values and immission values exists it can not be reliably derived from these values whether additional precautions are required or not Factors having an effect on the actual immission level at the workplace include the char acteristic...

Page 17: ...le de la scie 1 Cache de lame de scie aveccantilever 2 Bascule d amenée 3 Chariot 4 Raccordement au réseau 5 Interrupteur marche arrêt 6 Moteur 7 Tiges de saisie 8 Clé de montage 2x 1 2 3 4 5 6 7 8 XA0032F3 fm Betriebsanleitung ...

Page 18: ...lisez cet appareil qu en plein air 3 2 Instructions générales de sécurité Respectez les instructions de sécurité suivantes lors de l utilisation de l appareil afin d éliminer tout risque de dommage corporel ou matériel Respectez les instructions de sécurité spécifiques à chaque chapitre Respectez le cas échéant les directives en vigueur ou les instructions de préven tion des accidents relatives à ...

Page 19: ...ion de la lame de scie doit tou jours être montée lors du service La protection de la lame de scie ne doit pas être endommagée Le bras de la protec tion de la lame de scie doit retourner de lui même en position de départ 3 4 Symboles sur l appareil ADanger Le non respect des avertissements suivants peut entraîner des blessures ou des dommages matériels graves Portez une protec tion acoustique N ut...

Page 20: ...lame de scie du côté gauche La lame de scie doit tourner dans le sens des aiguilles d une montre 4 Lorsque la lame de scie tourne dans le sens contraire des aiguilles d une montre débran cher le câble de raccordement au réseau 5 Enfoncer l inverseur de phase dans la fiche de l appareil avec la lame d un tournevis et tourner de 180 AAttention Ne pas tourner l inverseur de phase directement sur les ...

Page 21: ... amenée jusqu à la butée 4 Refaire entièrement pivoter la bas cule d amenée dans la position de départ 3Remarque Si la pièce de bois n a pas été entièrement sciée tourner la pièce et répéter l opération de sciage coupe avec inversion 5 Retirer le tronçon scié de la bascule d amenée 6 Nettoyer la bascule pour garantir un maintien parfait de la prochaine pièce à usiner 7 Vous pouvez à présent passer...

Page 22: ...a bascule d amenée 14 Monter la limite de butée 15 Monter le cantilever 7 2 Entreposage de l appareil ADanger Entreposez l appareil de telle sorte qu il ne puisse pas être mis en marche sans autorisation et que personne ne puisse se bles ser AAttention Ne jamais entreposer l appareil en plein air ou dans un endroit humide sans protection Vaporiser un spray de nettoyage et d entretien accessoire av...

Page 23: ... dégagement P2 Vitesse de rotation KW KW min 1 7 4 kW S6 40 4 0 kW S1 100 1450 Lame de scie Diamètre maximal extérieur Diamètre minimal extérieur Alésage intérieur Vitesse de coupe maximale mm mm mm m s 700 660 30 55 Dimensions des pièces de bois pouvant être travaillées Diamètre maximal coupe avec inversion Diamètre minimal Longueur maximale Longueur minimale mm mm mm mm 300 25 1000 300 Dimension...

Page 24: ...verzicht van de zaag 1 Zaagbladbescherming met uitklap arm 2 Toevoerklep 3 Verrijdbaar onderstel 4 Netaansluiting 5 Hoofdschakelaar 6 Motor 7 Handgrepen 8 Montagesleutels 2x 1 2 3 4 5 6 7 8 XA0032H3 fm Betriebsanleitung ...

Page 25: ...pparaat uitsluitend binnen het vermogensgebied dat in de Technische Gegevens gespecificeerd is Gebruik dit apparaat uitsluitend buitens huis 3 2 Algemene veiligheids voorschriften Houdt u zich bij gebruik van dit toestel aan de volgende veiligheidsvoorschrif ten om gevaar voor personen of mate riële schade te voorkomen Houdt u zich aan de bijzondere veilig heidsvoorschriften in de betreffende hoof...

Page 26: ...keren Zaagbladbescherming De zaagbladbescherming moet altijd gemonteerd zijn tijdens bedrijf De zaag bladbescherming mag niet beschadigd zijn De klaparm van de zaagbladbe scherming moet vanzelf weer naar de beginstand terugkeren 3 4 Symbolen op het apparaat AGevaar Het niet opvolgen van de volgende waarschuwingen kan ernstige ver wondingen of materiele schade tot gevolg hebben Draag oordoppen Gebr...

Page 27: ...erzijde de draairichting van het zaagblad Het zaagblad moet met de wijzers van de klok meedraaien 4 Als het zaagblad tegen de wijzers van de klok in draait trekt u de stroomkabel van de aansluiting aan de apparaat 5 Met het lemmet van een schroe vendraaier fasedraaier in de ste ker van het toestel drukken en om 180 draaien AOpgelet De faseomkeerschakelaar niet direct aan de aansluitpennen draaien ...

Page 28: ... volle dig doorgezaagd is draai dan het dan om en zaag nogmaals van de andere kant zagen van twee kanten 5 Afgezaagd gedeelte uit de toevoer wip verwijderen 6 Wip reinigen om optimale steun voor het volgende werkstuk te ver vaardigen 7 Nu kan de volgende snede plaats vinden 8 Schakel de machine uit als u niet onmiddellijk verderwerkt 3Tip De bromtoon na het uitschakelen ontstaat bij het aanspreken...

Page 29: ...t kun nen inschakelen en waar niemand zich eraan kan bezeren ook al is ze uitgescha keld AOpgelet De machine mag niet in open lucht of in een vochtige ruimte opgebor gen worden Vóór langere stilstand het zaagblad met reinigings en onderhoudsspray toebe horen inspuiten ter bescherming tegen roest 7 3 Onderhoud Na elke periode van 50 werkuren Alle schroefverbindingen controleren en eventueel aandraa...

Page 30: ...diameter Maximale draaisnelheid mm mm mm m s 700 660 30 55 Afmetingen van de stukken hout die verwerkt mogen worden Maximale doorsnede bij zagen van twee kanten Minimale doorsnede Maximale lengte Minimale lengte mm mm mm mm 300 25 1000 300 Afmetingen van het apparaat Lengte Breedte Hoogte mm mm mm 950 790 1110 Gewicht van het apparaat kg 98 Geluidsemissie volgens EN ISO 374XXXX Geluidsniveau vrijl...

Page 31: ... della lama della sega con braccio 2 Tavola di alimentazione basculante 3 Carrello 4 Collegamento elettrico 5 Interruttore accensione spegnimento 6 Motore 7 Aste del manico 8 Chiavi per il montaggio 2 pz 1 2 3 4 5 6 7 8 XA0032I3 fm Betriebsanleitung ...

Page 32: ...ll aperto 3 2 Istruzioni generali per la sicurezza Durante l uso dell apparecchio osser vare le seguenti istruzioni relative alla sicurezza per evitare eventuali pericoli per le persone e o danni materiali Osservare in particolare le istruzioni relative alla sicurezza riportate nelle sin gole sezioni All occorrenza applicare le disposizioni di legge e le norme antinfortunistiche vigenti per l uso ...

Page 33: ...tavola deve tornare automaticamente nella posizione di partenza Coprilama L apparecchio va azionato esclusiva mente se il coprilama è montato e asso lutamente privo di danni di qualsiasi tipo Il relativo braccio deve tornare automati camente nella posizione di partenza 3 4 Simboli sull apparecchio APericolo La mancata osservanza delle seguenti indicazioni può provocare gravi ferite o danni materia...

Page 34: ... collegarlo alla rete elettrica 2 Accendere e spegnere subito l apparecchio 3Nota Il segnale sonoro emesso dopo lo spegnimento quando viene azionato il freno motore elettrico indica che l appa recchio funziona correttamente 3 Controllare il senso di rotazione della lama dal lato sinistro La lama deve girare in senso orario 4 Se la lama gira in senso antiora rio estrarre il cavo di alimenta zione d...

Page 35: ...ulante 3 Per eseguire le operazioni con la sega inclinare la tavola di alimenta zione basculante 18 verso la lama della sega afferrando l impugna tura con tutte e due le mani Premere la tavola di alimenta zione basculante esercitando sol tanto una forza adeguata per non far perdere giri al motore Girare la tavola di alimentazione per l arresto 4 Riportare la tavola di alimentazione basculante comp...

Page 36: ...gio allontanare necessariamente la chiave di montaggio 12 Rimontare il coprilama 13 Inclinare la tavola di alimentazione basculante verso l alto 14 Montare il limite di arresto 15 Montare la valvola del braccio 7 2 Custodia della macchina APericolo Custodire l apparecchio in modo tale che non possa essere azionato da persone non autorizzate e che nessuno possa ferirsi AAttenzione Non custodire la ...

Page 37: ... Protezione min ritardata o automatica Classe di protezione V A A 400 3 a 50 Hz 9 0 16 IP 54 Motore Potenza assorbita P1 Potenza erogata P2 Numero di giri kW kW min 1 7 4 kW S6 40 4 0 kW S1 100 1450 Lama per sega Diametro max esterno Diametro min esterno Foro interno Velocità max di taglio mm mm mm m s 700 660 30 55 Dimensioni pezzi di legno lavorabili Diametro max taglio di inversione Diametro mi...

Page 38: ...ierta de la hoja de sierra con brazo saliente 2 Rampa basculante de alimentación 3 Bastidor de ruedas 4 Conexión a la red 5 Interruptor de conexión desconexión 6 Motor 7 Asideros 8 Llave de montaje 2 1 2 3 4 5 6 7 8 XA0032S3 fm Betriebsanleitung ...

Page 39: ...aracterísticas técnicas Utilice esta máquina sólo al aire libre 3 2 Instrucciones generales de seguridad Al utilizar esta máquina deberá tener en cuenta las siguientes instrucciones de seguridad para evitar el peligro de sufrir daños personales o materiales Observe las instrucciones especiales de seguridad en cada uno de los capítulos Dado el caso tenga en cuenta la norma tiva legal o bien las pre...

Page 40: ... rampa basculante de alimentación debe vol ver por sí sola a la posición inicial Cubierta de la hoja de sierra Durante el servicio la cubierta de la hoja de sierra siempre debe estar montada La cubierta de la hoja de sierra no debe presentar ningún desperfecto El brazo de la cubierta de la hoja de sierra debe volver por sí solo a su posición inicial 3 4 Símbolos utilizados en la máquina A Peligro ...

Page 41: ...léctrica 2 Conecte y desconecte breve mente la sierra 3Nota El zumbido después de apagar se debe a la activación del freno de motor eléctrico No significa que la máquina esté defectuosa 3 Observe el sentido de rotación de la hoja de la sierra desde el lado izquierdo La hoja deberá girar en el sentido de las agujas del reloj 4 Si la hoja gira al revés desen chufe el cable de alimentación de la sier...

Page 42: ...n ambas manos por los asideros Apriete la rampa basculante de alimentación sin que se reduzca la velocidad de giro del motor Gire la rampa basculante de ali mentación hasta el tope 4 Vuelva a poner la rampa basculante de alimentación totalmente en su posición inicial 3Nota En caso de no cortar totalmente la pieza de madera gírela y repita el proceso por el lado contrario corte de inversión 5 Quite...

Page 43: ...de retirar la llave de mon taje 12 Vuelva a montar la cubierta de la hoja de sierra 13 Levante la rampa basculante de ali mentación 14 Monte el límite de tope 15 Monte la palanca saliente 7 2 Conservación de la máquina A Peligro Cuide la máquina de modo que no pueda ser puesta en marcha por personas no autorizadas no pueda causar daños a las per sonas próximas a ella A Atención Nunca guarde la máq...

Page 44: ...nimiento Madera demasiado húmeda Seque la madera antes de serrarla 11 Problemas y averías 12 Características técnicas Valores eléctricos Tensión Intensidad nominal Protección por fusible mín acción lenta o autómata K Grado de protección V A A 400 3 a 50 Hz 9 0 16 IP 54 Motor Potencia de entrada P1 Potencia generada P2 Revoluciones por minuto kW kW min 1 7 4 kW S6 40 4 0 kW S1 100 1450 Hoja de sier...

Page 45: ...pción Número de dientes Número de referencia EL 700 x 3 2 x 30 Z 56 KV 56 dentados múltiples combinados 091 000 3399 CV 700 x 3 2 x 30 Z 56 KV 56 dentados múltiples combinados 091 000 3453 HW 700 x 4 2 3 2 x 30 Z 42 F 42 dentados planos 091 000 3488 ...

Page 46: ...ven i overblik 1 Savklingeafdækning med udlægger 2 Fremføringsvippe 3 Understel 4 Strømtilslutning 5 Start stop kontakt 6 Motor 7 Grebstænger 8 Monteringsnøgle 2 stykker 1 2 3 4 5 6 7 8 XA0032C3 fm Betriebsanleitung ...

Page 47: ...t de følgende sikkerhedsanvisninger for at undgå risiko for personer eller tingska der Overhold denne betjeningsvejledning især de specielle sikkerhedsanvisninger i de respektive kapitler Overhold de lovpligtige direktiver eller forskrifter vedrørende ulykkesforebyg gelse for omgangen med rundsave AGenerelle farer Vær opmærksom Vær opmærksom på hvordan du arbejder Arbejd altid fornuf tigt Apparate...

Page 48: ... værn Dette apparat må kun anvendes i det fri Maks savklinge 700 mm Tykkelse sav klinge 3 2 mm Boring sav klinge 30 mm Maksimale savklin geomdrejninger Tandtal og tand form 56 Kombi mange tand Oplysninger på typeskiltet 3 5 Symboler i vejledningen AFare Advarer mod personskader eller alvorlige tingskader BFare for strømstød Advarer mod personskader pga elek tricitet cFare for indgreb Advarer mod p...

Page 49: ...x Kabel stik og kontakt ved beskadi gelser skal disse udskiftes af en elektriker x Motorbremse savklingen må kun køre i maks 10 sekunder efter at motoren er slået fra ATræstøv indebærer en risiko Forskellige træstøvsorter f eks af bøge egetræ og ask kan forårsage kræft hvis de inhaleres x Der må kun arbejdes i det fri x Sørg for at der under arbejdet kun kommer så lidt træstøv ud i omgivel serne s...

Page 50: ...faguddannet perso nale 7 1 Udskiftning af savklinge AFare Et stykke tid efter savningen kan sav klingen være meget varm der er fare for forbrænding Lad den varme sav klinge køle af Selvom savklingen står stille er der fare for at skære sig Brug derfor altid handsker ved udskiftning af savklin gen Vippen svinges helt ned til savklinge skift Anslagsbegrænsningen og udlæggergrebet skrues af som beskr...

Page 51: ...ationer på el værktøj må kun foretages af en elektriker El værktøj der skal repareres kan ind sendes til den lokale service afdeling Adressen finder du ved reservedels listen Ved indsendelse skal den fastslåede fejl beskrives Apparatets emballage består af 100 genbrugsmateriale Udtjente el værktøjer og tilbehør inde holder store mængder af værdifulde råstoffer og plast som ligeledes kan genbruges ...

Page 52: ...omgang Lydtryksniveau drift dB A dB A 87 102 De anførte værdier er emissionsværdier og er ikke nødvendigvis pålidelige arbejdspladsværdier Selv om der er en sammenhæng mellem emissions og immisionsværdierne afgører det ikke om der skal træffes ekstra sikkerhedsforanstaltninger på arbejdsplad sen Faktorer som påvirker immisionsniveauet på arbejdspladsen kan være arbejdsrummets udformning andre støj...

Page 53: ...53 A 091 000 3399 B 091 000 3453 C 091 000 3488 U3a0236 fm ...

Page 54: ......

Page 55: ......

Reviews: