background image

ENGLISH

en

14

shoes. Do not wear loose-fitting clothing or 

clothing with dangling strings or ribbons. Always 

wear face protection and protective goggles. 

Wear protective gloves.

• When using the blade: sturdy, non-slip shows 

with steel caps.

• Thoroughly check the area of use of the machine 

and remove all object that could be caught and 

ejected by the machine.

• Remove extension cables out of the range of 

action of the machine. Cutting accessory 

contacting a "live" wire may give the operator an 

electric shock. 

• Always inspect visually before use if the blade, 

the fixing screw and the blade assembly are worn 

or damaged. Worn or damaged components 

must be replaced in sets to avoid imbalance. 

Replace damaged or illegible markings.

• Never replace the non-metalling cutting line with 

a metallic cutting line. Use only genuine 

accessories.

• When working for long periods of time wear ear 

protectors. High noise levels over a prolonged 

period of time may affect your hearing.

• Practice all work techniques. Inexperienced 

persons are strongly advised to seek competent 

advise and guidance from an experienced 

person before operating this machine.

4.3 Kickback

• Kickback is the sudden response to an accessory 

pinching or jamming while rotating (24). Pinching 

or snagging causes rapid stalling of the rotating 

blade. This in turn causes an uncontrolled 

machine to be forced in the opposite direction of 

the blade at the pinched or snagged point. 

Make sure that you stand safely, hold the 

machine firmly on both handles and avoid getting 

caught or blocking the blade. Also be aware of 

hidden obstacles that may cause the blade to 

jam.

4.4 Operation

• Use the machine only in daylight or good artificial 

light.

• Avoid using the machine on wet grass.

• Do not operate the machine in bad weather 

conditions, especially when there is a risk of 

lightning. This reduces the risk to be hit by 

lightning.

• Keep the ventilation openings free from foreign 

bodies.

• Do not use a power tool while you are tired or 

under the influence of drugs, alcohol or 

medication. A moment of inattention while 

operating power tools may result in serious 

personal injury.

• Always use the supplied carry strap/shoulder 

strap.

• Avoid adverse body positions. Keep proper 

footing and balance at all times, especially when 

working on sloped ground.

• Ensure stable footing. If you lose your balance, 

immediately let go of the switch (6).

• Make sure you have the correct working position, 

take breaks and change working position.

• Guide the tool only at walking pace.

• When working on slopes, always move along 

horizontally, never mow up and down.

• Be extremely careful when changing direction on 

slopes.

• Do not work on steep slopes.

• Do not mow near steep slopes, ditches or 

embankments.

• Watch out for holes, furrows, rocks and other 

hidden objects that can cause you to fall. 

Remove all obstacles such as stones and 

branches

• Always keep the cutting tool close to the ground.

• Never operate the machine with damaged 

protective equipment or without protective 

equipment (e.g. step limiter, guard, handle).

• Carefully start up the motor according to the 

instructions and with your feet far away from the 

cutting insert.

• Danger from parts moving hazardously. Do not 

touch moving parts. Before any contact, all parts 

must have come to a complete standstill and the 

battery pack must have been removed.

• Do not put your hands or feet anywhere near or 

below rotating parts.

• Switch off the motor and remove battery pack(s). 

Ensure that all moving parts have come to a 

standstill:

- if you leave the machine unattended; 

- before clearing any blockages;

- before checking or cleaning the machine or 

before carrying out any work on the machine;

- if a foreign object has been hit or if the machine 

has been dropped. Check the machine for 

damage and have repairs carried out before 

putting the machine back into operation.

- when the machine starts to vibrate excessively.

• If the machine starts to vibrate with unusual 

strength, an immediate check is required:

- check  for  damage;

- replace or repair damaged parts;

- ensure that all nuts, bolts and screws are 

tightened.

• In the event of an accident or malfunction, switch 

off the machine immediately and remove the 

battery pack.

4.5 Maintenance and storage

• Maintain power tools and accessories. Many 

accidents are caused by poorly maintained 

power tools.

• All nuts, bolts and screws must always be 

tightened to ensure that the machine is in safe 

operating condition.

• When adjusting the machine take care not to jam 

your fingers between moving blades and fixed 

parts of the machine.

• Remove the battery packs from the machine, wait 

until all moving parts have come to a standstill 

Summary of Contents for FSB 36-18 LTX BL 40

Page 1: ...ce originale 20 nl Oorspronkelijke gebruiksaanwijzing 28 it Istruzioni originali 36 es Manual original 44 pt Manual original 52 sv Bruksanvisning i original 60 fi Alkuper iset ohjeet 67 no Original br...

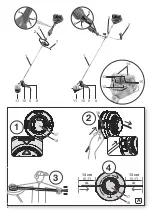
Page 2: ...A A A 12 13 14 15 8 9 10 11 1 3 8 9 10 11 13 cm 5 1 13 cm 5 1 1 2 2 3 7 4 6 5 6 4 5 16 17 18 1 2 3 4 17 18 2...

Page 3: ...B C D E F G F D 21 22 23 24 25 26 27 28 1 3 2 C 21 22 23 28 1 3 2 19 10 20 31 32 33 30 FSD 36 18 LTX BL 40 1 1 2 3 11 34 35 1 FSB 36 18 LTX BL 40 3...

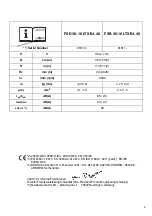
Page 4: ...WA KWA dB A 94 2 4 LWA G 5 dB A 96 14 2 2006 42 EC 2000 14 EC 2014 30 EU 2011 65 EU 3 EN 62841 1 2015 EN 50636 2 91 2014 EN ISO 11806 1 2011 partly EN IEC 63000 2018 4 DEKRA Certification B V Meander...

Page 5: ...estimmungsgem en Gebrauch haftet allein der Benutzer AllgemeinanerkannteUnfallverh tungsvorschriften und Sicherheitshinweise m ssen beachtet werden Beachten Sie die mit diesem Symbol gekennzeichneten...

Page 6: ...alle Arbeitstechniken Wenn Sie keinerlei Erfahrung mit solchen Ger ten haben sollten Sie zun chst die Hilfe von erfahrenen Personen in Anspruch nehmen 4 3 R ckschlag R ckschlag ist die pl tzliche Rea...

Page 7: ...ren und zum Transport stets die Schutzabdeckung am Messer anbringen 4 6 Verwendung und Behandlung von Akkumaschinen Laden Sie die Akkus nur in Ladeger ten auf die vom Hersteller empfohlen werden Durch...

Page 8: ...er N he stehende Personen und Haustiere auf sicherem Abstand zum Ger t Andere Personen fernhalten Einen Abstand von mindestens 15 m zu Personen und Gegenst nden einhalten Sch tzen Sie Ihr Ger t vor N...

Page 9: ...cm 5 1 Faden herausragen Ein zu langer Faden wird beim ersten Betrieb automatisch vom Fadenabl nger 9 abgeschnitten 6 4 Messer anbringen abnehmen Abb D Anbringen 1 Antriebswelle 23 arretieren mitgeli...

Page 10: ...verursachen Die Maschine muss stillstehen Maschine ausschalten Motor zum Stillstand kommen lassen Akkupacks 14 entnehmen Kappe 17 dr cken und gedr ckt halten F den von Hand herausziehen Falls der Schn...

Page 11: ...Akkupacks aufladen Eine Blockierung ist aufgetreten Akkupacks 14 entnehmen berpr fen Sie das Messer 24 den Fadenkopf 29 Die Betriebstemperatur der Maschine ist zu hoch Maschine abk hlen lassen Verwend...

Page 12: ...uren unter 0 C Erlaubte Umgebungs temperatur bei Lagerung 0 C bis 30 C Empfohlene Umgebungstemperatur beim Laden 0 C bis 40 C Gleichstrom Die angegebenen technischen Daten sind toleranzbehaftet entspr...

Page 13: ...tructions illustrations and specifications provided with this power tool Failure to follow all instructions listed below may result in electric shock fire and or serious injury Save all warnings and i...

Page 14: ...p proper footing and balance at all times especially when working on sloped ground Ensure stable footing If you lose your balance immediately let go of the switch 6 Make sure you have the correct work...

Page 15: ...rrying the machine with your finger on the switch or energising machines that have the switch on invites accidents Remove battery packs from the machine before making any adjustments changing tools ma...

Page 16: ...ter 9 Wear protective gloves 1 Hook the guard 10 into the shackle 19 2 Insert the screw 20 and firmly tighten it 6 2 Attaching removing the line head 29 fig C Fitting 1 Locking the drive shaft 23 inse...

Page 17: ...operation 7 1 Setting the machine for the user fig G 1 Tighten the shoulder strap 34 Adjust the length in such a way that the carabiner hook 35 is about a hand width below the hip 2 Hook in carabiner...

Page 18: ...ickback A blunt blade 24 can be rotated by 180 If both sides are blunt it is advisable to have it sharpened and balanced in a specialist workshop Check blades regularly for damage and have them repair...

Page 19: ...sive tape Explanatory notes regarding the specifications on page 4 Changes due to technological progress reserved U voltage B cutting width H max cutting line length HX cutting line diameter n0 no loa...

Page 20: ...respect es Dans l int r t de votre propre s curit et afin de prot ger votre outil lectrique respecter les passages de texte marqu s de ce symbole AVERTISSEMENT Lire la notice d utilisation afin d vit...

Page 21: ...elui de la lame au point du blocage Veillez toujours adopter une position stable maintenez fermement la machine par les deux poign es et vitez tout accrochage ou blocage de la lame Soyez attentif aux...

Page 22: ...e court circuitage des bornes d une batterie entre elles peut causer des br lures ou un feu En cas d utilisation non conforme du liquide peut fuir de la batterie viter tout contact En cas de contact a...

Page 23: ...Interrupteur mise en marche arr t r glage de la vitesse de rotation 7 FSD 36 18 LTX BL 40 limiteur de coupe ne pas utiliser comme poign e 8 La fl che indique le sens de rotation des outils de coupe 9...

Page 24: ...tra nement retirer la tige 21 D montage Proc der comme pour le montage mais d visser l crou de serrage 27 en le tournant dans le sens des aiguilles d une montre avec la cl universelle 28 6 5 Montage d...

Page 25: ...pe sec se casse et s use plus rapidement Retirez par exemple le fil de coupe de la bobine et conservez le dans un bol d eau Assurez vous que toutes les pi ces de la machine sont bien fix es et ne pr s...

Page 26: ...000 10 0 Ah LiHD etc R f 625591000 4 0 Ah Li Ion R f 625592000 5 2 Ah Li Ion etc F Chargeurs ASC 55 ASC 145 ASC 145 Duo etc Gamme d accessoires compl te voir www metabo com ou catalogue Les r paration...

Page 27: ...tion l tat de l outil lectrique ou les accessoires utilis s la sollicitation r elle peut plus ou moins varier Pour l estimation tenir compte des pauses de travail et des phases de sollicitation moindr...

Page 28: ...eigenlijk gebruik De algemeen erkende ongevallenpreventievoorschriften en de veiligheidsinstructies moeten in acht worden genomen Let voor uw veiligheid en die van het elektrisch gereedschap op de pas...

Page 29: ...eiden Oefen alle werktechnieken Wanneer u geen ervaring heeft met dergelijke gereedschappen moet u een beroep doen op de hulp van ervaren personen 4 3 Terugslag Terugslag is de plotselinge reactie als...

Page 30: ...hermende afdekking aan op het mes alvorens het opbergen en transporteren 4 6 Gebruik van en omgang met een met accu machine Laad accu s alleen op in oplaadapparaten die door de fabrikant worden geadvi...

Page 31: ...ersonen en huisdieren op een veilige afstand ten opzichte van het apparaat Houd andere personen uit de buurt Houd een afstand van minimaal 15 m in acht ten opzichte van personen en voorwerpen Bescherm...

Page 32: ...e draad wordt bij het eerste gebruik automatisch afgesnden door de draadafkorter 9 6 4 Mes aanbrengen verwijderen afb D Aanbrengen 1 Aandrijfas 23 vergrendelen meegeleverde staaf 21 in het boorgat 22...

Page 33: ...t houden Draad met de hand eruit trekken Indien de snijddraad op is zie hoofdstuk 6 3 WAARSCHUWING Accupacks 14 verwijderen Ongewenst starten kan ernstig letsel veroorzaken Het gereedschap moet stilst...

Page 34: ...System accupacks en toebehoor Gebruik alleen toebehoor dat voldoet aan de in deze gebruiksaanwijzing genoemde eisen en kenmerken A Struikgewasmes 3 vleugelig 255 mm incl beschermende afdekking als res...

Page 35: ...0 C Toegestane omgevingstemperatuur tijdens het laden 0 C tot 40 C Gelijkstroom De vermelde technische gegevens zijn tolerantiewaarden overeenkomstig de betreffende geldige norm Emissiewaarden Deze wa...

Page 36: ...i testo contrassegnate con questo simbolo AVVERTENZA Leggere le istruzioni per l uso al fine di ridurre il rischio di lesioni AVVERTENZA Leggere tutte le avvertenze di pericolo le istruzioni operative...

Page 37: ...e anche agli ostacoli coperti che potrebbero bloccare la lama 4 4 Utilizzo Utilizzare l apparecchio solo alla luce del giorno o con una buona luce artificiale Evitare di utilizzare la macchina sull er...

Page 38: ...contatto con tali liquidi In caso di contatto accidentale sciacquare accuratamente con acqua Rivolgersi immediatamente al medico qualora il liquido dovesse entrare in contatto con gli occhi Il liquid...

Page 39: ...zare come impugnatura 8 La freccia indica il senso di rotazione degli utensili di taglio 9 Troncatore filo AVVERTENZA Pericolo di lesioni a causa del tagliente affilato 10 Carter di protezione 11 Test...

Page 40: ...rnita in dotazione 6 5 Applicare l impugnatura AVVERTENZA La distanza minima tra l impugnatura e l estremit inferiore dell asta deve essere quella indicata in fig E F FSD 36 18 LTX BL 40 fig E 1 Scegl...

Page 41: ...fficina specializzata Conservare la macchina in un luogo asciutto Assicurarsi che i bambini non possano avvicinarsi alla macchina FSB 36 18 LTX BL 40 Per trasportare o depositare la macchina in modo d...

Page 42: ...alogo Le eventuali riparazioni degli elettroutensili devono essere eseguite esclusivamente da elettricisti specializzati e utilizzando soltanto ricambi originali Nel caso di elettroutensili Metabo che...

Page 43: ...rare le pause di lavoro e le fasi di carico ridotto Basandosi su valori stimati e opportunamente adattati stabilire misure di sicurezza idonee per l utilizzatore ad es di carattere organizzativo Valor...

Page 44: ...as sobre prevenci n de accidentes y las indicaciones de seguridad Por su propia protecci n y la de su herramienta el ctrica preste especial atenci n a los puntos de texto marcados con este s mbolo ADV...

Page 45: ...amiento o bloqueo conlleva una parada abrupta de la cuchilla A su vez se genera una aceleraci n incontrolada de la m quina en sentido contrario al del giro de la cuchilla en el punto de bloqueo Aseg r...

Page 46: ...ejos de sujetapapeles monedas llaves clavos tornillos u otras piezas peque as que pueden causar un puenteo de los contactos El cortocircuito de los contactos de la bater a puede causar quemaduras o un...

Page 47: ...as Lleve calzado de protecci n antideslizante No emplee hojas de sierra de metal P ngase guantes Cuidado con el contragolpe Cuidado con las piezas que salgan disparadas V ase p gina 2 y 3 1 Barra form...

Page 48: ...suministrada 21 en el orificio 22 Gire manualmente el eje de accionamiento 23 hasta que la barra 21 encaje y el eje de accionamiento no se pueda girar m s 2 Coloque la cuchilla 24 el disco 25 y la ta...

Page 49: ...N Saque la bater a 14 La puesta en marcha involuntaria puede causar lesiones graves La m quina debe estar parada ATENCI N Peligro de lesi n por bordes de corte afilados en los cortadores de hilo 9 y l...

Page 50: ...plazo N de pedido 628432000 B Cuchilla para c sped 4 hojas 254 mm incl cubierta protectora N de pedido 628433000 C Hilos de corte 2 mm como reemplazo N de pedido 628430000 D Cabezal de hilos completo...

Page 51: ...de 0 C a 40 C Corriente continua Las especificaciones t cnicas aqu indicadas est n sujetas a rangos de tolerancia conforme a las normas vigentes Valores de emisiones Estos valores permiten evaluar la...

Page 52: ...eitar sempre as normas de preven o de acidentes e as indica es de seguran a gerais aplic veis Para a sua pr pria prote o e para prote o da sua ferramenta el trica respeite as partes do texto identific...

Page 53: ...amento ou o bloqueio provocam a paragem repentina da l mina em rota o Atrav s disso a m quina descontrolada acelerada na zona de bloqueio no sentido de rota o contr rio ao da m quina Adote sempre um p...

Page 54: ...provocar ferimentos e perigo de inc ndio Quando a bateria n o estiver a ser utilizada mantenha a afastada de agrafos moedas chaves pregos parafusos ou outros objetos met licos pequenos que possam liga...

Page 55: ...te o para a cabe a caso exista o risco de queda de pe as Utilizar prote es para cal ado antiderrapantes N o utilizar l minas de serra met licas Usar luvas Tenha aten o aos contragolpes Tenha aten o pr...

Page 56: ...mento 23 introduzir a barra 21 juntamente fornecida no furo 22 Rodar o veio de acionamento 23 manualmente at a barra 21 engatar e deixar de ser poss vel rodar o veio de acionamento 2 Colocar a l mina...

Page 57: ...VISO Retirar as baterias 14 O arranque acidental pode provocar ferimentos graves A m quina dever estar imobilizada AVISO Perigo de ferimentos devido aresta de corte afiada no cortador de fio 9 e na l...

Page 58: ...54 mm inclui cobertura de prote o N de pedido 628433000 C Fio de corte 2 mm para substitui o N de pedido 628430000 D Cabe a do fio completa caixa completa com bobina e fio de corte para substitui o N...

Page 59: ...ndividuais v lidos Valores da emiss o Estes valores possibilitam a avalia o de emiss es da ferramenta el trica e a compara o com diversas ferramentas el tricas Consoante as condi es de utiliza o o est...

Page 60: ...or VARNING L s alla s kerhetsvarningar instruktioner illustrationer och specifikationer som medf ljer detta elverktyg Fel som uppst r till f ljd av att instruktionerna nedan inte f ljts kan orsaka els...

Page 61: ...mpliga kroppsst llningar Det r viktigt att st stadigt och att alltid h lla j mvikten s rskilt vid sluttningar Se till att st stadigt Sl pp genast brytaren 6 om du tappar balansen Se till att ha r tt a...

Page 62: ...teriet och tar upp eller b r maskinen Om du b r maskinen med fingret p brytaren eller ansluter p kopplad maskin till n tstr mmen finns risk f r olycka Ta ut batteripaketen ur maskinen innan inst llnin...

Page 63: ...rivaxeln 23 stick in den medlevererade pinnen 21 i h let 22 Vrid drivaxeln 23 f r hand tills pinnen 21 hakar fast och drivaxeln inte l ngre kan rotera 2 Skruva fast tr dhuvudet 29 moturs s som visas o...

Page 64: ...4 Montera handtaget i en bekv m position Se kapitlet 6 5 7 2 Starta maskinen ndra varvtal 1 H ll fast maskinen ordentligt med h ger hand p handtaget 4 och v nster hand p handtag 2 FSD 36 18 LTX BL 40...

Page 65: ...et bullrig Trimmertr den r f r kort Justera trimmertr den se kapitel 7 5 Alla lysdioder f r kapacitets och signalindikering 15 blinkar verbelastning L t maskinen svalna R r dig fram t i l ngsammare ta...

Page 66: ...bredd H max l ngd p trimmertr d HX diameter trimmertr d n0 varvtal vid tomg ng m vikt med minsta batteriet M tv rdena r uppm tta enligt EN ISO 11806 1 EN 60335 1 EN 50636 2 91 Till ten omgivningstempe...

Page 67: ...Lue kaikki t m n s hk ty kalun mukana toimitetut turvallisuusohjeet muut ohjeet kuvat ja tekniset tiedot Alla esitettyjenohjeidennoudattamisen laiminly nti voi aiheuttaa s hk iskun tulipalon ja tai v...

Page 68: ...ineill l k yt s hk ty kalua jos olet v synyt tai huumeiden alkoholin tai l kkeiden vaikutuksen alaisena Hetken tarkkaamattomuus s hk ty kalua k ytett ess voi aiheuttaa vakavia tapaturmia K yt aina muk...

Page 69: ...mp tila voi synnytt r j hdyksen Noudata kaikkia latausohjeita l koskaan lataa akkua tai akkuty kalua k ytt ohjeessa ilmoitetusta l mp tila alueesta poiketen Virheellinen lataus tai lataus ohjeiden vas...

Page 70: ...24 aiheuttavat tapaturmavaaran K yt suojak sineit 6 1 Suojuksen 10 kiinnitt minen kuva B VAROITUS Siimankatkaisimen 9 ter v leikkuureuna aiheuttaa tapaturmavaaran K yt suojak sineit 1 Ripusta suojus 1...

Page 71: ...OITUS Ennen akun irrottamista tai liitt mist Kytke kone pois p lt ja odota niin kauan ett moottori on pys htynyt Liitt minen Ty nn akku 14 lukittumiseen asti sis n Irrottaminen Paina akun lukituksen a...

Page 72: ...vittaessa ammattihuoltoliikkeen korjata se Kirist kaikki kiinnitykset ja suojukset tiukkaan Puhdista kone kuivalla liinalla l k yt vett l miss n tapauksessa yrit itse korjata vaurioituneita akkuja Akk...

Page 73: ...n ker tt v erik seen ja toimitettava ymp rist s st v n kierr tykseen Ennen kuin viet akun kierr tyspisteeseen tyhjenn akun lataus s hk ty kalussa Varmista koskettimet oikosululta esim erist teipill Se...

Page 74: ...kser illustrasjoner og tekniske data som f lger med dette elektriske verkt yet Manglende overholdelse av anvisningene nedenfor kan medf re elektrisk st t brann og eller alvorlige personskader Oppbevar...

Page 75: ...der i en skr ning S rg for st st tt Hvis du mister balansen m du slippe bryter 6 med en gang V r n ye med arbeidsstillingen din ta hvilepauser og skift posisjon F r maskinen kun i gangfart I bakker m...

Page 76: ...der fingeren p bryteren n r du b rer maskinen eller kobler maskinen til str mforsyningen i innkoblet tilstand kan dette f re til ulykker Ta batteripakken ut av maskinen f r alle former for innstilling...

Page 77: ...23 for h nd til staven 21 g r i inngrep og akselen ikke lenger kan dreies 2 Skru p snorhodet 29 i retning mot klokken slik det vises og trekk til for h nd 3 L sne drivakselen Trekk ut staven 21 Demont...

Page 78: ...old fast i skrittbegrenseren 7 2 Trykk inn sperreknappen 5 og hold den inne 3 Trykk inn bryteren 6 for sl p Hastigheten forandres ved trykke 7 3 Stopp maskinen Slipp bryteren 6 Hold maskinen i h ndtak...

Page 79: ...rter ikke Batterieffekten er for svak Lad opp batteriet Maskinen vibrerer kraftig Kniven 24 er ikke balansert eller den er slitt Skift kniver 24 Kappesnoren 16 er ikke like lang p begge sider Etterjus...

Page 80: ...med minste batteri m leverdier i henhold til EN ISO 11806 1 EN 60335 1 EN 50636 2 91 Tillatt omgivelsestemperatur ved bruk 20 C til 50 C begrenset ytelse ved temperaturer under 0 C Tillatt omgivelsest...

Page 81: ...EL l s brugsvejledningen for at reducere risikoen for personskader ADVARSEL L s alle sikkerhedsanvisninger instruktioner illustrationer og specifikationer som f lger med el v rkt jet I tilf lde af man...

Page 82: ...kinen n r gr sset er v dt Anvend ikke buskrydderen i d rligt vejr is r ikke ved fare for tordenvejr Dette neds tter risikoen for at blive ramt af lynet Hold ventilations bningerne frie for fremmedlege...

Page 83: ...ksplosion eller fare for personskade Batterier m ikke uds ttes for ild eller for h je temperaturer Ild eller temperaturer over 130 C 265 F kan medf re eksplosion F lg alle instruktioner for opladning...

Page 84: ...9 Tr dhoved 30 Skruer p h ndtaget 31 Vingeskrue 32 H ndtagstang 33 Kabelholder 34 Skuldersele 35 Karabinhage afh ngigt af udstyr ADVARSEL Sluk maskinen og tag batteripakken 14 ud Utilsigtet start kan...

Page 85: ...3 og ladetilstanden vises med lysdioderne 15 Blinker en lysdiode er batteriet n sten fladt og skal genoplades Inds ttelse fjernelse af batteripakke ADVARSEL Inden batteripakken fjernes eller is ttes S...

Page 86: ...rme korrekt Reng r maskinen med en t r klud Undg brugen af vand Beskadigede batterier m aldrig vedligeholdes De genopladelige batterier m kun repareres af producenten eller autoriserede reparat rer 9...

Page 87: ...nal lovgivning skal brugte el v rk t jer indsamles adskilt og afleveres milj rigtigt til genbrug Aflad batteriet i el v rkt jet f r det bortskaffes Beskyt kontakterne mod kortslutning isoler f eks med...

Page 88: ...nik Przestrzega og lnie obowi zuj cych przepis w BHP oraz uwag dotycz cych bezpiecze stwa Dla bezpiecze stwa u ytkownika oraz w celu ochrony elektronarz dzia zwr ci szczeg ln uwag na miejsca w tek cie...

Page 89: ...u urz dzeniami poprosi o pomoc osob posiadaj c takie do wiadczenie 4 3 Odrzut Odrzut jest gwa town reakcj spowodowan zahaczeniem lub zablokowaniem wiruj cej tarczy tn cej 24 Zahaczenie lub zablokowani...

Page 90: ...stosowanej do adowania okre lonego rodzaju akumulator w w spos b niezgodny z przeznaczeniem istnieje niebezpiecze stwo po aru W elektronarz dziach stosowa wy cznie przewidziane do tego celu akumulator...

Page 91: ...roni urz dzenie przed wilgoci Nie nara a na dzia anie deszczu Nosi ochron oczu Nosi ochronniki s uchu Oddzia ywanie wysokiego poziomu ha asu mo e spowodowa uszkodzenie s uchu Je li istnieje niebezpiec...

Page 92: ...nie zdejmowanie tarczy tn cej rys D Zak adanie 1 Zablokowa wa ek nap dowy 23 Wsun dostarczony pr t 21 do otworu 22 Obraca wa ek nap dowy 23 r k do momentu a pr t 21 si zatrza nie i nie b dzie mo na da...

Page 93: ...icy nie ma ju y ki tn cej patrz rozdzia 6 3 OSTRZE ENIE Wyj akumulatory 14 Niezamierzony rozruch mo e spowodowa ci kie obra enia Maszyna musi by nieruchoma OSTRZE ENIE Niebezpiecze stwo zranienia ostr...

Page 94: ...i osprz t Metabo lub CAS Cordless Alliance System Stosowa wy cznie osprz t kt ry spe nia wymagania i parametry okre lone w niniejszej instrukcji obs ugi A Tarcza tn ca 3 ostrza 255 mm z os on zabezpi...

Page 95: ...temperatura otoczenia podczas adowania od 0 C do 40 C Pr d sta y Zamieszczone dane techniczne podlegaj tolerancji odpowiednio do obowi zuj cych standard w Warto ci emisji Warto ci te umo liwiaj oszac...

Page 96: ...el 96 1 2 3 6 2000 14 VI 4 LWA G 5 4 1 2 3...

Page 97: ...el 97 4 1 4 2 4 3 24 4 4 6 4...

Page 98: ...el 98 4 5 4 6 130 C 265 F...

Page 99: ...el 99 Li Ion UN 3480 UN 3481 Metabo 4 7 15 m 2 3 1 2 5...

Page 100: ...1 12 13 14 15 16 17 18 19 20 21 22 23 24 25 26 27 28 29 30 31 32 33 34 35 14 9 24 6 1 10 B 9 1 10 19 2 20 6 2 29 C 1 23 21 22 23 21 2 29 3 21 6 3 16 29 A 1 18 17 2 16 LINE IN A 3 4 18 17 13 cm 5 1 9 6...

Page 101: ...18 LTX BL 40 E 1 7 1 2 2 1 30 FSB 36 18 LTX BL 40 F 1 7 1 2 32 1 31 3 33 6 6 Metabo Li Ion 15 13 LED 15 LED 14 12 14 7 1 G 1 34 35 2 3 3 3 11 4 6 5 7 2 1 4 2 FSD 36 18 LTX BL 40 7 2 5 3 6 7 3 6 7 4 1...

Page 102: ...el 102 14 9 24 8 1 8 2 FSB 36 18 LTX BL 40 32 31 90 31 14 9 24 9 1 9 2 6 3 11 9 3 24 24 180 9 4 15 7 5 15 8 9 10...

Page 103: ...6253670004 0 Ah LiHD 6253680005 5 Ah LiHD 6253690008 0 Ah LiHD 62554900010 0 Ah LiHD 625591000 4 0 Ah Li Ion 625592000 5 2 Ah Li Ion F ASC 55 ASC 145 ASC 145 Duo www metabo com Metabo Metabo www meta...

Page 104: ...el 104 ah Kh LpA LWA KpA KWA LWA G 2000 14...

Page 105: ...mal jel lt sz vegr szekben foglaltakat FIGYELMEZTET S A s r l svesz ly cs kkent se rdek ben olvassa el a haszn lati tmutat t FIGYELMEZTET S Olvassa el az ehhez a k ziszersz mhoz mell kelt sszes bizton...

Page 106: ...er sen mindk t markolattal s ker lje el a penge elakad s t vagy blokkol s t Figyeljen a rejtett akad lyokra amik a k s blokkol s t okozhatj k 4 4 zemel s A g pet csak nappali f nyben vagy j mesters ge...

Page 107: ...lyad kkal Ha v letlen l m gis rintkez sbe ker lt az akkumul torfolyad kkal azonnal bl tse le v zzel az rintett fel letet Ha a folyad k a szem be jutott keressen fel ezen k v l egy orvost A kil p akkum...

Page 108: ...6 18 LTX BL 40 l p shat rol ne haszn lja markolatk nt 8 A ny l jelzi a v g szersz mok forg sir ny t 9 sz lv g FIGYELMEZTET S S r l svesz ly az les v g lek miatt 10 v d burkolat 11 v g fej 12 akkuegys...

Page 109: ...t s a r d als v ge k z tti t vols gnak legal bb az E F br n megadott rt knek kell lennie FSD 36 18 LTX BL 40 E bra 1 V lassza ki a megfelel poz ci t l sd a 7 1 fejezetet 2 A markolatot 2 az bra szerin...

Page 110: ...T rolja a g pet egy sz raz helyen Gy z dj n meg arr l hogy gyermekek ne f rhessenek a g p k zel be FSB 36 18 LTX BL 40 A helytakar kos sz ll t shoz vagy t rol shoz a markolatr d 32 a sz rnyascsavar ki...

Page 111: ...szersz m jav t s t csak villamos szakember v gezheti el s csak eredeti alkatr szek felhaszn l s val A jav t sra szorul Metabo elektromos k ziszersz mokkal k rj k forduljon Metabo szakkeresked j hez A...

Page 112: ...y kisebb is lehet A becsl shez vegye figyelembe a munkasz neteket s az alacsonyabb k rnyezeti terhel ssel j r f zisokat is A megfelel en alkalmazott becs lt rt kek alapj n rjon el v d int zked seket a...

Page 113: ...ru 113 1 2 3 6 2000 14 E VI 4 LWA G 5 4 1 2 3...

Page 114: ...ru 114 4 1 4 2 4 3 24 4 4 4...

Page 115: ...ru 115 6 4 5 4 6...

Page 116: ...ru 116 130 C 265 F UN 3480 UN 3481 Metabo 4 7 15...

Page 117: ...2 3 4 5 6 7 FSD 36 18 LTX BL 40 8 9 10 11 12 13 14 15 16 17 18 19 20 21 22 23 24 25 26 27 28 29 30 31 32 33 34 35 14 9 24 6 1 10 9 1 10 19 2 20 6 2 29 1 23 21 22 23 21 2 29 3 21 6 3 16 29 1 18 17 2 1...

Page 118: ...1 22 23 21 2 24 25 26 25 D 27 28 3 21 27 28 6 5 E F FSD 36 18 LTX BL 40 E 1 7 1 2 2 1 30 FSB 36 18 LTX BL 40 F 1 7 1 2 32 1 31 3 33 6 6 Metabo 15 13 15 14 12 14 7 1 G 1 34 35 2 3 3 3 11 4 6 5 7 2 1 4...

Page 119: ...ru 119 7 4 11 11 7 5 29 3 9 14 14 17 6 3 14 9 24 8 1 8 2 FSB 36 18 LTX BL 40 32 90 31 31 14 9 24 9 1 9 2 6 3 11 9 3 24 24 180 9 4 8 9...

Page 120: ...254 628433000 C 2 628430000 D 628429000 E 6253670004 0 A LiHD 6253680005 5 A LiHD 6253690008 0 A LiHD 62554900010 0 A LiHD 6255910004 0 A Li Ion 6255920005 2 A Li Ion F ASC 55 ASC 145 ASC 145 Duo www...

Page 121: ...n0 m EN ISO 11806 1 EN 60335 1 EN 50636 2 91 20 C 50 C 0 C 0 C 30 C 0 C 40 C ah Kh LpA LWA KpA KWA LWA G 2000 14 EG EAC Text Metabowerke GmbH Metaboallee 1 D 72622 Nuertingen 127273 5 7 106 7 495 980...

Page 122: ......

Page 123: ......

Page 124: ...Metabowerke GmbH Metabo Allee 1 72622 Nuertingen Germany www metabo com 170 27 6560 0221...

Reviews: