ENGLISH
en
17
- insert the supplied rod (21) into the drilled hole
(22).
- Turn the drive shaft (23) by hand until the rod
(21) engages and the drive shaft cannot be
turned anymore.
2. As show, position the blade (24), disc (25) and
clamping cap (26) . WARNING! Place the disc
(25) in the correct position (see fig. D)! Screw on
the clamping nut (27) in anti-clockwise direction
and firmly tighten using the supplied
combination wrench (28).
3. Release the drive shaft:
Removal
Proceed in the same way as for fitting, however
unscrew the clamping nut (27) with the supplied
combination wrench (28) in clockwise direction.
6.5 Attaching the handle
WARNING! The distance from the handle to
the lower end of the rod must be at least the
value shown in fig. E / F.
FSD
36-18 LTX BL 40
(fig. E)
:
1. Choose the right position, see chapter 7.1.
2. Attach handle (2) as shown to the rod (1) and
firmly tighten the screws (30) .
FSB
36-18 LTX BL 40
(fig. F)
:
1. Choose the right position, see chapter 7.1.
2. Attach the handle bar (32) as shown to the rod
(1). Set the desired position and angle and firmly
tighten the wing screws (31) .
3. Press the cable into the cable holder (33) and let
it engage.
6.6 Battery pack
Charge the battery pack before use.
Recharge the battery pack if performance
diminishes.
Instructions on charging the battery pack can be
found in the operating instructions of the Metabo
charger.
In case of Li-Ion battery packs with capacity and
signal display (15) (equipment-specific):
- Press the button (13); the LEDs indicate the
charge (15) level.
- The battery pack is almost flat and must be
recharged if one LED is flashing.
Inserting and removing the battery pack
WARNING! Before removing or inserting the
battery pack: Switch off the machine and wait
until the motor is at a standstill.
Insertion: Slide in the battery packs (14) until they
engage.
Removal: Press the battery pack release button
(12) and pull out the battery packs (14).
WARNING! Wear protective goggles during
operation.
7.1 Setting the machine for the user (fig. G)
1. Tighten the shoulder strap (34) . Adjust the
length in such a way that the carabiner hook (35)
is about a hand width below the hip.
2. Hook in carabiner hook from the suspension
point (3).
3. Balance the machine:
- Loosen the screw of the suspension point (3).
- Move the suspension point in such a way that
the cutting head (11) rests slightly on the
ground when balanced.
- Tighten again the screw of the suspension point
4. Attach the handle in a comfortable position. See
7.2 Start the machine, modify the speed
1. Firmly hold the machine with the right hand on
the handle (4) and with the left hand on the
handle (2) . FSD 36-18 LTX BL 40: Do not hold
2. Press and keep pressed the switch lock (5) .
3. Press the switch (6) to start up. The speed can
be changed by depressing the switch.
7.3 Stopping the machine
Release the switch (6) . Hold the machine by the
handles with both hands and wait until the machine
has come to a complete standstill.
7.4 Mowing
Always guide the cutting head (11) close to the
ground. More the cutting head (11) evenly back and
forth. Walk forward slowly and carefully.
7.5 Readjust the cutting line
With the machine
running
, briefly tap the line head
(29) onto the ground: About 3 cm of line is
readjusted. A line that is too long is automatically cut
off by the line cutter (9) .
If the lines break off directly at the line head or are
too short, they must be pulled out by hand:
WARNING! Remove the battery packs (14) .
Unintentional startup can cause serious
injuries. The machine must be stationary.
- Switch off the machine, allow the motor to come to
a standstill, remove battery packs (14).
- Press and keep pressed the cap (17).
- Pull out lines by hand.
- If the cutting line is used up: see chapter 6.3.
WARNING! Remove the battery packs (14) .
Unintentional startup can cause serious
injuries. The machine must be stationary.
WARNING! Danger of injury from sharp
cutting edge on the line cutter (9) and on the
blade (24). Wear protective gloves.
8.1 Cleaning
• Clean after each use: Remove grass clippings,
leaves, dirt and other deposits.
7. Use
8. Cleaning, transporting,
storage
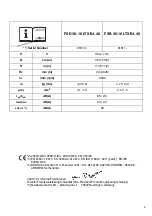
Summary of Contents for FSB 36-18 LTX BL 40
Page 96: ...el 96 1 2 3 6 2000 14 VI 4 LWA G 5 4 1 2 3...
Page 97: ...el 97 4 1 4 2 4 3 24 4 4 6 4...
Page 98: ...el 98 4 5 4 6 130 C 265 F...
Page 99: ...el 99 Li Ion UN 3480 UN 3481 Metabo 4 7 15 m 2 3 1 2 5...
Page 104: ...el 104 ah Kh LpA LWA KpA KWA LWA G 2000 14...
Page 113: ...ru 113 1 2 3 6 2000 14 E VI 4 LWA G 5 4 1 2 3...
Page 114: ...ru 114 4 1 4 2 4 3 24 4 4 4...
Page 115: ...ru 115 6 4 5 4 6...
Page 116: ...ru 116 130 C 265 F UN 3480 UN 3481 Metabo 4 7 15...
Page 122: ......
Page 123: ......
Page 124: ...Metabowerke GmbH Metabo Allee 1 72622 Nuertingen Germany www metabo com 170 27 6560 0221...


