15
ENGLISH
B
Changing the direction of rota-
tion!
(3-phase models only)
Depending on the phase sequence, it
is possible that the electric motor will
turn in the wrong direction. If the elec-
tric motor turns in the wrong direc-
tion, the splitting knife cannot be
operated. In this case the phase
changer setting must be changed:
1.
Install splitter ready for work and
connect it to the power suply.
2.
To check for this condition, start the
splitter (press the GREEN switch
button) – if the splitting knife does
not move, turn the splitter OFF
(press RED switch button).
3.
Unplug the power cable at the split-
ter.
4.
Using a flat-bladed screwdriver,
push the phase changer inside the
splitter's plug down and turn it 180
q
.
A
Caution!
Do not attempt to turn the phase
changer at the contact pins!
5.
Turn the splitter ON again– The
splitting knife will automatically
travel upwards.
Please take note of the following
safety information before operating
the splitter!
Also follow the safety instructions
given at the beginning of this manual!
A
Hazard generated by machine
defects!
Before starting any work, check to see
that the following are in proper working
order:
x
Inspect hydraulic lines for damage.
Check for any leaking hydraulic oil.
x
Check operating levers for damage.
Check to see that the operating
levers move freely and fully return to
their upper position.
x
Power cable, power cable plug and
switch (if damaged, have replaced
by a qualified electrician)
A
Hazard generated by insuffi-
cient personal protection gear!
x
Wear suitable work clothing, provid-
ing protection against falling logs.
x
Wear hearing protection.
x
Wear protective spectacle.
x
Wear non-slip safety shoes.
A
Risk of personal injury and
crushing by moving parts!
x
Do not operate splitter without
installed safety guards.
When the splitter is turned on, the
splitting knife immediately rises auto-
matically into its uppermost position.
Be sure that there is about 1 meter of
clearance above the splitting knife.
x
Keep sufficient distance to driven
components when operating the
splitter.
x
Do not hold the log to be split with
your hands. Hold with the the oper-
ating levers' claws only.
x
Always operate the splitting knife
with both hands on the operating
levers.
x
Always assume a proper, safe work
position:
at the front on the operator side
directly in front of the splitter
A
Danger of injury due to unex-
pected, sudden movement of the log
being split!
x
Only split one lög at a time.
x
Make sure of the correct table posi-
tion for the respective log length:
Uppermost table position:
up to 59 cm log length
Centre table position:
up to 78 cm log length
Centre table position:
up to 104 cm log length
x
Always position the log vertically on
the support table.
x
Always split a log lengthwise, in the
same direction the wood fibers run.
x
Logs with branch stubs can be very
difficult to split (irregular cross-grain
structure. If a log gets caught on the
splitting knife, turn the splitter OFF
before attempting to free it. When
removing a stuck log, do not reach
into the area between it and the
table. After freeing the log, do not try
to split it again in the same place.
Try splitting it again in another
place.
6.1
Splitting
1.
Open oil reservoir cap one full turn,
until the air can escape from the res-
ervoir.
3
Note:
At low temperatures the splitter
should be running idle for at least
15 minutes.
The hydraulic oil has then warmed up to
operating temperature, you can now
start splitting logs.
2.
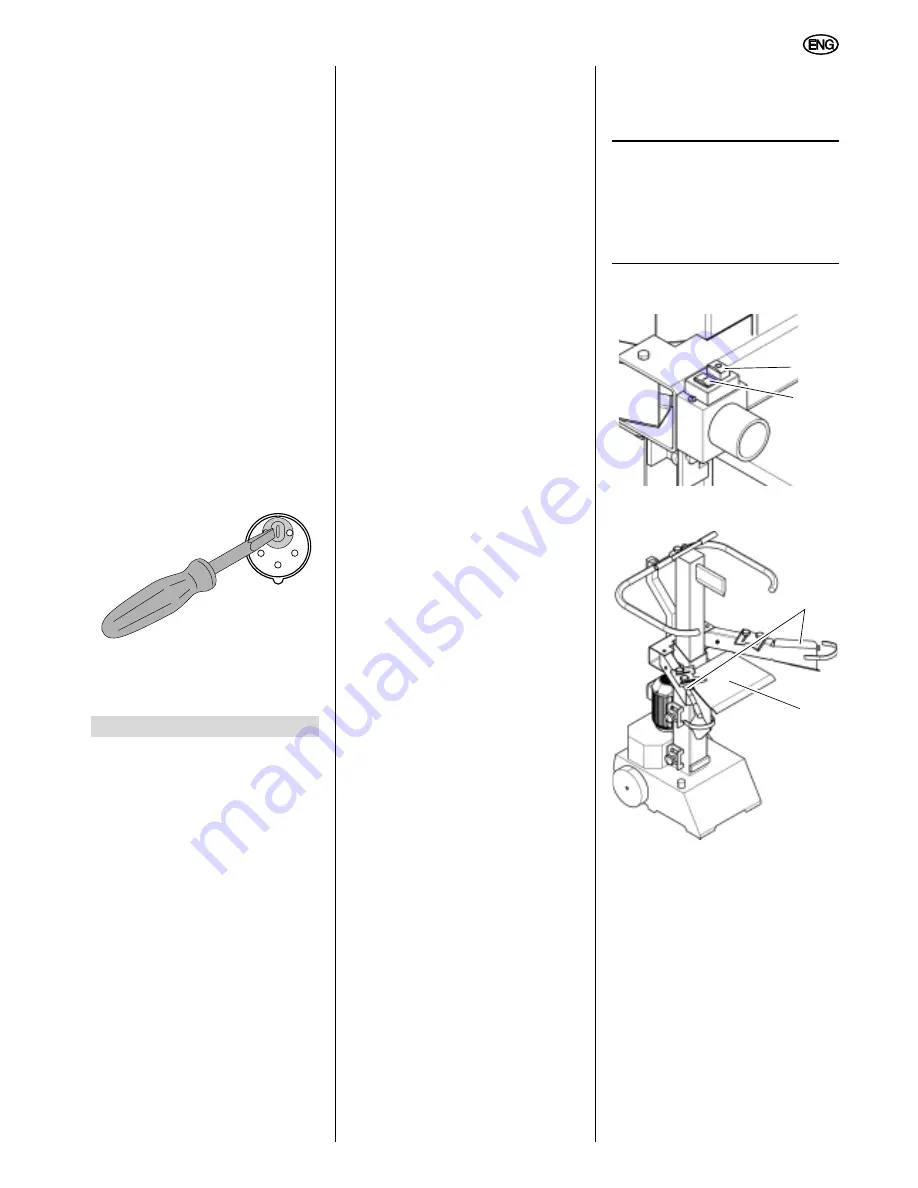
Start the splitter – by pressing the
GREEN switch button
(25)
.
3.
Place a log vertically on the support
table
(27)
.
4.
Hold log in place with the claws on
the operating levers
(26)
.
5.
Move the operating levers.
Movement of the splitting knife is
controlled by the two operating
levers. There are three possible
actions:
Press both operating levers
downward – The work cycle
starts, and the splitting knife
moves downward to split the log.
Press only one operating lever
downward – The splitting knife
stops.
Release both operating levers –
The splitting knife moves back
upward to its starting position.
6.
Operation
24
25
26
27


