background image

ENGLISH

7

ENG

and the instructions. Keep all enclosed documen-
tation for future reference, and pass on your power 
tool only together with this documentation.

For your own protection and for the 
protection of your power tool pay 
attention to all parts of the text that 
are marked with this symbol!

Pull the plug out of the plug socket before any 
adjustments or servicing are performed.

Always work with the additional handle correctly 
installed.

A damaged or cracked additional handle must be 
replaced. Never operate a machine with a defec-
tive additional handle.

Always hold the machine with both hands using 
the handles provided, stand securely and concen-
trate.

Always wear protective goggles, gloves, a dust 
mask and sturdy shoes when working with this 
tool.

Always work with the tool attached correctly. Pull 
on the tool to check that it is seated correctly. (It 
must be possible to move the tool a few centime-
tres in an axial direction.)

When working above ground level, make sure that 
the area underneath is free.

Do not touch the tool or parts close to the tool 
immediately after stopping work because they 
may still be extremely hot and could cause skin 
burns.

Always lay the power cable away from the back of 
the machine.

SYMBOLS ON THE TOOL:

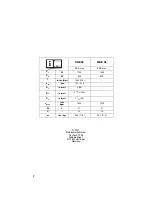
.... Class II Construction

V........ volts
A........ amperes
Hz...... hertz
W....... watts
BPM .. beat per minute

~

....... alternating current

n

0

...... no load speed

rpm ... revolutions per minute

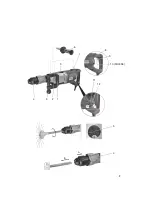
See page 3.

1 Bow handle

2 Front thread for additional handle

3 Clamping knob

4 Tool lock

5 Switch button

6 Additional handle

7 Rear thread for additional handle

8 Metabo VibraTech (MVT): integrated damping 

system

9 Trigger

10 Locking button for continuous activation *

11 Carbon brush service indicator (lamp signal 

for pending carbon brush change)

12 Adjusting wheel for setting the impact force 

and speed

* model-dependent

• Three rubber handles provide flexible grip in any 

working position

• Metabo VibraTech (MVT): integrated damping 

system in the bow and additional handles for 
reduced vibrations and less stress on the hands

• Additional handle can be attached to the 

housing at 3 different points

• Adjusting wheel for setting the impact force and 

speed. For working on softer materials such as 
brick.

• Lockable switch for convenient operation 

during continuous chiselling 

• Electronic smooth start-up for precision drilling
• Die cast aluminium gear housing for optimum 

heat dissipation and stability

• Service indicator for signalling pending carbon 

brush changes

 Before plugging in, check to see that the 
rated mains voltage and mains frequency, 

as stated on the rating label, match with your 
power supply.

Always use an extension cable with a minimum 
diameter of 1.5 mm

2

. The extension cable must be 

suitable for the machine power rating (see Tech-
nical Specifications). If using a roll of cable, always 
roll up the cable completely.

6.1

Assembly of the additional handle

For safety reasons, always use the bow 
handle  (1) or additional handle (6) 

supplied.

MHE 96 and KHE 96:

Release the clamping ring by turning the clamping 
knob (3) anticlockwise. Adjust the bow handle (1) 
to the required position and angle. Tighten the 
clamping knob.

4

Functional Description

5

Special Product Features

6

Commissioning

Summary of Contents for KHE 96

Page 1: ...Operating Instructions page Mode d emploi page Instrucciones de manejo p gina Instru es de servi o p gina 5 10 16 22 170 26 8590 1007 Made in Germany MHE 96 KHE 96...

Page 2: ...W 850 800 T in lbs Nm 1062 120 n0 min 125 250 D1 in mm 2 50 D2 in mm 5 29 32 150 D3 in mm 3 5 32 80 smax min bpm 1950 1950 W J 27 27 C 16 16 m lbs kg 26 0 11 8 24 3 11 0 14 2007 Metabowerke GmbH Postf...

Page 3: ...3 1 2 3 4 4 5 5 6 7 8 9 10 MHE 96 12 11 b a _...

Page 4: ...4 A B 6 31800 MHE 96 KHE 96 etc etc...

Page 5: ...invite accidents b Do not operate power tools in explosive atmospheres such as in the presence of flammable liquids gases or dust Power tools create sparks which may ignite the dust or fumes c Keep ch...

Page 6: ...is dangerous and must be repaired c Disconnect the plug from the power source and or the battery pack from the power tool before making any adjustments changing accessories or storing power tools Such...

Page 7: ...button 6 Additional handle 7 Rear thread for additional handle 8 Metabo VibraTech MVT integrated damping system 9 Trigger 10 Locking button for continuous activation 11 Carbon brush service indicator...

Page 8: ...operating mode 7 3 Adjusting the chisel position The chisel can be secured in 16 different positions Insert the chisel Turn the switch button 5 to position Turn the chisel to the required position Tu...

Page 9: ...range of accessories see www metabo com or the main catalogue Repairs to electrical tools must be carried out by qualified electricians ONLY Any Metabo power tool in need of repair can be sent to one...

Page 10: ...ult rieurement Le terme outil dans les avertissements fait r f rence votre outil lectrique aliment par le secteur avec cordon d alimentation ou votre outil fonctionnant sur batterie sans cordon d ali...

Page 11: ...des blessures de personnes e Ne pas se pr cipiter Garder une position et un quilibre adapt s tout moment Cela permet un meilleur contr le de l outil dans des situations inattendues f S habiller de ma...

Page 12: ...alimentation de la prise de courant avant toute op ration de r glage ou de maintenance Toujours travailler avec la poign e suppl mentaire correctement install e Une poign e suppl mentaire endommag e o...

Page 13: ...serrage en tournant le bouton de serrage vers la gauche 3 La poign e suppl mentaire 1 peut tre fix e dans la position souhait e et l angle voulu Serrer le bouton de serrage vigoureusement KHE 96 Pour...

Page 14: ...ppuyer de nouveau sur la g chette 9 puis rel cher Lorsque l outil est en position de marche continue il continue de tourner s il chappe des mains Afin d viter tout compor tement inattendu de l outil l...

Page 15: ...de grandes quantit s de mati res premi res et de mati res plastiques de grande qualit pouvant tre galement recycl es Ce mode d emploi est imprim sur du papier blanchi sans chlore Commentaires sur les...

Page 16: ...a el ctrica empleado en las siguientes instrucciones se refiere a su aparato el ctrico port til ya sea con cable de red o sin cable en caso de ser accionado por acumulador 1 Puesto de trabajo a Manten...

Page 17: ...l ctrica sujet ndola por el interruptor de conexi n desconexi n o si introduce el enchufe en la toma de corriente con el aparato conectado puede dar lugar a un accidente d Retire las herramientas de a...

Page 18: ...documentos para referencia en el futuro y solamente entregue su herramienta junto con estos documentos Para su propia protecci n y la de su herramienta el ctrica observe las partes marcadas con este...

Page 19: ...a consulte las especificaciones t cnicas En caso de utili zarse un enrollador de cable desenrolle siempre el cable por completo 6 1 Montaje de la empu adura comple mentaria Por razones de seguridad ut...

Page 20: ...cilla en la letra G potencia m xima 7 5 Conexi n y desconexi n Funcionamiento instant neo MHE 96 KHE 96 Pulsar el interruptor 9 de la herramienta para ponerla en marcha Para pararla soltar el interrup...

Page 21: ...para su reparaci n una descripci n de la anomal a determinada Los envases Metabo son 100 reciclables Las herramientas el ctricas y sus accesorios fuera de uso contienen grandes cantidades de materia p...

Page 22: ...entas el ctricas com conex o a rede com cabo e a ferramentas el ctricas operada a pilhas sem cabo 1 Seguran a na rea de trabalho a Mantenha a sua rea de trabalho limpa e bem iluminada Desordem ou reas...

Page 23: ...mpre o equil brio Desta forma poder ser mais f cil controlar a ferramenta el ctrica em situa es inesperadas f Use roupa apropriada N o use roupa larga ou j ias Mantenha o cabelo roupa e luvas afastada...

Page 24: ...s marcadas com o s mbolo Antes de iniciar qualquer manuten o ou ajuste puxe a ficha da tomada da rede Trabalhe somente com o punho adicional devida mente montado O punho suplementar danificado ou rach...

Page 25: ...ara a esquerda o bot o de fixa o 3 O punho em arco 1 pode ser montado em qualquer posi o e ngulo desejado Apertar muito bem o bot o de fixa o KHE 96 Para perfura es com martelo A um bloqueio da broca...

Page 26: ...os nos punhos previstos posi cione se de forma segura e concentre se no trabalho 7 6 Metabo VibraTech MVT Para possibilitar opera es com vibra es redu zidas e consequentemente menos esfor os nas arti...

Page 27: ...os em um processo de recic lagem Estas Instru es de Servi o est o impressas em papel reciclado H mais notas explicativas na p gina 2 Reserva se o direito de proceder a altera es devidas ao progresso t...

Page 28: ...Metabowerke GmbH 72622 N rtingen Germany www metabo com...

Reviews: